Epson LQ-860 User Manual - Page 92
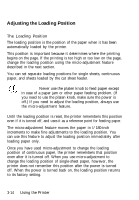
Using Micro-adjustment, Note:
 |
View all Epson LQ-860 manuals
Add to My Manuals
Save this manual to your list of manuals |
Page 92 highlights
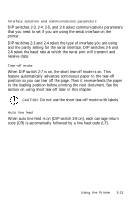
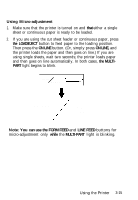
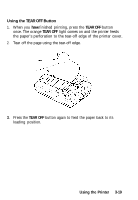
Using Micro-adjustment 1. Make sure that the printer is turned on and that either a single sheet or continuous paper is ready to be loaded. 2. If you are using the cut sheet feeder or continuous paper, press the LOAD/EJECT button to feed paper to the loading position. Then press the ON LINE button. (Or, simply press ON LINE, and the printer loads the paper and then goes on line.) If you are using single sheets, wait two seconds; the printer loads paper and then goes on line automatically. In both cases, the MULTIPART light begins to blink. LOAD EJECT ON LINE MULTIPART Note: You can use the FORM FEED and LINE FEED buttons for micro-adjustment only while the MULTI-PART light is blinking. Using the Printer 3-15
-
 1
1 -
2
-
3
-
4
-
5
-
6
-
7
-
8
-
9
-
10
-
11
-
12
-
13
-
14
-
15
-
16
-
17
-
18
-
19
-
20
-
21
-
22
-
23
-
24
-
25
-
26
-
27
-
28
-
29
-
30
-
31
-
32
-
33
-
34
-
35
-
36
-
37
-
38
-
39
-
40
-
41
-
42
-
43
-
44
-
45
-
46
-
47
-
48
-
49
-
50
-
51
-
52
-
53
-
54
-
55
-
56
-
57
-
58
-
59
-
60
-
61
-
62
-
63
-
64
-
65
-
66
-
67
-
68
-
69
-
70
-
71
-
72
-
73
-
74
-
75
-
76
-
77
-
78
-
79
-
80
-
81
-
82
-
83
-
84
-
85
-
86
-
 87
87 -
 88
88 -
 89
89 -
 90
90 -
 91
91 -
 92
92 -
 93
93 -
 94
94 -
 95
95 -
 96
96 -
 97
97 -
98
-
99
-
100
-
101
-
102
-
103
-
104
-
105
-
106
-
107
-
108
-
109
-
110
-
111
-
112
-
113
-
114
-
115
-
116
-
117
-
118
-
119
-
120
-
121
-
122
-
123
-
124
-
125
-
126
-
127
-
128
-
129
-
130
-
131
-
132
-
133
-
134
-
135
-
136
-
137
-
138
-
139
-
140
-
141
-
142
-
143
-
144
-
145
-
146
-
147
-
148
-
149
-
150
-
151
-
152
-
153
-
154
-
155
-
156
-
157
-
158
-
159
-
160
-
161
-
162
-
163
-
164
-
165
-
166
-
167
-
168
-
169
-
170
-
171
-
172
-
173
-
174
-
175
-
176
-
177
-
178
-
179
-
180
-
181
-
182
-
183
-
184
-
185
-
186
-
187
-
188
-
189
-
190
-
191
-
192
-
193
-
194
-
195
-
196
-
197
-
198
-
199
-
200
-
201
-
202
-
203
-
204
-
205
-
206
-
207
-
208
-
209
-
210
-
211
-
212
-
213
-
214
-
215
-
216
-
217
-
218
-
219
-
220
-
221
-
222
-
223
-
224
-
225
-
226
-
227
-
228
-
229
-
230
-
231
-
232
-
233
-
234
-
235
-
236
-
237
-
238
-
239
-
240
-
241
-
242
-
243
-
244
-
245
-
246
-
247
-
248
-
249
-
250
-
251
-
252
-
253
-
254
-
255
-
256
-
257
-
258
-
259
-
260
-
261
-
262
-
263
-
264
-
265
-
266
-
267
-
268
-
269
-
270
-
271
-
272
-
273
-
274
-
275
-
276
-
277
-
278
-
279
-
280
-
281
-
282
-
283
-
284
-
285
-
286
-
287
-
288
-
289
-
290
-
291
-
292
-
293
-
294
-
295
-
296
-
297
-
298
-
299
-
300
-
301
-
302
-
303
-
304
-
305
-
306
-
307
-
308
-
309
-
310
-
311
-
312
-
313
-
314
-
315
-
316
-
317
-
318
-
319
-
320
-
321
-
322
-
323
-
324
-
325
 |
 |
Using Micro-adjustment
1.
Make sure that the printer is turned on and
that
either a single
sheet or continuous paper is ready to be loaded.
2.
If you are using the cut sheet feeder or continuous paper, press
the LOAD/EJECT
button to feed paper to the loading position.
Then press the
ON LINE
button. (Or, simply press
ON LINE,
and
the printer loads the paper and then goes on line.) If you are
using single sheets, wait two seconds; the printer loads paper
and then goes on line automatically. In both cases,
the MULTI-
PART
light begins to blink.
LOAD
EJECT
ON LINE
MULTI-
PART
Note: You
can use the FORM FEED
and
LINE FEED
buttons for
micro-adjustment only
while
the
MULTI-PART
light is blinking.
Using the Printer
3-15