Epson Stylus COLOR 670 Special Edition Printer Basics - Page 24
Printing with PhotoEnhance
 |
View all Epson Stylus COLOR 670 Special Edition manuals
Add to My Manuals
Save this manual to your list of manuals |
Page 24 highlights
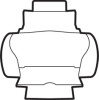
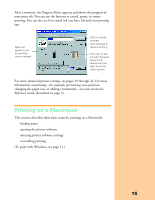
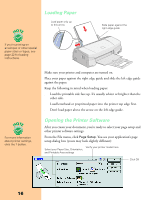
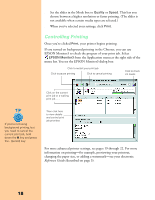
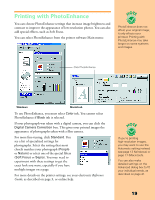
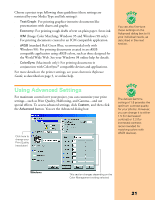
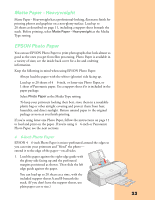
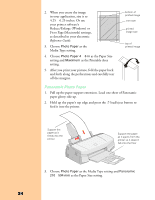
Printing with PhotoEnhance You can choose PhotoEnhance settings that increase image brightness and contrast to improve the appearance of low-resolution photos. You can also add special effects, such as Soft Focus. You can select PhotoEnhance from the printer software Main menu: PhotoEnhance does not affect your original image; it only affects your printout. Printing with PhotoEnhance may take longer on some systems and images. Click PhotoEnhance Windows Macintosh To use PhotoEnhance, you must select Color ink. You cannot select PhotoEnhance if Black ink is selected. If your photograph was taken with a digital camera, you can click the Digital Camera Correction box. This gives your printed images the appearance of photographs taken with a film camera. For more fine-tuning, click Standard. You see a list of specialized settings for photographs. Select the setting that most closely matches your photograph (People or Nature) or select one of the special filters (Soft Focus or Sepia). You may need to experiment with these settings to get the exact look you want, especially if you have multiple images on a page. For more details on the printer settings, see your electronic Reference Guide, as described on page 3, or online help. If you're printing high-resolution images, you may want to use the Automatic setting instead; see page 13 (Windows) or page 17 (Macintosh). You can also make detailed settings on the Advanced dialog box to fit your individual needs, as described on page 21. 19
-
 1
1 -
2
-
3
-
4
-
5
-
6
-
7
-
8
-
9
-
10
-
11
-
12
-
13
-
14
-
15
-
16
-
17
-
18
-
 19
19 -
 20
20 -
 21
21 -
 22
22 -
 23
23 -
 24
24 -
 25
25 -
 26
26 -
 27
27 -
 28
28 -
 29
29 -
30
-
31
-
32
-
33
-
34
-
35
-
36
-
37
-
38
-
39
-
40
-
41
-
42
-
43
-
44
-
45
-
46
-
47
-
48
-
49
-
50
-
51
-
52
-
53
-
54
-
55
-
56
-
57
-
58
-
59
 |
 |