Epson Stylus COLOR 670 Special Edition Printer Basics - Page 40
Aligning the Print Head
 |
View all Epson Stylus COLOR 670 Special Edition manuals
Add to My Manuals
Save this manual to your list of manuals |
Page 40 highlights
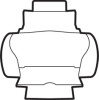
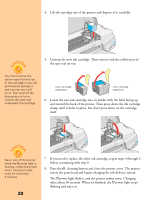
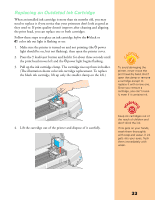
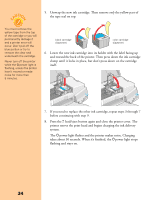
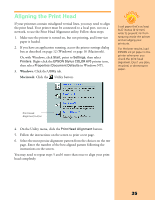
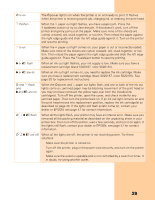
Aligning the Print Head If your printouts contain misaligned vertical lines, you may need to align the print head. Your printer must be connected to a local port, not on a network, to use the Print Head Alignment utility. Follow these steps: 1. Make sure the printer is turned on, but not printing, and letter-size paper is loaded. 2. If you have an application running, access the printer settings dialog box as described on page 12 (Windows) or page 16 (Macintosh). Or, with Windows, click Start, point to Settings, then select Printers. Right-click the EPSON Stylus COLOR 670 printer icon, then select Properties (Document Defaults in Windows NT). 3. Windows: Click the Utility tab. Macintosh: Click the Utility button. Load paper that's at least 8.27 inches (210 mm) wide to prevent ink from spraying inside the printer and smudging your printouts. For the best results, load EPSON ink jet paper in the printer whenever you check the print head alignment. Don't use plain, recycled, or photocopier paper. Print Head Alignment button 4. On the Utility menu, click the Print Head Alignment button. 5. Follow the instructions on the screen to print a test page. 6. Select the most precise alignment pattern from the choices on the test page. Enter the number of the best aligned pattern following the instructions on the screen. You may need to repeat steps 5 and 6 more than once to align your print head completely. 35
-
 1
1 -
2
-
3
-
4
-
5
-
6
-
7
-
8
-
9
-
10
-
11
-
12
-
13
-
14
-
15
-
16
-
17
-
18
-
19
-
20
-
21
-
22
-
23
-
24
-
25
-
26
-
27
-
28
-
29
-
30
-
31
-
32
-
33
-
34
-
 35
35 -
 36
36 -
 37
37 -
 38
38 -
 39
39 -
 40
40 -
 41
41 -
 42
42 -
 43
43 -
 44
44 -
 45
45 -
46
-
47
-
48
-
49
-
50
-
51
-
52
-
53
-
54
-
55
-
56
-
57
-
58
-
59
 |
 |
