Epson Stylus COLOR 670 Special Edition Printer Basics - Page 32
Maintaining Your Printer, Cleaning the Print Head, Using the Head Cleaning Utility
 |
View all Epson Stylus COLOR 670 Special Edition manuals
Add to My Manuals
Save this manual to your list of manuals |
Page 32 highlights
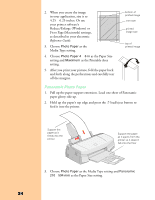
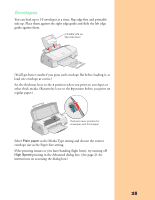
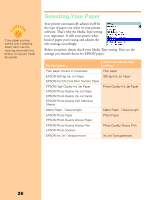
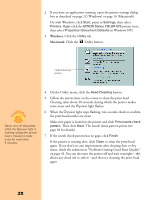
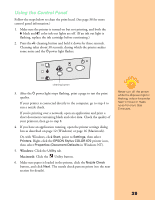
Maintaining Your Printer This section describes the most common maintenance procedures to keep your printer working at its best and to prepare it to be moved. Follow the instructions in this chapter for: s cleaning the print head (below) s replacing an ink cartridge (on page 30) s aligning the print head (on page 35) s cleaning the printer (on page 36) s transporting the printer (on page 36) For more details, see your electronic Reference Guide, as described on page 3. Cleaning the Print Head If your printed image is too light or the image has gaps, you may need to clean the print head. This unclogs the nozzles so they can deliver ink properly. Cleaning the print head uses ink, so do it only if necessary. You can clean the print head in either of the following ways: s using the Head Cleaning utility (when the printer is connected to a local port, not over a network), as described below s using the printer's control panel buttons, as described on page 29 Using the Head Cleaning Utility Follow these steps to run the Head Cleaning utility (the recommended method): 1. Make sure the printer is turned on but not printing, and both the B black and A color ink out lights are off. (If an ink out light is flashing, replace the ink cartridge instead.) When you don't turn on your printer for a long time, the print quality can decline. It's a good idea to turn on your printer at least once a month to maintain good print quality. If any paper you buy comes with a cleaning sheet, don't use the cleaning sheet with your printer; it may jam inside the printer. 27
-
 1
1 -
2
-
3
-
4
-
5
-
6
-
7
-
8
-
9
-
10
-
11
-
12
-
13
-
14
-
15
-
16
-
17
-
18
-
19
-
20
-
21
-
22
-
23
-
24
-
25
-
26
-
 27
27 -
 28
28 -
 29
29 -
 30
30 -
 31
31 -
 32
32 -
 33
33 -
 34
34 -
 35
35 -
 36
36 -
 37
37 -
38
-
39
-
40
-
41
-
42
-
43
-
44
-
45
-
46
-
47
-
48
-
49
-
50
-
51
-
52
-
53
-
54
-
55
-
56
-
57
-
58
-
59
 |
 |