Epson TM-m50II Web Config Reference Guide - Page 84
Importing for CA-signed Certificate, Import Top Table 10-72 Setting
 |
View all Epson TM-m50II manuals
Add to My Manuals
Save this manual to your list of manuals |
Page 84 highlights
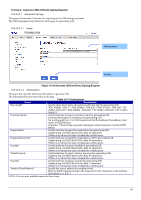
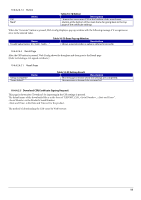
"Self-signed Certificate" "Update" "Confirm" "Download" - Button for moving to the settings page to update the self-signed certificate If the date and time are not adjusted in the printer, the following message is shown in the main frame. "Invalid Date and Time." - Button for moving to the confirmation page for the self-signed certificate - Button to download the self-signed certificate date in PEM format (extension:.cer). The default name of the downloaded file is in the form of "SelfSigned_". is the date and time set for the product. - - This button is always shown. (Only this button is shown on the page when the administrator is logged off or a registered user is logged on.) 10.4.4.2.2 Importing for CA-signed Certificate 10.4.4.2.2.1 Import Top Page This page is shown after the 'Import' button in the CA-signed certificate settings is pressed. The following figure shows the layout of the page for importing the CA-signed certificate into the printer. 10.4.4.2.2.1.1 Image Setting Items Description Button Figure 10-33 Import Top Page 10.4.4.2.2.1.2 Setting Items On the Import Top Page, the following items can be controlled by the administrator. Items "Server Certificate" File Format "Private Key" Table 10-72 Setting Items Description -Enter the file of the server certificate to import it into the printer. You can also use the file button to select the file. Choose the file format of the server certificate to import it into the printer. "Certificate (PEM/DER)"/ "Certificate with Private Key (PKCS#12)" -Enter the private key file of the server certificate to import it into the printer. You can also use the file button to select the file. Condition - -Enabled if certificate (PEM/DER) selected 84
-
 1
1 -
2
-
3
-
4
-
5
-
6
-
7
-
8
-
9
-
10
-
11
-
12
-
13
-
14
-
15
-
16
-
17
-
18
-
19
-
20
-
21
-
22
-
23
-
24
-
25
-
26
-
27
-
28
-
29
-
30
-
31
-
32
-
33
-
34
-
35
-
36
-
37
-
38
-
39
-
40
-
41
-
42
-
43
-
44
-
45
-
46
-
47
-
48
-
49
-
50
-
51
-
52
-
53
-
54
-
55
-
56
-
57
-
58
-
59
-
60
-
61
-
62
-
63
-
64
-
65
-
66
-
67
-
68
-
69
-
70
-
71
-
72
-
73
-
74
-
75
-
76
-
77
-
78
-
 79
79 -
 80
80 -
 81
81 -
 82
82 -
 83
83 -
 84
84 -
 85
85 -
 86
86 -
 87
87 -
 88
88 -
 89
89 -
90
-
91
-
92
-
93
-
94
-
95
-
96
-
97
-
98
-
99
-
100
-
101
-
102
-
103
-
104
-
105
-
106
-
107
-
108
-
109
-
110
-
111
-
112
-
113
-
114
-
115
-
116
-
117
-
118
-
119
-
120
-
121
-
122
-
123
-
124
-
125
-
126
-
127
-
128
-
129
-
130
-
131
-
132
-
133
-
134
-
135
-
136
-
137
-
138
-
139
-
140
-
141
-
142
-
143
-
144
-
145
-
146
-
147
-
148
-
149
-
150
-
151
-
152
-
153
-
154
-
155
-
156
-
157
-
158
-
159
-
160
-
161
-
162
-
163
-
164
-
165
-
166
-
167
-
168
-
169
-
170
 |
 |
