Epson TM-m50II Web Config Reference Guide - Page 89
Updating self-signed Certificates
 |
View all Epson TM-m50II manuals
Add to My Manuals
Save this manual to your list of manuals |
Page 89 highlights
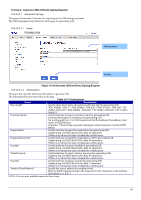
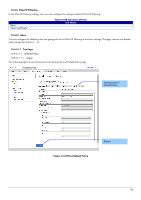
10.4.4.2.6 Updating self-signed Certificates 10.4.4.2.6.1 Update Top Page This page is shown after 'Update' for the import is pressed in the self-signed certificate settings. The following figure shows the layout of the page for updating the self-signed certificate that is already embedded in the printer. 10.4.4.2.6.1.1 Image Setting Items Button Figure 10-36 Updating self-signed Certificates 10.4.4.2.6.1.2 Setting Items Items "Key Length" Table 10-81 Setting Items Description Use the drop-down list to choose the public key size for updating the self-signed certificate. "RSA 1024bit - SHA-1" / "RSA 2048bit - SHA-256" / "RSA 3072bit - SHA-256" / "EC 256bit - SHA-256" / "RSA 4096bit - SHA-384" / "EC 384bit - SHA-384" / "EC 521bit - SHA-512" "Common Name" Use the text box to input a common name for generating CSR. Entering information is mandatory for generating CSR. Set a string with from 1 to 128 characters in the IPv4 address, IPv6 address, host name, or FQDN format. Commas (",")(0x2c) have a special meaning as control characters. See the NOTE below. "Organization" "SEIKO EPSON CORP." -Fixed "Valid Date (UTC)" Shows the date and time for the client "Certificate Validity (year)" Use the drop-down list to select a year for the valid term of the self-signed certificate. "1" / "2" / "3" / "4" / "5" / "6" / "7" / "8" / "9" / "10" The units are years. "To use ePOS-Device, use a Certificate Fixed Strings which Key Length is RSA." NOTE: You can enter multiple names. 10.4.4.2.6.1.3 Button "Next" "Back" Items Table 10-82 Button Description Button at the bottom of the main frame for updating the self-signed certificate. Button at the bottom of the main frame for going back to the top page of the certificate settings. When the "Next" button is pressed, Web Config displays a pop-up window with the following message if it recognizes an error in the entered value. Table 10-83 Error Pop-up Items Description "Invalid value below. ¥n -%s¥n -%s¥n..." Shows the warning with the items of the mis inputted value. 89
-
 1
1 -
2
-
3
-
4
-
5
-
6
-
7
-
8
-
9
-
10
-
11
-
12
-
13
-
14
-
15
-
16
-
17
-
18
-
19
-
20
-
21
-
22
-
23
-
24
-
25
-
26
-
27
-
28
-
29
-
30
-
31
-
32
-
33
-
34
-
35
-
36
-
37
-
38
-
39
-
40
-
41
-
42
-
43
-
44
-
45
-
46
-
47
-
48
-
49
-
50
-
51
-
52
-
53
-
54
-
55
-
56
-
57
-
58
-
59
-
60
-
61
-
62
-
63
-
64
-
65
-
66
-
67
-
68
-
69
-
70
-
71
-
72
-
73
-
74
-
75
-
76
-
77
-
78
-
79
-
80
-
81
-
82
-
83
-
 84
84 -
 85
85 -
 86
86 -
 87
87 -
 88
88 -
 89
89 -
 90
90 -
 91
91 -
 92
92 -
 93
93 -
 94
94 -
95
-
96
-
97
-
98
-
99
-
100
-
101
-
102
-
103
-
104
-
105
-
106
-
107
-
108
-
109
-
110
-
111
-
112
-
113
-
114
-
115
-
116
-
117
-
118
-
119
-
120
-
121
-
122
-
123
-
124
-
125
-
126
-
127
-
128
-
129
-
130
-
131
-
132
-
133
-
134
-
135
-
136
-
137
-
138
-
139
-
140
-
141
-
142
-
143
-
144
-
145
-
146
-
147
-
148
-
149
-
150
-
151
-
152
-
153
-
154
-
155
-
156
-
157
-
158
-
159
-
160
-
161
-
162
-
163
-
164
-
165
-
166
-
167
-
168
-
169
-
170
 |
 |
