HTC Mogul Getting Started Guide - Page 66
Setting Up Email Accounts - internet not working
 |
View all HTC Mogul manuals
Add to My Manuals
Save this manual to your list of manuals |
Page 66 highlights
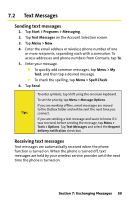
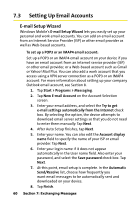
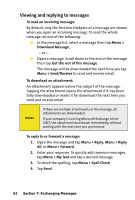
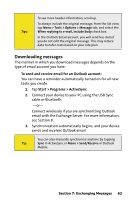
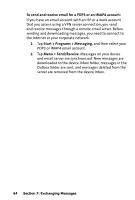
7.3 Setting Up Email Accounts E-mail Setup Wizard Windows Mobile's E-mail Setup Wizard lets you easily set up your personal and work email accounts. You can add an email account from an Internet Service Provider (ISP) or other email provider as well as Web-based accounts. To set up a POP3 or an IMAP4 email account: Set up a POP3 or an IMAP4 email account on your device if you have an email account from an Internet service provider (ISP) or other email provider, or a Web-based account such as Gmail or Yahoo! Mail Plus. You can also add a work account that you access using a VPN server connection as a POP3 or an IMAP4 account. For more information about setting up your company Outlook email account, see Section 8. 1. Tap Start > Programs > Messaging. 2. Tap New E-mail Account on the Account Selection screen. 3. Enter your email address, and select the Try to get e-mail settings automatically from the Internet check box. By selecting the option, the device attempts to download email server settings so that you do not need to enter them manually. Tap Next. 4. After Auto Setup finishes, tap Next. 5. Enter your name. You can also edit the Account display name field to specify the name of your ISP or email provider. Tap Next. 6. Enter your login name if it does not appear automatically in the User name field. Also enter your password, and select the Save password check box. Tap Next. 7. At this point, email setup is complete. In the Automatic Send/Receive list, choose how frequently you want email messages to be automatically sent and downloaded on your device. 8. Tap Finish. 60 Section 7: Exchanging Messages
-
 1
1 -
2
-
3
-
4
-
5
-
6
-
7
-
8
-
9
-
10
-
11
-
12
-
13
-
14
-
15
-
16
-
17
-
18
-
19
-
20
-
21
-
22
-
23
-
24
-
25
-
26
-
27
-
28
-
29
-
30
-
31
-
32
-
33
-
34
-
35
-
36
-
37
-
38
-
39
-
40
-
41
-
42
-
43
-
44
-
45
-
46
-
47
-
48
-
49
-
50
-
51
-
52
-
53
-
54
-
55
-
56
-
57
-
58
-
59
-
60
-
 61
61 -
 62
62 -
 63
63 -
 64
64 -
 65
65 -
 66
66 -
 67
67 -
 68
68 -
 69
69 -
 70
70 -
 71
71 -
72
-
73
-
74
-
75
-
76
-
77
-
78
-
79
-
80
-
81
-
82
-
83
-
84
-
85
-
86
-
87
-
88
-
89
-
90
-
91
-
92
-
93
-
94
-
95
-
96
-
97
-
98
-
99
-
100
-
101
-
102
-
103
-
104
-
105
-
106
-
107
-
108
-
109
-
110
-
111
-
112
-
113
-
114
-
115
-
116
-
117
-
118
-
119
-
120
-
121
-
122
-
123
-
124
-
125
-
126
-
127
-
128
-
129
-
130
-
131
-
132
-
133
-
134
-
135
-
136
-
137
-
138
-
139
-
140
-
141
-
142
 |
 |
