| Section |
Page |
| Product basics |
17 |
| Product introduction |
18 |
| Product features |
19 |
| Product walkaround |
22 |
| Front view |
22 |
| HP Color LaserJet CM6049f MFP |
22 |
| Back view |
23 |
| Interface ports |
24 |
| Serial number and model number location |
25 |
| Control panel |
27 |
| Use the control panel |
28 |
| Control-panel layout |
28 |
| Home screen |
29 |
| Buttons on the touchscreen |
30 |
| Control-panel help system |
30 |
| Navigate the Administration menu |
31 |
| Information menu |
32 |
| Default Job Options menu |
34 |
| Default Options for Originals |
34 |
| Image adjustment |
35 |
| Default Copy Options |
36 |
| Default Fax Options |
37 |
| Default E-mail Options |
38 |
| Default Send to Folder Options |
39 |
| Default Print Options |
40 |
| Time/Scheduling menu |
41 |
| Management menu |
43 |
| Initial Setup menu |
45 |
| Networking and I/O |
45 |
| Fax Setup |
52 |
| E-mail Setup |
55 |
| Send Setup menu |
55 |
| Device Behavior menu |
56 |
| Print Quality menu |
64 |
| Troubleshooting menu |
68 |
| Resets menu |
74 |
| Service menu |
75 |
| Software for Windows |
77 |
| Supported operating systems for Windows |
78 |
| Supported printer drivers for Windows |
79 |
| HP Universal Print Driver (UPD) |
80 |
| UPD installation modes |
80 |
| Select the correct printer driver for Windows |
81 |
| Priority for print settings |
82 |
| Change printer-driver settings for Windows |
83 |
| Supported utilities for Windows |
84 |
| HP Web Jetadmin |
84 |
| Embedded Web server |
84 |
| Software for other operating systems |
85 |
| Use the product with Macintosh |
87 |
| Software for Macintosh |
88 |
| Supported operating systems for Macintosh |
88 |
| Supported printer drivers for Macintosh |
88 |
| Remove software from Macintosh operating systems |
88 |
| Priority for print settings for Macintosh |
88 |
| Change printer-driver settings for Macintosh |
89 |
| Software for Macintosh computers |
89 |
| HP Printer Utility |
89 |
| Open the HP Printer Utility |
89 |
| HP Printer Utility features |
89 |
| Supported utilities for Macintosh |
90 |
| Embedded Web server |
90 |
| Use features in the Macintosh printer driver |
91 |
| Print |
91 |
| Create and use printing presets in Macintosh |
91 |
| Resize documents or print on a custom paper size |
91 |
| Print a cover page |
91 |
| Use watermarks |
92 |
| Print multiple pages on one sheet of paper in Macintosh |
92 |
| Print on both sides of the page (duplex printing) |
93 |
| Set the stapling options |
93 |
| Store jobs |
94 |
| Set the color options |
94 |
| Use the Services menu |
94 |
| Connect the product |
97 |
| USB connection |
98 |
| Network connection |
99 |
| Network configuration |
101 |
| Benefits of a network connection |
102 |
| Supported network protocols |
103 |
| Configuring network settings |
104 |
| TCP/IP |
104 |
| Internet Protocol (IP) |
104 |
| Transmission Control Protocol (TCP) |
104 |
| IP address |
104 |
| Configure IP parameters |
104 |
| Dynamic Host Configuration Protocol (DHCP) |
105 |
| BOOTP |
105 |
| Subnets |
105 |
| Subnet mask |
105 |
| Gateways |
105 |
| Default gateway |
105 |
| Configure TCP/IPv4 parameters |
106 |
| Input or change the IP address |
106 |
| Set the subnet mask |
106 |
| Set the default gateway |
107 |
| Configure TCP/IPv6 parameters |
107 |
| Network utilities |
108 |
| Other components and utilities |
108 |
| Paper and print media |
109 |
| Understand paper and print media use |
110 |
| Supported paper and print media sizes |
111 |
| Supported paper types |
114 |
| Special paper or print media guidelines |
116 |
| Load paper and print media |
117 |
| Load Tray 1 |
117 |
| Print envelopes |
118 |
| Load trays 2, 3, 4, or 5 |
118 |
| Load standard-sized media into trays 2, 3, 4, or 5 |
118 |
| Load undetectable standard-sized media into Tray 2, 3, 4, and 5 |
120 |
| Load custom-size media into tray 2, 3, 4, or 5 |
121 |
| Load large size paper into Tray 3, 4, or 5 |
122 |
| Load letterhead, pre-printed, or pre-punched paper |
122 |
| Change the Image Rotation setting |
123 |
| Choose the correct orientation for loading letterhead, pre-printed, or pre-punched paper |
123 |
| Configure trays |
127 |
| Configure a tray when loading paper |
127 |
| Configure a tray to match print job settings |
127 |
| Automatic media type sensing (auto sense mode) |
127 |
| Auto sense settings |
128 |
| Select the paper by source, type, or size |
128 |
| Source |
128 |
| Type and Size |
129 |
| Choose an output location |
130 |
| Standard output bins |
130 |
| Optional output accessories |
130 |
| 3-bin stapler/stacker features |
130 |
| Booklet maker finisher features |
131 |
| Accessory walkaround |
131 |
| Use the booklet-making feature |
132 |
| Create a booklet from the print driver |
133 |
| Create a booklet from a copy |
133 |
| Configure the accessory operation mode |
134 |
| Select the operating mode at the control panel |
134 |
| Select the operating mode in the printer driver |
134 |
| Select the operating mode in the printer driver (Mac OS X) |
134 |
| Use product features |
137 |
| Economy settings |
138 |
| Sleep and wake |
138 |
| Set economy modes from the EWS |
139 |
| Use the stapler |
140 |
| Supported paper sizes for stapling |
140 |
| Staple print jobs |
142 |
| Job storage features for print jobs |
143 |
| Gain access to the job storage features |
143 |
| Use the proof and hold feature |
143 |
| Create a proof and hold job |
143 |
| Print the remaining copies of a proof and hold job |
144 |
| Delete a proof and hold job |
144 |
| Use the personal job feature |
145 |
| Print a personal job |
145 |
| Delete a personal job |
145 |
| Use the QuickCopy feature |
146 |
| Create a QuickCopy job |
146 |
| Print additional copies of a QuickCopy job |
146 |
| Delete a QuickCopy job |
146 |
| Use the stored job feature for copy jobs |
147 |
| Create a stored copy job |
147 |
| Print a stored job |
147 |
| Delete a stored job |
147 |
| Print photos or marketing material |
149 |
| Supported glossy paper |
149 |
| Configure the paper tray |
149 |
| Configure the driver settings |
150 |
| Print weatherproof maps and outdoor signs |
151 |
| Supported tough paper |
151 |
| Configure the paper tray |
151 |
| Configure the driver settings |
151 |
| Set the duplex alignment |
152 |
| Print tasks |
153 |
| Cancel a print job |
154 |
| Stop the current print job from the control panel |
154 |
| Stop the current print job from the software program |
154 |
| Use features in the Windows printer driver |
155 |
| Open the printer driver |
155 |
| Use printing shortcuts |
155 |
| Set paper and quality options |
155 |
| Set document effects |
156 |
| Set document finishing options |
156 |
| Set product output options |
156 |
| Set job storage options |
156 |
| Set color options |
157 |
| Obtain support and product-status information |
157 |
| Set advanced printing options |
158 |
| Use color |
159 |
| Manage color |
160 |
| Automatic or manual color adjustment |
160 |
| Manual color options |
160 |
| Print in grayscale |
161 |
| Restrict color use |
161 |
| Restrict color printing and copying from the control panel |
161 |
| RGB Color (Color Themes) |
161 |
| Match colors |
163 |
| Sample book color matching |
163 |
| Printing color samples |
163 |
| PANTONE® color matching |
164 |
| Advanced color use |
165 |
| HP ImageREt 4800 |
165 |
| Paper selection |
165 |
| sRGB |
165 |
| Print in four colors — CMYK |
165 |
| CMYK ink set emulation (HP postscript level 3 emulation) |
165 |
| Copy |
167 |
| Use the Copy screen |
168 |
| Set the default copy options |
168 |
| Copy from the scanner glass |
168 |
| Copy from the document feeder |
168 |
| Adjust the copy settings |
169 |
| Copy two-sided documents |
170 |
| Copying two-sided documents manually |
170 |
| Copy two-sided documents automatically |
170 |
| Copy mixed-size originals |
172 |
| Change the copy-collation setting |
173 |
| Copy photos and books |
174 |
| Combine copy jobs by using Job Build |
175 |
| Cancel a copy job |
176 |
| Scan and send to e-mail |
177 |
| Configure e-mail settings |
178 |
| Supported protocols |
178 |
| Configure e-mail server settings |
178 |
| Use the Send E-mail screen |
180 |
| Perform basic e-mail functions |
181 |
| Load documents |
181 |
| Send documents |
181 |
| Send a document |
181 |
| Use the auto-complete function |
182 |
| Use the address book |
182 |
| Create a recipient list |
182 |
| Use the local address book |
183 |
| Add e-mail addresses to the local address book |
183 |
| Delete e-mail addresses from the local address book |
183 |
| Change e‑mail settings for the current job |
184 |
| Scan to a folder |
185 |
| Scan to a workflow destination |
186 |
| Fax |
187 |
| Analog fax |
188 |
| Connect the fax accessory to a phone line |
188 |
| Configure and use the fax features |
188 |
| Digital fax |
190 |
| Manage and maintain the product |
191 |
| Information pages |
192 |
| Embedded Web server |
194 |
| Open the embedded Web server by using a network connection |
194 |
| Embedded Web server sections |
195 |
| Use HP Web Jetadmin software |
198 |
| Security features |
199 |
| Secure the embedded Web server |
199 |
| Secure Disk Erase |
199 |
| Data affected |
199 |
| Gain access to Secure Disk Erase |
200 |
| Additional Information |
200 |
| DSS authentication |
200 |
| Lock the control-panel menus |
200 |
| Set the real-time clock |
201 |
| Set the date format |
201 |
| Set the date |
201 |
| Set the time format |
201 |
| Set the time |
201 |
| Manage supplies |
203 |
| Print-cartridge storage |
203 |
| HP policy on non-HP print cartridges |
203 |
| HP fraud hotline and Web site |
203 |
| Replace supplies |
204 |
| Locate supplies |
204 |
| Supply replacement guidelines |
204 |
| Approximate replacement intervals for supplies |
205 |
| Change print cartridges |
205 |
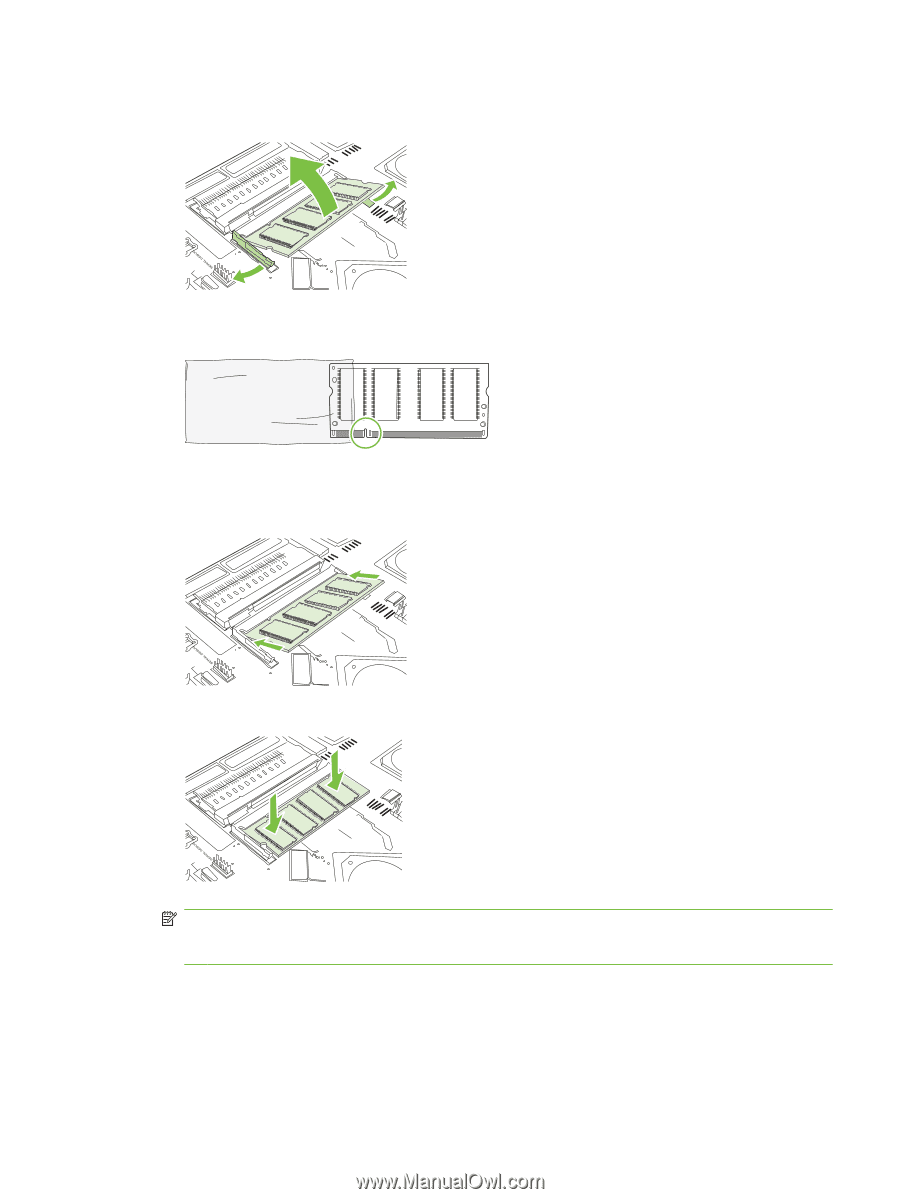
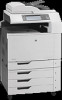
| Change image drums |
208 |
| Install memory |
211 |
| Install DDR memory DIMMs |
211 |
| Enable memory |
214 |
| Enable memory for Windows 2000 and XP |
214 |
| Install an HP Jetdirect or EIO print server card or EIO hard disk |
215 |
| Replace the staple cartridge |
217 |
| Replace saddle stitch staple cartridges in the booklet maker |
219 |
| Clean the product |
222 |
| Clean the outside of the product |
222 |
| Clean the touchscreen |
222 |
| Clean the scanner glass |
222 |
| Cleaning the ADF delivery system |
222 |
| Clean the ADF delivery system |
223 |
| Clean the ADF rollers |
224 |
| ADF maintenance kit |
226 |
| Calibrate the scanner |
227 |
| Upgrade the firmware |
228 |
| Determine the current firmware version |
228 |
| Download new firmware from the HP Web site |
228 |
| Transfer the new firmware to the product |
228 |
| Use FTP to upload the firmware through a browser |
228 |
| Use FTP to upgrade the firmware on a network connection |
229 |
| Use HP Web Jetadmin to upgrade the firmware |
230 |
| Use MS-DOS commands to upgrade the firmware |
230 |
| Use the HP Jetdirect firmware |
230 |
| Solve problems |
233 |
| Solving general problems |
234 |
| Troubleshooting checklist |
234 |
| Restore factory settings |
235 |
| Factors that affect product performance |
235 |
| Control-panel message types |
236 |
| Control-panel messages |
237 |
| Jams |
238 |
| Common causes of jams |
238 |
| Jam locations |
239 |
| Clear jams |
239 |
| AREA 1: Clear jams in the output bin |
240 |
| AREA 2: Clear jams in the fuser |
242 |
| Clear jams in the duplex area |
246 |
| AREA 5: Clear jams in Tray 2 and the internal paper path |
249 |
| AREA 6: Clear jams in Tray 1 |
252 |
| AREA 7: Clear jams in optional Trays 3, 4, and 5 |
255 |
| AREA 8: Clear jams in the optional finishing devices |
258 |
| Clear jams in the output-accessory bridge |
258 |
| Clear jams in the sorter area |
259 |
| Clear jams in the booklet maker |
260 |
| AREA 9: Clear jams in the ADF |
262 |
| Clear staple jams |
263 |
| Clear staple jams in the main stapler |
263 |
| Clear staple jams in the booklet maker |
264 |
| Jam recovery |
267 |
| Paper-handling problems |
268 |
| Product feeds multiple sheets |
268 |
| Product feeds incorrect page size |
268 |
| Product pulls from incorrect tray |
268 |
| Paper does not feed automatically |
269 |
| Paper does not feed from Tray 2, 3, 4, or 5 |
269 |
| Transparencies or glossy paper will not feed |
270 |
| Envelopes jam or will not feed in the product |
271 |
| Output is curled or wrinkled |
271 |
| Product will not duplex or duplexes incorrectly |
272 |
| Understand lights on the formatter |
273 |
| HP Jetdirect LEDs |
273 |
| Heartbeat LED |
273 |
| Correct print quality and copy quality problems |
274 |
| Example print quality problems |
274 |
| Repetitive defects ruler |
274 |
| Print quality problems associated with the environment |
276 |
| Print quality problems associated with jams |
276 |
| Optimize and improve image quality |
276 |
| Use supported paper |
276 |
| Calibrate the product |
276 |
| Specify the correct paper type |
276 |
| Clean the fuser |
277 |
| Respond to control panel error messages |
277 |
| Clean the registration second transfer assembly |
278 |
| Use manual print modes |
280 |
| Print-quality-troubleshooting pages |
281 |
| Performance problems |
282 |
| Solve fax problems |
283 |
| Solve e-mail problems |
283 |
| Validate the SMTP gateway address |
283 |
| Validate the LDAP gateway address |
283 |
| Solve network connectivity problems |
284 |
| Solve network printing problems |
284 |
| Verify communication over the network |
284 |
| Solve common Macintosh problems |
286 |
| Supplies and accessories |
289 |
| Order parts, accessories, and supplies |
290 |
| Part numbers |
291 |
| Accessories |
291 |
| Print cartridges |
291 |
| Image drums |
291 |
| Maintenance kits |
291 |
| Memory |
292 |
| Cables and interfaces |
292 |
| Product specifications |
293 |
| Physical specifications |
294 |
| Electrical specifications |
295 |
| Acoustic specifications |
296 |
| Environmental specifications |
297 |
| Regulatory information |
299 |
| Compliance with FCC regulations |
300 |
| Declaration of Conformity |
301 |
| Environmental product stewardship program |
302 |
| Protecting the environment |
302 |
| Ozone production |
302 |
| Power consumption |
302 |
| Toner consumption |
302 |
| Paper use |
302 |
| Plastics |
302 |
| HP LaserJet print supplies |
302 |
| Return and recycling instructions |
303 |
| United States and Puerto Rico |
303 |
| Multiple returns (more than one cartridge) |
303 |
| Single returns |
303 |
| Shipping |
303 |
| Non-U.S. returns |
303 |
| Paper |
303 |
| Material restrictions |
303 |
| Disposal of waste equipment by users in private households in the European Union |
304 |
| Material Safety Data Sheet (MSDS) |
304 |
| For more information |
305 |
| Certificate of volatility |
306 |
| Types of memory |
306 |
| Volatile memory |
306 |
| Non-volatile memory |
306 |
| Hard-disk-drive memory |
306 |
| Safety statements |
307 |
| Laser safety |
307 |
| Canadian DOC regulations |
307 |
| VCCI statement (Japan) |
307 |
| Power cord statement (Japan) |
307 |
| EMC statement (Korea) |
307 |
| EMI statement (Taiwan) |
307 |
| General telecom statement |
308 |
| Laser statement for Finland |
308 |
| Substances Table (China) |
309 |
 1
1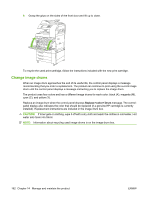 208
208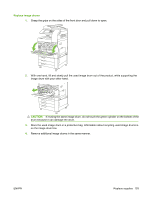 209
209 210
210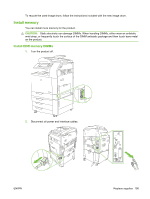 211
211 212
212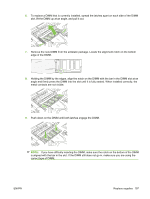 213
213 214
214 215
215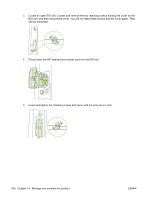 216
216 217
217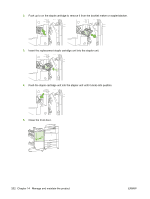 218
218