HP Color LaserJet CM6049f HP Color LaserJet CM6049f MFP - User Guide - Page 65
Print Quality menu, Table 2-16
 |
View all HP Color LaserJet CM6049f manuals
Add to My Manuals
Save this manual to your list of manuals |
Page 65 highlights
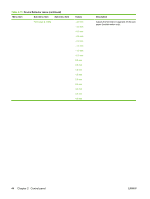
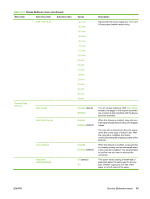
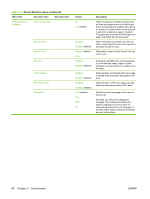
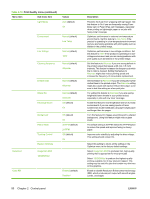
Table 2-16 Print Quality menu (continued) Menu item Sub-menu item Auto Sense Mode Tray 1 sensing Optimize Tray 2-5 Sensing Paper Curl Pre-rotation Fuser Temp Tray 1 Gloss Mode Values Description Full Sensing (default for Tray 1) Expanded Sensing (default for Trays 2-5) Transparency Only Expanded Sensing Transparency Only (default) When Full Sensing is selected, the product recognizes light, plain, heavy, glossy, and tough paper and overhead transparencies. When Expanded Sensing is selected, the device recognizes normal paper, overhead transparencies, glossy paper, and tough paper. When Transparency Only is selected, the device recognizes only overhead transparency and nonoverhead transparency types. When Expanded Sensing is selected, the device recognizes normal paper, overhead transparencies, glossy paper, and tough paper. When Transparency Only is selected, the device recognizes only overhead transparency and non-overhead transparency types. Normal Reduced To help reduce paper curl, set this option to Reduced. This decreases full speed to 10 PPM (instead of 40 ppm) and 3/4 speed to 7.5 ppm (instead of 30 ppm). Off (default) On Turn this feature On if horizontal streaks appear on pages. Using this feature increases the warm-up time for the device. Normal (default) Alternate 1 Alternate 2 Alternate 3 If you are seeing a faint image of the page repeated at the bottom of the page or on the following page, you should first make sure the Paper Type and Print Mode settings are correct for the type of paper you are using. If you continue to see ghost images on your print jobs, set the Fuser Temp feature to one of the Alternate settings . Try the Alternate 1 setting first and see if it solves the problem. If you continue to see the problem, try Alternate 2 and then Alternate 3. With the Alternate 2 and Alternate 3 settings you may see an extra delay between jobs. Normal (default) Alternate If you are seeing marks on the back side of the paper when printing from Tray 1, set the mode to Alternate. This increases the frequency of the cleaning cycle. Normal (default) High Chosen when stable high gloss is required. Set this feature to High for glossy print jobs, such as photos, if you notice the gloss finish decreasing after the first page is printed. This setting reduces the performance for all paper types. ENWW Print Quality menu 49
-
 1
1 -
2
-
3
-
4
-
5
-
6
-
7
-
8
-
9
-
10
-
11
-
12
-
13
-
14
-
15
-
16
-
17
-
18
-
19
-
20
-
21
-
22
-
23
-
24
-
25
-
26
-
27
-
28
-
29
-
30
-
31
-
32
-
33
-
34
-
35
-
36
-
37
-
38
-
39
-
40
-
41
-
42
-
43
-
44
-
45
-
46
-
47
-
48
-
49
-
50
-
51
-
52
-
53
-
54
-
55
-
56
-
57
-
58
-
59
-
 60
60 -
 61
61 -
 62
62 -
 63
63 -
 64
64 -
 65
65 -
 66
66 -
 67
67 -
 68
68 -
 69
69 -
 70
70 -
71
-
72
-
73
-
74
-
75
-
76
-
77
-
78
-
79
-
80
-
81
-
82
-
83
-
84
-
85
-
86
-
87
-
88
-
89
-
90
-
91
-
92
-
93
-
94
-
95
-
96
-
97
-
98
-
99
-
100
-
101
-
102
-
103
-
104
-
105
-
106
-
107
-
108
-
109
-
110
-
111
-
112
-
113
-
114
-
115
-
116
-
117
-
118
-
119
-
120
-
121
-
122
-
123
-
124
-
125
-
126
-
127
-
128
-
129
-
130
-
131
-
132
-
133
-
134
-
135
-
136
-
137
-
138
-
139
-
140
-
141
-
142
-
143
-
144
-
145
-
146
-
147
-
148
-
149
-
150
-
151
-
152
-
153
-
154
-
155
-
156
-
157
-
158
-
159
-
160
-
161
-
162
-
163
-
164
-
165
-
166
-
167
-
168
-
169
-
170
-
171
-
172
-
173
-
174
-
175
-
176
-
177
-
178
-
179
-
180
-
181
-
182
-
183
-
184
-
185
-
186
-
187
-
188
-
189
-
190
-
191
-
192
-
193
-
194
-
195
-
196
-
197
-
198
-
199
-
200
-
201
-
202
-
203
-
204
-
205
-
206
-
207
-
208
-
209
-
210
-
211
-
212
-
213
-
214
-
215
-
216
-
217
-
218
-
219
-
220
-
221
-
222
-
223
-
224
-
225
-
226
-
227
-
228
-
229
-
230
-
231
-
232
-
233
-
234
-
235
-
236
-
237
-
238
-
239
-
240
-
241
-
242
-
243
-
244
-
245
-
246
-
247
-
248
-
249
-
250
-
251
-
252
-
253
-
254
-
255
-
256
-
257
-
258
-
259
-
260
-
261
-
262
-
263
-
264
-
265
-
266
-
267
-
268
-
269
-
270
-
271
-
272
-
273
-
274
-
275
-
276
-
277
-
278
-
279
-
280
-
281
-
282
-
283
-
284
-
285
-
286
-
287
-
288
-
289
-
290
-
291
-
292
-
293
-
294
-
295
-
296
-
297
-
298
-
299
-
300
-
301
-
302
-
303
-
304
-
305
-
306
-
307
-
308
-
309
-
310
-
311
-
312
-
313
-
314
-
315
-
316
-
317
-
318
-
319
-
320
 |
 |