HP Dc5800 Service Reference Guide: HP Compaq dc5800 Business PC - Page 48
Password Security, Establishing a Setup Password Using Computer Setup
 |
UPC - 883585860944
View all HP Dc5800 manuals
Add to My Manuals
Save this manual to your list of manuals |
Page 48 highlights
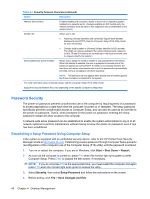
Table 4-1 Security Features Overview (continued) Option Description Network Service Boot Enables/disables the computer's ability to boot from an operating system installed on a network server. (Feature available on NIC models only; the network controller must be either a PCI expansion card or embedded on the system board.) System IDs Allows you to set: ● Asset tag (18-byte identifier) and ownership Tag (80-byte identifier displayed during POST). See the Computer Setup (F10) Utility Guide for more information. ● Chassis serial number or Universal Unique Identifier (UUID) number. The UUID can only be updated if the current chassis serial number is invalid. (These ID numbers are normally set in the factory and are used to uniquely identify the system.) DriveLockSecurity (some models) Allows you to assign or modify a master or user password for hard drives. When this feature is enabled, the user is prompted to provide one of the DriveLock passwords during POST. If neither is successfully entered, the hard drive will remain inaccessible until one of the passwords is successfully provided during a subsequent cold-boot sequence. NOTE: This selection will only appear when at least one drive that supports the DriveLock feature is attached to the system. For more information about Computer Setup, see the Computer Setup (F10) Utility Guide. Support for security features may vary depending on the specific computer configuration. Password Security The power-on password prevents unauthorized use of the computer by requiring entry of a password to access applications or data each time the computer is turned on or restarted. The setup password specifically prevents unauthorized access to Computer Setup, and can also be used as an override to the power-on password. That is, when prompted for the power-on password, entering the setup password instead will allow access to the computer. A network-wide setup password can be established to enable the system administrator to log in to all network systems to perform maintenance without having to know the power-on password, even if one has been established. Establishing a Setup Password Using Computer Setup If the system is equipped with an embedded security device, refer to the HP ProtectTools Security Manager Guide at http://www.hp.com. Establishing a setup password through Computer Setup prevents reconfiguration of the computer (use of the Computer Setup (F10) utility) until the password is entered. 1. Turn on or restart the computer. If you are in Windows, click Start > Shut Down > Restart. 2. As soon as the computer is turned on, press F10 when the monitor light turns green to enter Computer Setup. Press Enter to bypass the title screen, if necessary. NOTE: If you do not press F10 at the appropriate time, you must restart the computer and again press F10 when the monitor light turns green to access the utility. 3. Select Security, then select Setup Password and follow the instructions on the screen. 4. Before exiting, click File > Save Changes and Exit. 40 Chapter 4 Desktop Management
-
 1
1 -
2
-
3
-
4
-
5
-
6
-
7
-
8
-
9
-
10
-
11
-
12
-
13
-
14
-
15
-
16
-
17
-
18
-
19
-
20
-
21
-
22
-
23
-
24
-
25
-
26
-
27
-
28
-
29
-
30
-
31
-
32
-
33
-
34
-
35
-
36
-
37
-
38
-
39
-
40
-
41
-
42
-
 43
43 -
 44
44 -
 45
45 -
 46
46 -
 47
47 -
 48
48 -
 49
49 -
 50
50 -
 51
51 -
 52
52 -
 53
53 -
54
-
55
-
56
-
57
-
58
-
59
-
60
-
61
-
62
-
63
-
64
-
65
-
66
-
67
-
68
-
69
-
70
-
71
-
72
-
73
-
74
-
75
-
76
-
77
-
78
-
79
-
80
-
81
-
82
-
83
-
84
-
85
-
86
-
87
-
88
-
89
-
90
-
91
-
92
-
93
-
94
-
95
-
96
-
97
-
98
-
99
-
100
-
101
-
102
-
103
-
104
-
105
-
106
-
107
-
108
-
109
-
110
-
111
-
112
-
113
-
114
-
115
-
116
-
117
-
118
-
119
-
120
-
121
-
122
-
123
-
124
-
125
-
126
-
127
-
128
-
129
-
130
-
131
-
132
-
133
-
134
-
135
-
136
-
137
-
138
-
139
-
140
-
141
-
142
-
143
-
144
-
145
-
146
-
147
-
148
-
149
-
150
-
151
-
152
-
153
-
154
-
155
-
156
-
157
-
158
-
159
-
160
-
161
-
162
-
163
-
164
-
165
-
166
-
167
-
168
-
169
-
170
-
171
-
172
-
173
-
174
-
175
-
176
-
177
-
178
-
179
-
180
-
181
-
182
-
183
-
184
-
185
-
186
-
187
-
188
-
189
-
190
-
191
-
192
-
193
-
194
-
195
-
196
-
197
-
198
-
199
-
200
-
201
-
202
-
203
-
204
-
205
-
206
-
207
-
208
-
209
-
210
-
211
-
212
-
213
-
214
-
215
-
216
-
217
-
218
-
219
-
220
-
221
-
222
-
223
-
224
-
225
-
226
-
227
-
228
-
229
-
230
-
231
-
232
-
233
-
234
-
235
-
236
-
237
-
238
-
239
-
240
-
241
-
242
-
243
-
244
-
245
-
246
-
247
-
248
-
249
-
250
-
251
-
252
-
253
-
254
-
255
 |
 |
