HP Dc7900 Service Reference Guide: HP Compaq dc7900 Business PC - Page 263
Solving Display Problems, Table D-6
 |
UPC - 884962028483
View all HP Dc7900 manuals
Add to My Manuals
Save this manual to your list of manuals |
Page 263 highlights
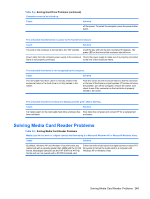
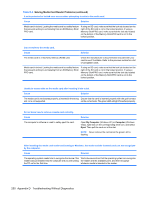
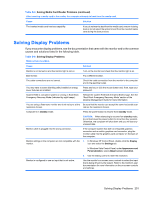
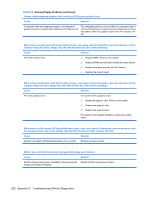
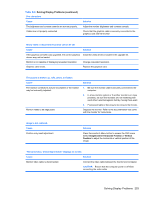
Table D-5 Solving Media Card Reader Problems (continued) After inserting a media card in the reader, the computer attempts to boot from the media card. Cause Solution The inserted media card has boot capability. If you do not want to boot from the media card, remove it during boot or do not select the option to boot from the inserted media card during the boot process. Solving Display Problems If you encounter display problems, see the documentation that came with the monitor and to the common causes and solutions listed in the following table. Table D-6 Solving Display Problems Blank screen (no video). Cause Solution Monitor is not turned on and the monitor light is not on. Turn on the monitor and check that the monitor light is on. Bad monitor. Try a different monitor. The cable connections are not correct. Check the cable connection from the monitor to the computer and to the electrical outlet. You may have a screen blanking utility installed or energy saver features are enabled. Press any key or click the mouse button and, if set, type your password. System ROM is corrupted; system is running in Boot Block Emergency Recovery Mode (indicated by eight beeps). Reflash the system ROM with the latest BIOS image. See the "Boot Block Emergency Recovery Mode" section of the Desktop Management Guide for more information You are using a fixed-sync monitor and it will not sync at the Be sure that the monitor can accept the same horizontal scan resolution chosen. rate as the resolution chosen. Computer is in standby mode. Press the power button to resume from standby mode. CAUTION: When attempting to resume from standby mode, do not hold down the power button for more than four seconds. Otherwise, the computer will shut down and you will lose any unsaved data. Monitor cable is plugged into the wrong connector. If the computer system has both an integrated graphics connector and an add-in graphics card connector, plug the monitor cable into the graphics card connector on the back of the computer. Monitor settings in the computer are not compatible with the 1. In Windows XP Control Panel, double-click the Display monitor. icon and select the Settings tab. In Windows Vista Control Panel, under Appearance and Personalization, select Adjust screen resolution. Monitor is configured to use an input that is not active. 2. Use the sliding control to reset the resolution. Use the monitor's on-screen menu controls to select the input that is being driven by the system. Refer to the monitor's user documentation for more information on the on-screen controls and settings. Solving Display Problems 251
-
 1
1 -
2
-
3
-
4
-
5
-
6
-
7
-
8
-
9
-
10
-
11
-
12
-
13
-
14
-
15
-
16
-
17
-
18
-
19
-
20
-
21
-
22
-
23
-
24
-
25
-
26
-
27
-
28
-
29
-
30
-
31
-
32
-
33
-
34
-
35
-
36
-
37
-
38
-
39
-
40
-
41
-
42
-
43
-
44
-
45
-
46
-
47
-
48
-
49
-
50
-
51
-
52
-
53
-
54
-
55
-
56
-
57
-
58
-
59
-
60
-
61
-
62
-
63
-
64
-
65
-
66
-
67
-
68
-
69
-
70
-
71
-
72
-
73
-
74
-
75
-
76
-
77
-
78
-
79
-
80
-
81
-
82
-
83
-
84
-
85
-
86
-
87
-
88
-
89
-
90
-
91
-
92
-
93
-
94
-
95
-
96
-
97
-
98
-
99
-
100
-
101
-
102
-
103
-
104
-
105
-
106
-
107
-
108
-
109
-
110
-
111
-
112
-
113
-
114
-
115
-
116
-
117
-
118
-
119
-
120
-
121
-
122
-
123
-
124
-
125
-
126
-
127
-
128
-
129
-
130
-
131
-
132
-
133
-
134
-
135
-
136
-
137
-
138
-
139
-
140
-
141
-
142
-
143
-
144
-
145
-
146
-
147
-
148
-
149
-
150
-
151
-
152
-
153
-
154
-
155
-
156
-
157
-
158
-
159
-
160
-
161
-
162
-
163
-
164
-
165
-
166
-
167
-
168
-
169
-
170
-
171
-
172
-
173
-
174
-
175
-
176
-
177
-
178
-
179
-
180
-
181
-
182
-
183
-
184
-
185
-
186
-
187
-
188
-
189
-
190
-
191
-
192
-
193
-
194
-
195
-
196
-
197
-
198
-
199
-
200
-
201
-
202
-
203
-
204
-
205
-
206
-
207
-
208
-
209
-
210
-
211
-
212
-
213
-
214
-
215
-
216
-
217
-
218
-
219
-
220
-
221
-
222
-
223
-
224
-
225
-
226
-
227
-
228
-
229
-
230
-
231
-
232
-
233
-
234
-
235
-
236
-
237
-
238
-
239
-
240
-
241
-
242
-
243
-
244
-
245
-
246
-
247
-
248
-
249
-
250
-
251
-
252
-
253
-
254
-
255
-
256
-
257
-
 258
258 -
 259
259 -
 260
260 -
 261
261 -
 262
262 -
 263
263 -
 264
264 -
 265
265 -
 266
266 -
 267
267 -
 268
268 -
269
-
270
-
271
-
272
-
273
-
274
-
275
-
276
-
277
-
278
-
279
-
280
-
281
-
282
-
283
-
284
-
285
-
286
-
287
-
288
-
289
-
290
-
291
-
292
-
293
-
294
-
295
-
296
-
297
-
298
-
299
-
300
 |
 |
