HP Dc7900 Service Reference Guide: HP Compaq dc7900 Business PC - Page 52
features such as HP Embedded Security for ProtectTools, the Smart Cover Sensor and the Smart Cover
 |
UPC - 884962028483
View all HP Dc7900 manuals
Add to My Manuals
Save this manual to your list of manuals |
Page 52 highlights
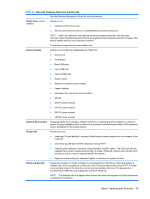
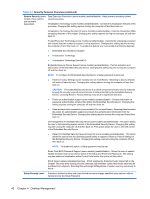
automatic integration between asset tracking features and these products enables you to choose the management tool that is best suited to the environment and to leverage the investment in existing tools. HP also offers several solutions for controlling access to valuable components and information. HP Embedded Security for ProtectTools, if installed, prevents unauthorized access to data and checks system integrity and authenticates third-party users attempting system access. (For more information, refer to the HP ProtectTools Security Manager Guide at http://www.hp.com/products/security.) Security features such as HP Embedded Security for ProtectTools, the Smart Cover Sensor and the Smart Cover Lock, available on some models, help to prevent unauthorized access to the internal components of the personal computer. By disabling parallel, serial, or USB ports, or by disabling removable media boot capability, you can protect valuable data assets. Memory Change and Smart Cover Sensor alerts can be automatically forwarded to system management applications to deliver proactive notification of tampering with a computer's internal components. NOTE: HP Embedded Security for ProtectTools, the Smart Cover Sensor, and the Smart Cover Lock are available as options on some systems. Use the following utilities to manage security settings on the HP computer: ● Locally, using the Computer Setup Utilities. See the Computer Setup (F10) Utility Guide included with the computer for additional information and instructions on using the Computer Setup Utilities. Some computers also have HP BIOS Configuration for ProtectTools, which is a Windows-based component of ProtectTools that allows administrators to configure BIOS security settings from within the running OS. ● Remotely, using HP Client Manager from Symantec, HP Client Automation, or System Software Manager. This software enables the secure, consistent deployment and control of security settings. The following table and sections refer to managing security features of the computer locally through the Computer Setup (F10) Utilities. Table 4-1 Security Features Overview Option Description Setup Password Allows you to set and enable setup (administrator) password. NOTE: If the setup password is set, it is required to change Computer Setup options, flash the ROM, and make changes to certain plug and play settings under Windows. Power-On Password Allows you to set and enable power-on password. The power-on password prompt appears after a power cycle. If the user does not enter the correct power-on password, the unit will not boot. NOTE: This password does not appear on warm boots , such as Ctrl+Alt+Delete or Restart from Windows, unless enabled in Password Options (see below). Password Options Allows you to: (This selection appears ● Lock legacy resources (appears if a setup password is set) only if a power-on password or setup ● Enable/disable network server mode (appears if a power-on password is set) password is set.) ● Specify whether the password is required for warm boot (Ctrl+Alt+Delete) (appears if a power- on password is set) ● Enable/Disable Setup Browse Mode (appears if a setup password is set) (allows viewing, but not changing, the F10 Setup Options without entering setup password) ● Enable/disable Stringent Password (appears if a power-on password is set), which when enabled bypasses the onboard password jumper to disable the power-on password 40 Chapter 4 Desktop Management
-
 1
1 -
2
-
3
-
4
-
5
-
6
-
7
-
8
-
9
-
10
-
11
-
12
-
13
-
14
-
15
-
16
-
17
-
18
-
19
-
20
-
21
-
22
-
23
-
24
-
25
-
26
-
27
-
28
-
29
-
30
-
31
-
32
-
33
-
34
-
35
-
36
-
37
-
38
-
39
-
40
-
41
-
42
-
43
-
44
-
45
-
46
-
 47
47 -
 48
48 -
 49
49 -
 50
50 -
 51
51 -
 52
52 -
 53
53 -
 54
54 -
 55
55 -
 56
56 -
 57
57 -
58
-
59
-
60
-
61
-
62
-
63
-
64
-
65
-
66
-
67
-
68
-
69
-
70
-
71
-
72
-
73
-
74
-
75
-
76
-
77
-
78
-
79
-
80
-
81
-
82
-
83
-
84
-
85
-
86
-
87
-
88
-
89
-
90
-
91
-
92
-
93
-
94
-
95
-
96
-
97
-
98
-
99
-
100
-
101
-
102
-
103
-
104
-
105
-
106
-
107
-
108
-
109
-
110
-
111
-
112
-
113
-
114
-
115
-
116
-
117
-
118
-
119
-
120
-
121
-
122
-
123
-
124
-
125
-
126
-
127
-
128
-
129
-
130
-
131
-
132
-
133
-
134
-
135
-
136
-
137
-
138
-
139
-
140
-
141
-
142
-
143
-
144
-
145
-
146
-
147
-
148
-
149
-
150
-
151
-
152
-
153
-
154
-
155
-
156
-
157
-
158
-
159
-
160
-
161
-
162
-
163
-
164
-
165
-
166
-
167
-
168
-
169
-
170
-
171
-
172
-
173
-
174
-
175
-
176
-
177
-
178
-
179
-
180
-
181
-
182
-
183
-
184
-
185
-
186
-
187
-
188
-
189
-
190
-
191
-
192
-
193
-
194
-
195
-
196
-
197
-
198
-
199
-
200
-
201
-
202
-
203
-
204
-
205
-
206
-
207
-
208
-
209
-
210
-
211
-
212
-
213
-
214
-
215
-
216
-
217
-
218
-
219
-
220
-
221
-
222
-
223
-
224
-
225
-
226
-
227
-
228
-
229
-
230
-
231
-
232
-
233
-
234
-
235
-
236
-
237
-
238
-
239
-
240
-
241
-
242
-
243
-
244
-
245
-
246
-
247
-
248
-
249
-
250
-
251
-
252
-
253
-
254
-
255
-
256
-
257
-
258
-
259
-
260
-
261
-
262
-
263
-
264
-
265
-
266
-
267
-
268
-
269
-
270
-
271
-
272
-
273
-
274
-
275
-
276
-
277
-
278
-
279
-
280
-
281
-
282
-
283
-
284
-
285
-
286
-
287
-
288
-
289
-
290
-
291
-
292
-
293
-
294
-
295
-
296
-
297
-
298
-
299
-
300
 |
 |