HP Designjet 111 HP Designjet 111 Printer Series - User Guide - Page 12
Connection and software installation, Install the Windows printer driver - setup
 |
View all HP Designjet 111 manuals
Add to My Manuals
Save this manual to your list of manuals |
Page 12 highlights
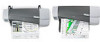
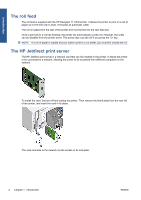
2 Connection and software installation Connect & install Install the Windows printer driver 1. Insert the HP Designjet 111 Software and Documentation CD into your CD drive. 2. If the CD does not autorun, run the setup.exe program in the root directory of the CD. 3. Follow the instructions on the screen. Connect using a USB cable (Windows) USB is the preferred solution for a direct computer-to-printer connection. 1. Do not connect the computer to the printer yet. First, install the Windows printer driver: see Install the Windows printer driver on page 6. 2. When asked how the printer is connected, choose Connected directly to this computer. 3. Choose USB and click Next. 4. Choose your printer model and click Next. 5. When prompted to do so, connect your computer to the printer, using a USB cable. Ensure that the printer is switched on. When the printer software has detected the printer, the installation process will be completed automatically. Connect using a parallel cable (Windows) Use the parallel port only if your system does not support USB. A parallel connection is slower than USB and restricts the functionality available: in particular, not all functions of HP Designjet System Maintenance will be available. 1. Turn off both printer and computer before connecting them via the parallel port, to avoid damaging your equipment. 2. Connect the parallel cable from your computer to the printer. NOTE: The cable must be IEEE 1284 compliant. 3. Turn on the computer and the printer. 4. Install the Windows printer driver: see Install the Windows printer driver on page 6. If the Add New Hardware Wizard appears on your screen, click Cancel. 5. When asked how the printer is connected, choose Connected directly to this computer. 6. Choose Parallel cable and your parallel port number, and click Next. 7. Choose your printer model and click Next. 6 Chapter 2 Connection and software installation ENWW
-
 1
1 -
2
-
3
-
4
-
5
-
6
-
 7
7 -
 8
8 -
 9
9 -
 10
10 -
 11
11 -
 12
12 -
 13
13 -
 14
14 -
 15
15 -
 16
16 -
 17
17 -
18
-
19
-
20
-
21
-
22
-
23
-
24
-
25
-
26
-
27
-
28
-
29
-
30
-
31
-
32
-
33
-
34
-
35
-
36
-
37
-
38
-
39
-
40
-
41
-
42
-
43
-
44
-
45
-
46
-
47
-
48
-
49
-
50
-
51
-
52
-
53
 |
 |