HP Designjet 111 HP Designjet 111 Printer Series - User Guide - Page 18
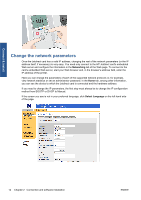
Change the IP address of the HP Jetdirect print server
 |
View all HP Designjet 111 manuals
Add to My Manuals
Save this manual to your list of manuals |
Page 18 highlights
Connect & install You may find that sharing your directly connected printer with other users will slow down your computer unacceptably. TIP: The best way to share the printer over a network is to connect the printer not to any computer, but to the network. Change the IP address of the HP Jetdirect print server You may need to do this if you are moving the printer from one LAN subnet to another, and need to change the IP address because of a conflict. NOTE: If you are using the DHCP protocol, you do not need this procedure, because the addresses are assigned automatically. NOTE: This procedure will not work if the print server is not correctly configured, either because of an error or because it is a brand new card. The correct procedure depends on your operating system. First, print the configuration pages of the HP Jetdirect print server, in the following way. 1. Press and hold down the Power key (the bottom key on the front panel). 2. Press the OK key (the upper right key on the front panel) four times while the Power key is pressed. 3. Release the Power key. The printer prints the configuration pages. Look for the TCP/IP area in the printed configuration pages, which contains the current IP address of the HP Jetdirect print server, in the format 'nnn.nnn.nnn.nnn' (where each nnn is a number between 0 and 255). Windows If you are using a Jetdirect card that already has an IP address, skip to step 7. If you are using a Jetdirect card that has an IP address of 192.0.0.192, begin at step 1. 1. At your computer, click Start > Control Panel > Network Connections. 2. Right-click Local Area Connection and select Properties. 3. Select Internet Protocol (TCP/IP) and click Properties. 4. Select Use the following IP address. 5. Change the IP address to 192.0.0.193. 6. Change the subnet mask to 255.255.255.0. Leave the other fields empty. Click OK to close the menus. 7. Open a Web browser and type the IP address of your printer. 8. Click the Networking button. 9. Select TCP/IP from the menu at the top of the page and then select Manual from the IP Configuration Method pull-down list. 10. Enter the IP address and subnet mask in the appropriate fields. Click the Apply button. 11. If your Jetdirect card previously had an IP address of 192.0.0.192, open the Control Panel's Network Connections and change the TCP/IP configuration back to its original configuration. 12 Chapter 2 Connection and software installation ENWW
-
 1
1 -
2
-
3
-
4
-
5
-
6
-
7
-
8
-
9
-
10
-
11
-
12
-
 13
13 -
 14
14 -
 15
15 -
 16
16 -
 17
17 -
 18
18 -
 19
19 -
 20
20 -
 21
21 -
 22
22 -
 23
23 -
24
-
25
-
26
-
27
-
28
-
29
-
30
-
31
-
32
-
33
-
34
-
35
-
36
-
37
-
38
-
39
-
40
-
41
-
42
-
43
-
44
-
45
-
46
-
47
-
48
-
49
-
50
-
51
-
52
-
53
 |
 |