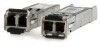
HP GbE2c HP GbE2c Ethernet Blade Switch for c-Class BladeSystem Command Refere - Page 11
Accessing the switch - password reset
 |
UPC - 808736802215
View all HP GbE2c manuals
Add to My Manuals
Save this manual to your list of manuals |
Page 11 highlights
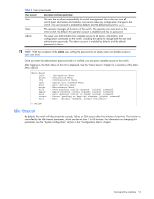
The supported SSH encryption and authentication methods are listed below. • Server Host Authentication-Client RSA authenticates the switch in the beginning of every connection • Key Exchange-RSA • Encryption: • AES256-CBC • AES192-CBC • AES128-CBC • 3DES-CBC • 3DES • ARCFOUR • User Authentication-Local password authentication; Remote Authentication Dial-in User Service (RADIUS) The following SSH clients are supported: • SSH 3.0.1 for Linux (freeware) • SecureCRT® 4.1.8 (VanDyke Technologies, Inc.) • OpenSSH_3.9 for Linux (FC 3) • FedoraCore 3 for SCP commands • PuTTY Release 0.58 (Simon Tatham) for Windows NOTE: The switch implementation of SSH is based on versions 1.5 and 2.0, and supports SSH clients from version 1.0 through version 2.0. SSH clients of other versions are not supported. You may configure the client software to use protocol SSH version 1 or version 2. By default, SSH service is not enabled on the switch. Once the IP parameters are configured, you can access the command line interface to enable SSH. To establish an SSH connection with the switch, run the SSH program on the workstation by issuing the ssh command, followed by the user account name and the switch IP address: >> # ssh @ You will then be prompted to enter your password. NOTE: The first time you run SSH from the workstation, a warning message might appear. At the prompt, enter yes to continue. Accessing the switch To enable better switch management and user accountability, the switch provides different levels or classes of user access. Levels of access to the CLI and Web management functions and screens increase as needed to perform various switch management tasks. The three levels of access are: • User-User interaction with the switch is completely passive; nothing can be changed on the switch. Users may display information that has no security or privacy implications, such as switch statistics and current operational state information. • Operator-Operators can only effect temporary changes on the switch. These changes will be lost when the switch is rebooted/reset. Operators have access to the switch management features used for daily switch operations. Because any changes an operator makes are undone by a reset of the switch, operators cannot severely impact switch operation, but do have access to the Maintenance menu. • Administrator-Only administrators can make permanent changes to the switch configuration, changes that are persistent across a reboot/reset of the switch. Administrators can access switch functions to configure and troubleshoot problems on the switch. Because administrators can also make temporary (operator-level) changes as well, they must be aware of the interactions between temporary and permanent changes. Access to switch functions is controlled through the use of unique usernames and passwords. Once you are connected to the switch via the local console, Telnet, or SSH, you are prompted to enter a password. The password entered determines the access level. The default user names/password for each access level is listed in the following table. NOTE: It is recommended that you change default switch passwords after initial configuration and as regularly as required under your network security policies. For more information, see the "Setting passwords" section in the "First-time configuration" chapter. Command line interface 11
-
 1
1 -
2
-
3
-
4
-
5
-
 6
6 -
 7
7 -
 8
8 -
 9
9 -
 10
10 -
 11
11 -
 12
12 -
 13
13 -
 14
14 -
 15
15 -
 16
16 -
17
-
18
-
19
-
20
-
21
-
22
-
23
-
24
-
25
-
26
-
27
-
28
-
29
-
30
-
31
-
32
-
33
-
34
-
35
-
36
-
37
-
38
-
39
-
40
-
41
-
42
-
43
-
44
-
45
-
46
-
47
-
48
-
49
-
50
-
51
-
52
-
53
-
54
-
55
-
56
-
57
-
58
-
59
-
60
-
61
-
62
-
63
-
64
-
65
-
66
-
67
-
68
-
69
-
70
-
71
-
72
-
73
-
74
-
75
-
76
-
77
-
78
-
79
-
80
-
81
-
82
-
83
-
84
-
85
-
86
-
87
-
88
-
89
-
90
-
91
-
92
-
93
-
94
-
95
-
96
-
97
-
98
-
99
-
100
-
101
-
102
-
103
-
104
-
105
-
106
-
107
-
108
-
109
-
110
-
111
-
112
-
113
-
114
-
115
-
116
-
117
-
118
-
119
-
120
-
121
-
122
-
123
-
124
-
125
-
126
-
127
-
128
-
129
-
130
-
131
-
132
-
133
-
134
-
135
-
136
-
137
-
138
-
139
-
140
-
141
-
142
-
143
-
144
-
145
-
146
-
147
-
148
-
149
-
150
-
151
-
152
-
153
-
154
-
155
-
156
-
157
-
158
-
159
-
160
-
161
-
162
-
163
-
164
-
165
-
166
-
167
-
168
-
169
-
170
-
171
-
172
-
173
-
174
-
175
 |
 |
