HP GbE2c HP GbE2c Ethernet Blade Switch for c-Class BladeSystem Command Refere - Page 18
First-time configuration, Introduction, Configuring Simple Network Management Protocol support - ethernet blade switch default password
 |
UPC - 808736802215
View all HP GbE2c manuals
Add to My Manuals
Save this manual to your list of manuals |
Page 18 highlights
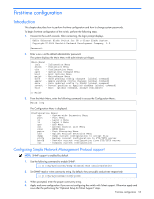
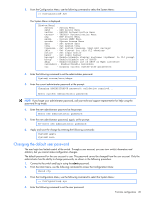
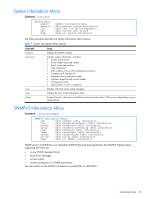
First-time configuration Introduction This chapter describes how to perform first-time configuration and how to change system passwords. To begin first-time configuration of the switch, perform the following steps. 1. Connect to the switch console. After connecting, the login prompt displays. GbE2c Ethernet Blade Switch for HP c-Class Blade System. Copyright(C)2006 Hewlett-Packard Development Company, L.P. Password: 2. Enter admin as the default administrator password. The system displays the Main Menu with administrator privileges. [Main Menu] info - Information Menu stats - Statistics Menu cfg - Configuration Menu oper - Operations Command Menu boot - Boot Options Menu maint - Maintenance Menu diff - Show pending config changes [global command] apply - Apply pending config changes [global command] save - Save updated config to FLASH [global command] revert - Revert pending or applied changes [global command] exit - Exit [global command, always available] >> Main# 3. From the Main Menu, enter the following command to access the Configuration Menu: Main# /cfg The Configuration Menu is displayed. [Configuration Menu] sys - System-wide Parameter Menu port - Port Menu l2 - Layer 2 Menu l3 - Layer 3 Menu qos - QOS Menu acl - Access Control List Menu rmon - RMON Menu pmirr - Port Mirroring Menu ufd - Uplink Failure Detection Menu dump - Dump current configuration to script file ptcfg - Backup current configuration to FTP/TFTP server gtcfg - Restore current configuration from FTP/TFTP server cur - Display current configuration Configuring Simple Network Management Protocol support NOTE: SNMP support is enabled by default. 1. Use the following command to enable SNMP: >> # /cfg/sys/access/snmp disable|read only|read/write 2. Set SNMP read or write community string. By default, they are public and private respectively: >> # /cfg/sys/ssnmp/rcomm|wcomm 3. When prompted, enter the proper community string. 4. Apply and save configuration if you are not configuring the switch with Telnet support. Otherwise apply and save after the performing the "Optional Setup for Telnet Support" steps. First-time configuration 18
-
 1
1 -
2
-
3
-
4
-
5
-
6
-
7
-
8
-
9
-
10
-
11
-
12
-
 13
13 -
 14
14 -
 15
15 -
 16
16 -
 17
17 -
 18
18 -
 19
19 -
 20
20 -
 21
21 -
 22
22 -
 23
23 -
24
-
25
-
26
-
27
-
28
-
29
-
30
-
31
-
32
-
33
-
34
-
35
-
36
-
37
-
38
-
39
-
40
-
41
-
42
-
43
-
44
-
45
-
46
-
47
-
48
-
49
-
50
-
51
-
52
-
53
-
54
-
55
-
56
-
57
-
58
-
59
-
60
-
61
-
62
-
63
-
64
-
65
-
66
-
67
-
68
-
69
-
70
-
71
-
72
-
73
-
74
-
75
-
76
-
77
-
78
-
79
-
80
-
81
-
82
-
83
-
84
-
85
-
86
-
87
-
88
-
89
-
90
-
91
-
92
-
93
-
94
-
95
-
96
-
97
-
98
-
99
-
100
-
101
-
102
-
103
-
104
-
105
-
106
-
107
-
108
-
109
-
110
-
111
-
112
-
113
-
114
-
115
-
116
-
117
-
118
-
119
-
120
-
121
-
122
-
123
-
124
-
125
-
126
-
127
-
128
-
129
-
130
-
131
-
132
-
133
-
134
-
135
-
136
-
137
-
138
-
139
-
140
-
141
-
142
-
143
-
144
-
145
-
146
-
147
-
148
-
149
-
150
-
151
-
152
-
153
-
154
-
155
-
156
-
157
-
158
-
159
-
160
-
161
-
162
-
163
-
164
-
165
-
166
-
167
-
168
-
169
-
170
-
171
-
172
-
173
-
174
-
175
 |
 |
