HP Kayak XA-s 02xx HP Kayak XA-s PC Workstation - User Guide for Minitower Mod - Page 54
Installing a Drive in a Front-Access Shelf
 |
View all HP Kayak XA-s 02xx manuals
Add to My Manuals
Save this manual to your list of manuals |
Page 54 highlights
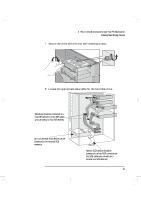
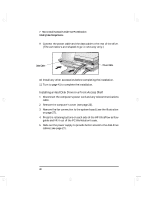
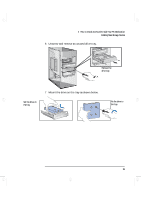
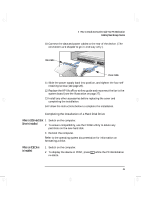
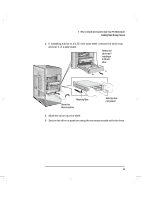
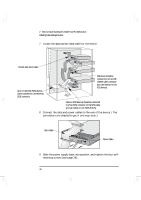
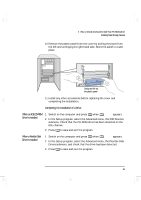
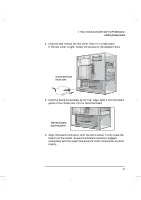
geron.bk : geron-2.fb4 Page 42 Sunday, March 22, 1998 5:03 AM 2 How to Install Accessories Inside Your PC Workstation Installing Mass Storage Devices 3 If an error message appears, follow the instructions provided by the Error Message Utility. When prompted, press to run the Setup program. 4 Select the Advanced menu, and the IDE Devices submenu. In the Primary Master item, check that the details for the device have been correctly detected by the Setup program. 5 Press to save and exit Setup. Refer to the operating system documentation for information on formatting a drive. NOTE If an IDE drive is removed, switch on the computer. The system BIOS will detect that the device is missing. Press to confirm that you want to remove the device. The system configuration will be updated automatically. Before Installing an IDE Device Before Installing a SCSI Device Installing a Drive in a Front-Access Shelf These instructions explain how to install a drive (such as a flexible disk drive, a CD-ROM drive, CD-RW drive, or a tape drive) in one of the front-access drive shelves. You should also refer to the manual supplied with the drive for any additional installation instructions. Refer to the drive's installation guide to see if you must set jumpers or if there is a special installation procedure to follow. If you are installing a SCSI device, refer to the section "Before Installing a SCSI Hard Disk" on page 35 before using the following instructions. 1 Disconnect the computer's power cord and any telecommunications cable. 2 Remove the computer's cover (see page 23). 3 Slide out the power supply to provide better access to the disk drive cables (see page 27). 42 English
-
 1
1 -
2
-
3
-
4
-
5
-
6
-
7
-
8
-
9
-
10
-
11
-
12
-
13
-
14
-
15
-
16
-
17
-
18
-
19
-
20
-
21
-
22
-
23
-
24
-
25
-
26
-
27
-
28
-
29
-
30
-
31
-
32
-
33
-
34
-
35
-
36
-
37
-
38
-
39
-
40
-
41
-
42
-
43
-
44
-
45
-
46
-
47
-
48
-
 49
49 -
 50
50 -
 51
51 -
 52
52 -
 53
53 -
 54
54 -
 55
55 -
 56
56 -
 57
57 -
 58
58 -
 59
59 -
60
-
61
-
62
-
63
-
64
-
65
-
66
-
67
-
68
-
69
-
70
-
71
-
72
-
73
-
74
-
75
-
76
-
77
-
78
-
79
-
80
-
81
-
82
-
83
-
84
-
85
-
86
-
87
-
88
-
89
-
90
-
91
-
92
-
93
-
94
-
95
-
96
-
97
-
98
-
99
-
100
-
101
-
102
-
103
-
104
-
105
-
106
-
107
-
108
-
109
-
110
-
111
-
112
-
113
-
114
-
115
-
116
-
117
-
118
-
119
-
120
-
121
-
122
-
123
-
124
-
125
-
126
-
127
-
128
-
129
-
130
-
131
-
132
-
133
-
134
-
135
-
136
-
137
-
138
-
139
-
140
-
141
-
142
-
143
-
144
-
145
-
146
-
147
-
148
 |
 |