HP Kayak XA-s 02xx HP Kayak XA-s PC Workstation - User Guide for Minitower Mod - Page 68
Check Internal Items
 |
View all HP Kayak XA-s 02xx manuals
Add to My Manuals
Save this manual to your list of manuals |
Page 68 highlights
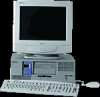
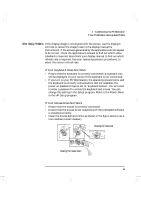
geron.bk : geron-3.fb4 Page 56 Sunday, March 22, 1998 5:03 AM 3 Troubleshooting Your PC Workstation If Your PC Workstation Does Not Start Properly Check Internal Items If the PC Workstation still does not start properly, follow this procedure to check the internal items: 1 Turn off the display, the computer, and all external devices. 2 Unplug all power cords and cables, noting their positions. Disconnect the PC Workstation from any telecommunications network. 3 Remove the cover. 4 Check the following items: LCD Error Messages - Power CPU 1 Power CPU 2 CPU Freq CPU error - - - - Temp disk Temp CPU Temp IO slot Fan CPU Fan disk Fan IO slot Power supply Action Reference Check all internal cables. Check that the processor and VRM are correctly installed. Check that the processor speed switches have been set correctly. Reset the PC Workstation or power-off the LAN. Check that the memory modules are correctly installed. Check that accessory boards are firmly seated in their slots. Verify that any switches and jumpers on the accessory boards are properly set. Check that the switches on the system board are properly set. Check fans and that air flow guide is not blocked. Ensure they are correctly attached and firmly in place. Refer to "Installing a Processor" page 49. Refer to "System Board Switches" page 91. Refer to "Your PC Workstation's Hardware Control Panel" on page 9. Refer to "Installing Memory" page 29. Refer to "Installing Accessory Boards" page 46. Refer to the manuals that came with each board. Refer to "System Board Switches" page 91. Refer to the illustration on page 27. Check that fans are installed correctly. Refer to the illustration on page 27. Check that power supply is properly connected. Refer to "Replacing the Power Supply after Installing Accessories" on page 28 56 English
-
 1
1 -
2
-
3
-
4
-
5
-
6
-
7
-
8
-
9
-
10
-
11
-
12
-
13
-
14
-
15
-
16
-
17
-
18
-
19
-
20
-
21
-
22
-
23
-
24
-
25
-
26
-
27
-
28
-
29
-
30
-
31
-
32
-
33
-
34
-
35
-
36
-
37
-
38
-
39
-
40
-
41
-
42
-
43
-
44
-
45
-
46
-
47
-
48
-
49
-
50
-
51
-
52
-
53
-
54
-
55
-
56
-
57
-
58
-
59
-
60
-
61
-
62
-
 63
63 -
 64
64 -
 65
65 -
 66
66 -
 67
67 -
 68
68 -
 69
69 -
 70
70 -
 71
71 -
 72
72 -
 73
73 -
74
-
75
-
76
-
77
-
78
-
79
-
80
-
81
-
82
-
83
-
84
-
85
-
86
-
87
-
88
-
89
-
90
-
91
-
92
-
93
-
94
-
95
-
96
-
97
-
98
-
99
-
100
-
101
-
102
-
103
-
104
-
105
-
106
-
107
-
108
-
109
-
110
-
111
-
112
-
113
-
114
-
115
-
116
-
117
-
118
-
119
-
120
-
121
-
122
-
123
-
124
-
125
-
126
-
127
-
128
-
129
-
130
-
131
-
132
-
133
-
134
-
135
-
136
-
137
-
138
-
139
-
140
-
141
-
142
-
143
-
144
-
145
-
146
-
147
-
148
 |
 |