HP LaserJet Pro 100 HP LaserJet Pro 100 Color MFP M175 - User Guide - Page 39
Install software for Mac computers on a wired network, Con the IP address, Manual configuration
 |
View all HP LaserJet Pro 100 manuals
Add to My Manuals
Save this manual to your list of manuals |
Page 39 highlights
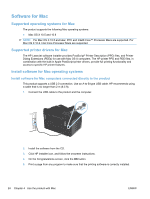
Install software for Mac computers on a wired network Configure the IP address The product IP address can be set manually, or it can be configured automatically via DHCP, BootP, or AutoIP. Manual configuration Only the IPv4 protocol can be configured manually. 1. On the control panel, press the Setup button. 2. Use the arrow buttons to select Network Setup, and then press the OK button. 3. Use the arrow buttons to select TCP/IP Config, and then press the OK button. 4. Use the arrow buttons to select Manual, and then press the OK button. 5. Use the arrow buttons to set the IP address, and then press the OK button. 6. If the IP address is incorrect, use the arrow buttons to select No, and then press the OK button. Repeat step 5 with the correct IP address, and then repeat step 5 for the subnet mask and default gateway settings. Automatic configuration 1. On the control panel, press the Setup button. 2. Use the arrow buttons to select Network Setup, and then press the OK button. 3. Use the arrow buttons to select TCP/IP Config, and then press the OK button. 4. Use the arrow buttons to select Automatic, and then press the OK button. It may take several minutes before the automatic IP address is ready for use. NOTE: If you want to disable or enable specific automatic IP modes (such as BOOTP, DHCP, or AutoIP), these settings can be changed by using the HP Utility. Install the software 1. Quit all programs on the computer. 2. Install the software from the CD. 3. Click the HP Installer icon, and follow the onscreen instructions. 4. On the Congratulations screen, click the OK button. 5. Print a page from any program to make sure that the printing software is correctly installed. Install software for Mac computers on a wireless network Before installing the product software and setting the product to connect to a wireless network, make sure that the product is not connected to the network using a network cable. ENWW Software for Mac 25
-
 1
1 -
2
-
3
-
4
-
5
-
6
-
7
-
8
-
9
-
10
-
11
-
12
-
13
-
14
-
15
-
16
-
17
-
18
-
19
-
20
-
21
-
22
-
23
-
24
-
25
-
26
-
27
-
28
-
29
-
30
-
31
-
32
-
33
-
 34
34 -
 35
35 -
 36
36 -
 37
37 -
 38
38 -
 39
39 -
 40
40 -
 41
41 -
 42
42 -
 43
43 -
 44
44 -
45
-
46
-
47
-
48
-
49
-
50
-
51
-
52
-
53
-
54
-
55
-
56
-
57
-
58
-
59
-
60
-
61
-
62
-
63
-
64
-
65
-
66
-
67
-
68
-
69
-
70
-
71
-
72
-
73
-
74
-
75
-
76
-
77
-
78
-
79
-
80
-
81
-
82
-
83
-
84
-
85
-
86
-
87
-
88
-
89
-
90
-
91
-
92
-
93
-
94
-
95
-
96
-
97
-
98
-
99
-
100
-
101
-
102
-
103
-
104
-
105
-
106
-
107
-
108
-
109
-
110
-
111
-
112
-
113
-
114
-
115
-
116
-
117
-
118
-
119
-
120
-
121
-
122
-
123
-
124
-
125
-
126
-
127
-
128
-
129
-
130
-
131
-
132
-
133
-
134
-
135
-
136
-
137
-
138
-
139
-
140
-
141
-
142
-
143
-
144
-
145
-
146
-
147
-
148
-
149
-
150
-
151
-
152
-
153
-
154
-
155
-
156
-
157
-
158
-
159
-
160
-
161
-
162
-
163
-
164
-
165
-
166
-
167
-
168
-
169
-
170
-
171
-
172
-
173
-
174
-
175
-
176
-
177
-
178
-
179
-
180
-
181
-
182
-
183
-
184
-
185
-
186
-
187
-
188
-
189
-
190
-
191
-
192
-
193
-
194
-
195
-
196
-
197
-
198
-
199
-
200
-
201
-
202
-
203
-
204
-
205
-
206
-
207
-
208
-
209
-
210
-
211
-
212
-
213
-
214
-
215
-
216
-
217
-
218
-
219
-
220
 |
 |
