HP LaserJet Pro 100 HP LaserJet Pro 100 Color MFP M175 - User Guide - Page 54
Automatic configuration, Install the software, Install the product on a wireless network
 |
View all HP LaserJet Pro 100 manuals
Add to My Manuals
Save this manual to your list of manuals |
Page 54 highlights
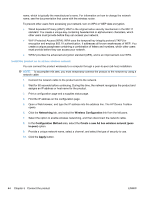
Automatic configuration 1. On the control panel, press the Setup button. 2. Use the arrow buttons to select Network Setup, and then press the OK button. 3. Use the arrow buttons to select TCP/IP Config, and then press the OK button. 4. Use the arrow buttons to select Automatic, and then press the OK button. It may take several minutes before the automatic IP address is ready for use. NOTE: If you want to disable or enable specific automatic IP modes (such as BOOTP, DHCP, or AutoIP), these settings can be changed by using the HP Device Toolbox. Install the software 1. Quit all programs on the computer. 2. Install the software from the CD. 3. Follow the onscreen instructions. 4. When prompted, select the Connect through a wired network option, and then click the Next button. 5. From the list of available printers, select the printer that has the correct IP address. 6. Click the Finish button. 7. On the More Options screen, you can install more software, or click the Finish button. 8. Print a page from any program to make sure that the printing software is correctly installed. Install the product on a wireless network Before installing the product software, make sure the product is not connected to the network using a network cable. If your wireless router does not support Wi-Fi Protected Setup (WPS), obtain the wireless router network settings from your system administrator, or complete the following tasks: ● Obtain the wireless network name or service set identifier (SSID). ● Determine the security password or encryption key for the wireless network. Connect the product to a wireless network using WPS If your wireless router supports Wi-Fi Protected Setup (WPS), this is the simplest way to set up the product on a wireless network. 1. Press the WPS button on your wireless router. 2. Press and hold the Wireless button on the product control panel for two seconds. Release the button when the wireless light starts blinking. 3. Wait up to two minutes while the product establishes a network connection with the wireless router. 40 Chapter 5 Connect the product ENWW
-
 1
1 -
2
-
3
-
4
-
5
-
6
-
7
-
8
-
9
-
10
-
11
-
12
-
13
-
14
-
15
-
16
-
17
-
18
-
19
-
20
-
21
-
22
-
23
-
24
-
25
-
26
-
27
-
28
-
29
-
30
-
31
-
32
-
33
-
34
-
35
-
36
-
37
-
38
-
39
-
40
-
41
-
42
-
43
-
44
-
45
-
46
-
47
-
48
-
 49
49 -
 50
50 -
 51
51 -
 52
52 -
 53
53 -
 54
54 -
 55
55 -
 56
56 -
 57
57 -
 58
58 -
 59
59 -
60
-
61
-
62
-
63
-
64
-
65
-
66
-
67
-
68
-
69
-
70
-
71
-
72
-
73
-
74
-
75
-
76
-
77
-
78
-
79
-
80
-
81
-
82
-
83
-
84
-
85
-
86
-
87
-
88
-
89
-
90
-
91
-
92
-
93
-
94
-
95
-
96
-
97
-
98
-
99
-
100
-
101
-
102
-
103
-
104
-
105
-
106
-
107
-
108
-
109
-
110
-
111
-
112
-
113
-
114
-
115
-
116
-
117
-
118
-
119
-
120
-
121
-
122
-
123
-
124
-
125
-
126
-
127
-
128
-
129
-
130
-
131
-
132
-
133
-
134
-
135
-
136
-
137
-
138
-
139
-
140
-
141
-
142
-
143
-
144
-
145
-
146
-
147
-
148
-
149
-
150
-
151
-
152
-
153
-
154
-
155
-
156
-
157
-
158
-
159
-
160
-
161
-
162
-
163
-
164
-
165
-
166
-
167
-
168
-
169
-
170
-
171
-
172
-
173
-
174
-
175
-
176
-
177
-
178
-
179
-
180
-
181
-
182
-
183
-
184
-
185
-
186
-
187
-
188
-
189
-
190
-
191
-
192
-
193
-
194
-
195
-
196
-
197
-
198
-
199
-
200
-
201
-
202
-
203
-
204
-
205
-
206
-
207
-
208
-
209
-
210
-
211
-
212
-
213
-
214
-
215
-
216
-
217
-
218
-
219
-
220
 |
 |