HP LaserJet Pro 100 HP LaserJet Pro 100 Color MFP M175 - User Guide - Page 86
Interpret the print quality Reports, Print Quality
 |
View all HP LaserJet Pro 100 manuals
Add to My Manuals
Save this manual to your list of manuals |
Page 86 highlights
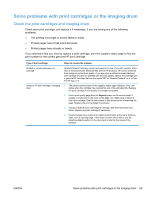
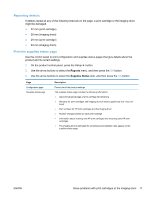
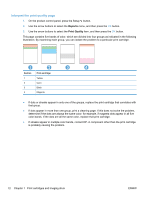
Interpret the print quality page 1. On the product control panel, press the Setup button. 2. Use the arrow buttons to select the Reports menu, and then press the OK button. 3. Use the arrow buttons to select the Print Quality item, and then press the OK button. This page contains five bands of color, which are divided into four groups as indicated in the following illustration. By examining each group, you can isolate the problem to a particular print cartridge. Section 1 2 3 4 Print-cartridge Yellow Cyan Black Magenta ● If dots or streaks appear in only one of the groups, replace the print cartridge that correlates with that group. ● If dots appear in more than one group, print a cleaning page. If this does not solve the problem, determine if the dots are always the same color; for example, if magenta dots appear in all five color bands. If the dots are all the same color, replace that print cartridge. ● If streaks appear in multiple color bands, contact HP. A component other than the print cartridge is probably causing the problem. 72 Chapter 7 Print cartridges and imaging drum ENWW
-
 1
1 -
2
-
3
-
4
-
5
-
6
-
7
-
8
-
9
-
10
-
11
-
12
-
13
-
14
-
15
-
16
-
17
-
18
-
19
-
20
-
21
-
22
-
23
-
24
-
25
-
26
-
27
-
28
-
29
-
30
-
31
-
32
-
33
-
34
-
35
-
36
-
37
-
38
-
39
-
40
-
41
-
42
-
43
-
44
-
45
-
46
-
47
-
48
-
49
-
50
-
51
-
52
-
53
-
54
-
55
-
56
-
57
-
58
-
59
-
60
-
61
-
62
-
63
-
64
-
65
-
66
-
67
-
68
-
69
-
70
-
71
-
72
-
73
-
74
-
75
-
76
-
77
-
78
-
79
-
80
-
 81
81 -
 82
82 -
 83
83 -
 84
84 -
 85
85 -
 86
86 -
 87
87 -
 88
88 -
 89
89 -
 90
90 -
 91
91 -
92
-
93
-
94
-
95
-
96
-
97
-
98
-
99
-
100
-
101
-
102
-
103
-
104
-
105
-
106
-
107
-
108
-
109
-
110
-
111
-
112
-
113
-
114
-
115
-
116
-
117
-
118
-
119
-
120
-
121
-
122
-
123
-
124
-
125
-
126
-
127
-
128
-
129
-
130
-
131
-
132
-
133
-
134
-
135
-
136
-
137
-
138
-
139
-
140
-
141
-
142
-
143
-
144
-
145
-
146
-
147
-
148
-
149
-
150
-
151
-
152
-
153
-
154
-
155
-
156
-
157
-
158
-
159
-
160
-
161
-
162
-
163
-
164
-
165
-
166
-
167
-
168
-
169
-
170
-
171
-
172
-
173
-
174
-
175
-
176
-
177
-
178
-
179
-
180
-
181
-
182
-
183
-
184
-
185
-
186
-
187
-
188
-
189
-
190
-
191
-
192
-
193
-
194
-
195
-
196
-
197
-
198
-
199
-
200
-
201
-
202
-
203
-
204
-
205
-
206
-
207
-
208
-
209
-
210
-
211
-
212
-
213
-
214
-
215
-
216
-
217
-
218
-
219
-
220
 |
 |