HP OmniBook 600C fw 02.00.02-1 and sw 06.00.02 HAFM Server Omnibook - Installa - Page 38
Set HAFM Server Date and Time, Internet Protocol TCP/IP Properties
 |
View all HP OmniBook 600C manuals
Add to My Manuals
Save this manual to your list of manuals |
Page 38 highlights
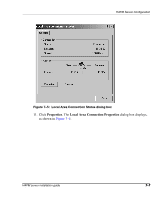
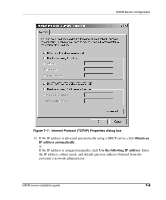
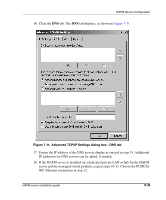
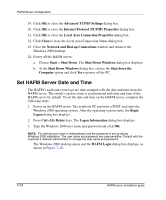
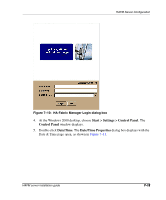
HAFM Server Configuration 19. Click OK to close the Advanced TCP/IP Settings dialog box. 20. Click OK to close the Internet Protocol (TCP/IP) Properties dialog box. 21. Click OK to close the Local Area Connection Properties dialog box. 22. Click Close to close the Local Area Connection Status dialog box. 23. Close the Network and Dial-up Connections window and return to the Windows 2000 desktop. 24. Power off the HAFM server: a. Choose Start > Shut Down. The Shut Down Windows dialog box displays. b. At the Shut Down Windows dialog box, choose the Shut down the Computer option and click Yes to power off the PC. Set HAFM Server Date and Time The HAFM's audit and event logs are time-stamped with the date and time from the HAFM server. The switch's system clock is synchronized with date and time of the HAFM server by default. To set the date and time on the HAFM server, complete the following steps: 1. Power on the HAFM server. The notebook PC performs a POST and starts the Windows 2000 operating system. After the operating system starts, the Begin Logon dialog box displays. 2. Press Ctrl+Alt+Delete keys. The Logon Information dialog box displays. 3. Type the Windows 2000 user name and password and click OK. NOTE: The default user name is Administrator and the password is set up during Windows 2000 installation. The user name and password are case-sensitive. Consult with the customer's network administrator to change the user name and password. The Windows 2000 desktop opens and the HAFM Login dialog box displays, as shown in Figure 7-10. 7-12 HAFM server installation guide
-
 1
1 -
2
-
3
-
4
-
5
-
6
-
7
-
8
-
9
-
10
-
11
-
12
-
13
-
14
-
15
-
16
-
17
-
18
-
19
-
20
-
21
-
22
-
23
-
24
-
25
-
26
-
27
-
28
-
29
-
30
-
31
-
32
-
 33
33 -
 34
34 -
 35
35 -
 36
36 -
 37
37 -
 38
38 -
 39
39 -
 40
40 -
 41
41 -
 42
42 -
 43
43 -
44
-
45
-
46
-
47
-
48
-
49
-
50
-
51
-
52
-
53
-
54
-
55
-
56
-
57
-
58
-
59
-
60
-
61
-
62
-
63
-
64
-
65
-
66
-
67
-
68
 |
 |