HP OmniBook 600C fw 02.00.02-1 and sw 06.00.02 HAFM Server Omnibook - Installa - Page 65
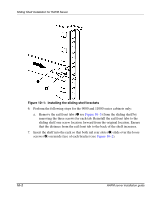
Positioning the sliding shelf bracket on a rail rear slot, At the back of the rack
 |
View all HP OmniBook 600C manuals
Add to My Manuals
Save this manual to your list of manuals |
Page 65 highlights
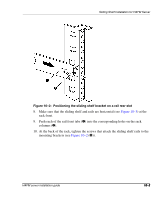
Sliding Shelf Installation for HAFM Server Figure 10-2: Positioning the sliding shelf bracket on a rail rear slot 8. Make sure that the sliding shelf and rails are horizontal (see Figure 10-3) at the rack front. 9. Push each of the rail front tabs (1) into the corresponding holes on the rack columns (2). 10. At the back of the rack, tighten the screws that attach the sliding shelf rails to the mounting brackets (see Figure 10-2 (2)). HAFM server installation guide 10-3
-
 1
1 -
2
-
3
-
4
-
5
-
6
-
7
-
8
-
9
-
10
-
11
-
12
-
13
-
14
-
15
-
16
-
17
-
18
-
19
-
20
-
21
-
22
-
23
-
24
-
25
-
26
-
27
-
28
-
29
-
30
-
31
-
32
-
33
-
34
-
35
-
36
-
37
-
38
-
39
-
40
-
41
-
42
-
43
-
44
-
45
-
46
-
47
-
48
-
49
-
50
-
51
-
52
-
53
-
54
-
55
-
56
-
57
-
58
-
59
-
 60
60 -
 61
61 -
 62
62 -
 63
63 -
 64
64 -
 65
65 -
 66
66 -
 67
67 -
 68
68
 |
 |
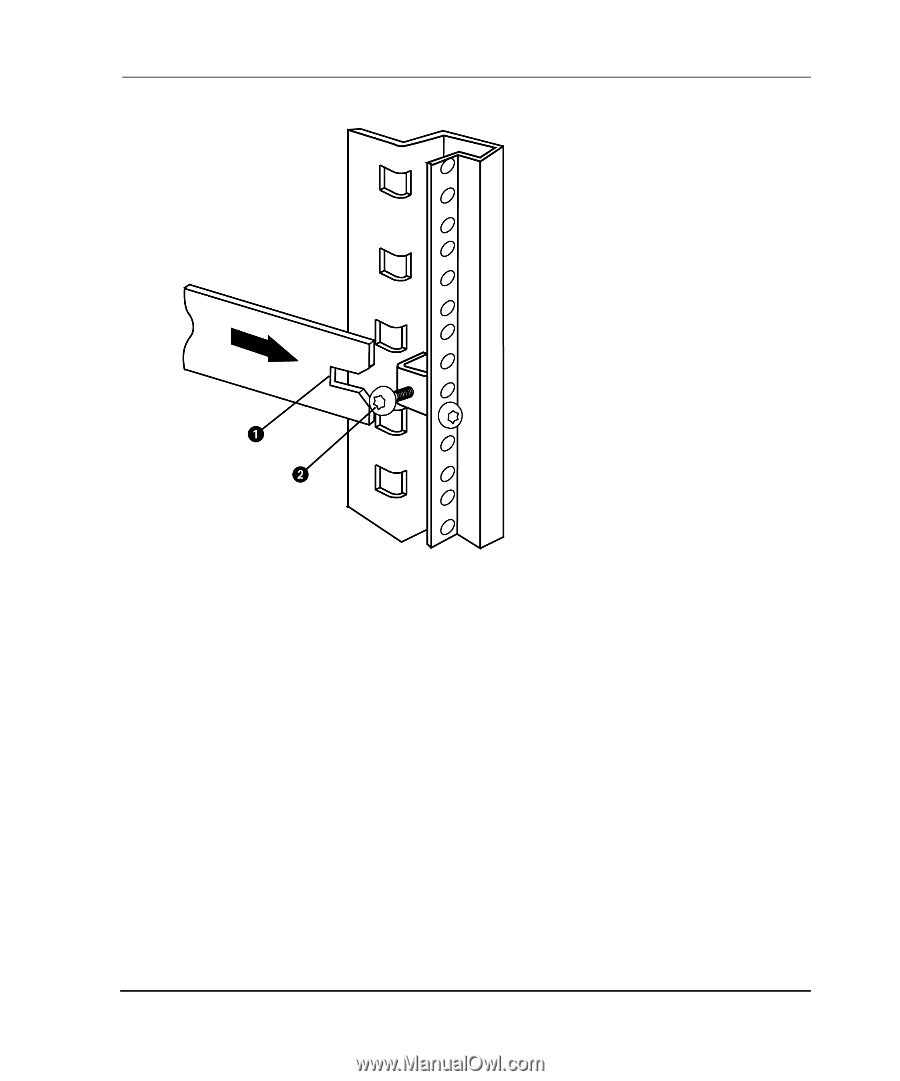
Sliding Shelf Installation for HAFM Server
10–3
HAFM server installation guide
10–3
Figure 10–2:
Positioning the sliding shelf bracket on a rail rear slot
8.
Make sure that the sliding shelf and rails are horizontal (see
Figure 10–3
) at the
rack front.
9.
Push each of the rail front tabs (
1
) into the corresponding holes on the rack
columns (
2
).
10.
At the back of the rack, tighten the screws that attach the sliding shelf rails to the
mounting brackets (see
Figure 10–2
(
2
)).