HP OmniBook 600C fw 02.00.02-1 and sw 06.00.02 HAFM Server Omnibook - Installa - Page 58
Record or Verify HAFM Server Restore Information, Start > Shut Down
 |
View all HP OmniBook 600C manuals
Add to My Manuals
Save this manual to your list of manuals |
Page 58 highlights
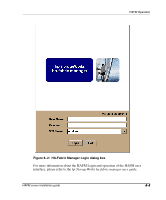
Backing Up and Restoring the HAFM Server 2. Back up the director and switch configuration file to the HAFM server. For instructions, see hp StorageWorks director 2/64 installation guide. 3. If the Hardware View page for any director or switch is open, click Close and return to the Products View page. 4. Close HAFM. Click Product on menu bar and choose Exit from the menu. 5. Use these steps to reboot the HAFM server: a. At the Windows 2000 desktop, choose Start > Shut Down. The Shut Down Windows dialog box displays. b. Choose Restart and click OK. The computer powers down and restarts. After the operating system starts, the Begin Logon dialog box displays. c. Press Ctrl+Alt+Del. The Logon Information dialog box displays. d. Type a Windows 2000 user name and password and click OK. The Windows 2000 desktop opens and the HAFM Login dialog box displays. e. Type the user name and password and select a local host from the HAFM Server drop-down list. f. Click Login. The Products View page displays. Record or Verify HAFM Server Restore Information Configuration information must be recorded to restore the HAFM server in case of hard drive failure. The Windows 2000 operating system and the HAFM applications must also be restored. Use these steps to record or verify HAFM server configuration information: 1. Verify that the following network configuration information is recorded: a. Computer name is recorded. b. Network addresses are recorded for the NIC installed in the server: IP address Subnet mask Gateway address c. DNS Server IP address is recorded. 2. Verify that the following date and time information is recorded: 9-2 HAFM server installation guide
-
 1
1 -
2
-
3
-
4
-
5
-
6
-
7
-
8
-
9
-
10
-
11
-
12
-
13
-
14
-
15
-
16
-
17
-
18
-
19
-
20
-
21
-
22
-
23
-
24
-
25
-
26
-
27
-
28
-
29
-
30
-
31
-
32
-
33
-
34
-
35
-
36
-
37
-
38
-
39
-
40
-
41
-
42
-
43
-
44
-
45
-
46
-
47
-
48
-
49
-
50
-
51
-
52
-
 53
53 -
 54
54 -
 55
55 -
 56
56 -
 57
57 -
 58
58 -
 59
59 -
 60
60 -
 61
61 -
 62
62 -
 63
63 -
64
-
65
-
66
-
67
-
68
 |
 |
