HP OmniBook xe3-gc HP OmniBook Notebook PC XE3 Series - Reference Guide - Page 115
Removing and Reinstalling the Hard Disk Drive - hard drive location
 |
View all HP OmniBook xe3-gc manuals
Add to My Manuals
Save this manual to your list of manuals |
Page 115 highlights
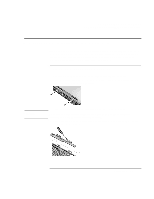
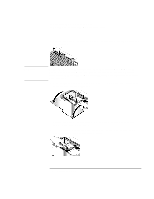
Solving Problems with Your Computer Removing and Reinstalling the Hard Disk Drive Removing and Reinstalling the Hard Disk Drive Removing the hard disk drive is not a simple task since, to improve stability, the drive is located in the middle of the computer. If you do need to remove it, HP recommends that you back up your data and allow a qualified service person to do it. If you decide to remove the drive yourself, follow these instructions carefully. If you decide to remove the hard disk drive 1. Shut down the computer, unplug the AC adapter, and remove the battery. 2. Close the display, and from the rear of the computer remove the two Phillips screws from the back of the plastic hinge covers. CAUTION 3. Lean the display backward as far as possible, so that it is out of the way. Do not touch metal surfaces inside the computer until they have cooled off, especially if the computer has just been running. 4. Carefully pry up the plastic cover above the keyboard at the hinges, using a flathead screwdriver, and remove it. Reference Guide 115
-
 1
1 -
2
-
3
-
4
-
5
-
6
-
7
-
8
-
9
-
10
-
11
-
12
-
13
-
14
-
15
-
16
-
17
-
18
-
19
-
20
-
21
-
22
-
23
-
24
-
25
-
26
-
27
-
28
-
29
-
30
-
31
-
32
-
33
-
34
-
35
-
36
-
37
-
38
-
39
-
40
-
41
-
42
-
43
-
44
-
45
-
46
-
47
-
48
-
49
-
50
-
51
-
52
-
53
-
54
-
55
-
56
-
57
-
58
-
59
-
60
-
61
-
62
-
63
-
64
-
65
-
66
-
67
-
68
-
69
-
70
-
71
-
72
-
73
-
74
-
75
-
76
-
77
-
78
-
79
-
80
-
81
-
82
-
83
-
84
-
85
-
86
-
87
-
88
-
89
-
90
-
91
-
92
-
93
-
94
-
95
-
96
-
97
-
98
-
99
-
100
-
101
-
102
-
103
-
104
-
105
-
106
-
107
-
108
-
109
-
 110
110 -
 111
111 -
 112
112 -
 113
113 -
 114
114 -
 115
115 -
 116
116 -
 117
117 -
 118
118 -
 119
119 -
 120
120 -
121
-
122
-
123
-
124
-
125
-
126
-
127
-
128
-
129
-
130
-
131
-
132
-
133
-
134
-
135
-
136
-
137
-
138
-
139
-
140
-
141
-
142
-
143
-
144
-
145
-
146
-
147
-
148
-
149
-
150
-
151
 |
 |
