HP OmniBook xe3-gc HP OmniBook Notebook PC XE3 Series - Reference Guide - Page 116
They remain attached to the case.
 |
View all HP OmniBook xe3-gc manuals
Add to My Manuals
Save this manual to your list of manuals |
Page 116 highlights
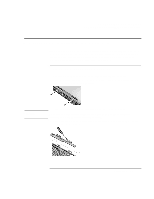
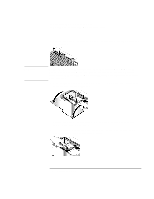
Solving Problems with Your Computer Removing and Reinstalling the Hard Disk Drive 5. Unscrew the four Phillips screws at the top of the keyboard. (They remain attached to the keyboard.) WARNING Handle the hard drive by its edges only, since static electricity can permanently damage computer parts. Before touching the interior of the computer, discharge static electricity by touching the metal shielding around the connectors on the rear of the computer. 6. Slide the keyboard backward to detach it, then tilt it forward and turn it upside down. (Keep the keyboard cable attached.) 7. Unscrew the four Phillips-head screws from the sides of the hard disk drive case. (They remain attached to the case.) 8. Tilt up the rear of the hard disk drive case and, pulling gently by the strap, detach it from the connector and lift it out of the computer. 116 Reference Guide
-
 1
1 -
2
-
3
-
4
-
5
-
6
-
7
-
8
-
9
-
10
-
11
-
12
-
13
-
14
-
15
-
16
-
17
-
18
-
19
-
20
-
21
-
22
-
23
-
24
-
25
-
26
-
27
-
28
-
29
-
30
-
31
-
32
-
33
-
34
-
35
-
36
-
37
-
38
-
39
-
40
-
41
-
42
-
43
-
44
-
45
-
46
-
47
-
48
-
49
-
50
-
51
-
52
-
53
-
54
-
55
-
56
-
57
-
58
-
59
-
60
-
61
-
62
-
63
-
64
-
65
-
66
-
67
-
68
-
69
-
70
-
71
-
72
-
73
-
74
-
75
-
76
-
77
-
78
-
79
-
80
-
81
-
82
-
83
-
84
-
85
-
86
-
87
-
88
-
89
-
90
-
91
-
92
-
93
-
94
-
95
-
96
-
97
-
98
-
99
-
100
-
101
-
102
-
103
-
104
-
105
-
106
-
107
-
108
-
109
-
110
-
 111
111 -
 112
112 -
 113
113 -
 114
114 -
 115
115 -
 116
116 -
 117
117 -
 118
118 -
 119
119 -
 120
120 -
 121
121 -
122
-
123
-
124
-
125
-
126
-
127
-
128
-
129
-
130
-
131
-
132
-
133
-
134
-
135
-
136
-
137
-
138
-
139
-
140
-
141
-
142
-
143
-
144
-
145
-
146
-
147
-
148
-
149
-
150
-
151
 |
 |
