HP Photosmart C4400 Full User Guide - Page 100
Paper jams, Remove printed papers from the output tray frequently. - software windows 8
 |
View all HP Photosmart C4400 manuals
Add to My Manuals
Save this manual to your list of manuals |
Page 100 highlights
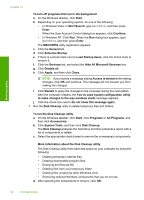
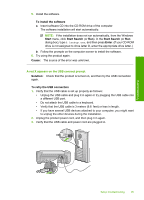
6. Insert the product CD-ROM into your computer's CD-ROM drive and then start the Setup program. NOTE: If the Setup program does not appear, locate the setup.exe file on the CD-ROM drive and double-click it. NOTE: When the computer is turned on, a software group called the Terminate and Stay Resident (TSR) programs automatically loads. These programs activate some of the computer utilities, such as the anti-virus software, that are not required for the computer to function. Occasionally, TSR's prevent the HP software from loading so that it does not install properly. In Windows Vista and Windows XP, use the MSCONFIG utility to prevent TSR programs and services from starting up. 7. Follow the onscreen instructions and the instructions provided in the Setup Guide that came with the product. When the software installation is complete, the HP Digital Imaging Monitor icon appears in the Windows system tray. Troubleshooting To verify that the software is properly installed, double-click the HP Solution Center icon on the desktop. If the HP Solution Center shows the essential icons (Scan Picture and Scan Document), the software has been properly installed. Paper jams To help avoid paper jams, follow these guidelines: • Remove printed papers from the output tray frequently. • Prevent curled or wrinkled photo paper by storing all unused photo paper flat in a resealable bag. • Ensure that paper loaded in the input tray lays flat and the edges are not bent or torn. • Do not combine different paper types and paper sizes in the input tray; the entire stack of paper in the input tray must be the same size and type. • Adjust the paper-width guide in the input tray to fit snugly against all paper. Make sure the paper-width guide does not bend the paper in the input tray. • Do not force paper too far forward in the input tray. • Use paper types that are recommended for the product. Paper jams 97
-
 1
1 -
2
-
3
-
4
-
5
-
6
-
7
-
8
-
9
-
10
-
11
-
12
-
13
-
14
-
15
-
16
-
17
-
18
-
19
-
20
-
21
-
22
-
23
-
24
-
25
-
26
-
27
-
28
-
29
-
30
-
31
-
32
-
33
-
34
-
35
-
36
-
37
-
38
-
39
-
40
-
41
-
42
-
43
-
44
-
45
-
46
-
47
-
48
-
49
-
50
-
51
-
52
-
53
-
54
-
55
-
56
-
57
-
58
-
59
-
60
-
61
-
62
-
63
-
64
-
65
-
66
-
67
-
68
-
69
-
70
-
71
-
72
-
73
-
74
-
75
-
76
-
77
-
78
-
79
-
80
-
81
-
82
-
83
-
84
-
85
-
86
-
87
-
88
-
89
-
90
-
91
-
92
-
93
-
94
-
 95
95 -
 96
96 -
 97
97 -
 98
98 -
 99
99 -
 100
100 -
 101
101 -
 102
102 -
 103
103 -
 104
104 -
 105
105 -
106
-
107
-
108
-
109
-
110
-
111
-
112
-
113
-
114
-
115
-
116
-
117
-
118
-
119
-
120
-
121
-
122
-
123
-
124
-
125
-
126
-
127
-
128
-
129
-
130
-
131
-
132
-
133
-
134
-
135
-
136
-
137
-
138
-
139
-
140
-
141
-
142
-
143
-
144
-
145
-
146
-
147
-
148
-
149
-
150
-
151
-
152
-
153
-
154
-
155
-
156
-
157
-
158
-
159
-
160
-
161
-
162
-
163
-
164
-
165
-
166
-
167
-
168
-
169
-
170
-
171
-
172
-
173
-
174
-
175
-
176
-
177
-
178
-
179
-
180
-
181
-
182
-
183
-
184
-
185
-
186
-
187
-
188
-
189
-
190
-
191
-
192
-
193
-
194
-
195
-
196
-
197
-
198
-
199
-
200
-
201
-
202
-
203
-
204
-
205
-
206
-
207
-
208
-
209
-
210
-
211
-
212
-
213
-
214
-
215
-
216
-
217
-
218
-
219
-
220
-
221
-
222
-
223
-
224
-
225
-
226
-
227
-
228
-
229
-
230
-
231
-
232
-
233
-
234
-
235
-
236
-
237
-
238
-
239
-
240
-
241
-
242
-
243
 |
 |
