HP Photosmart C4400 Full User Guide - Page 67
Scan an image or document, HP Digital Imaging Monitor
 |
View all HP Photosmart C4400 manuals
Add to My Manuals
Save this manual to your list of manuals |
Page 67 highlights
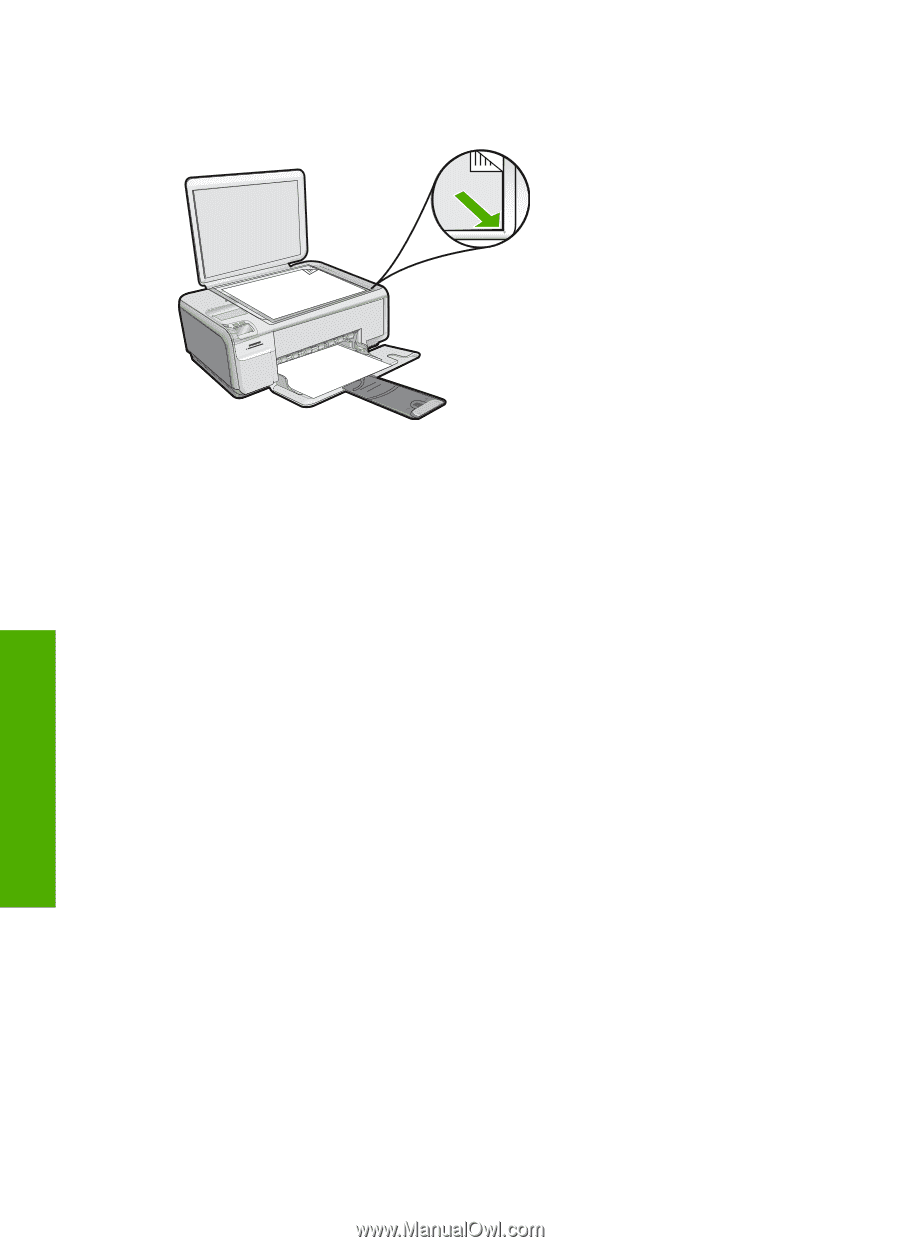
Chapter 10 3. When prompted, load your original photo print side down on the right front corner of the glass. 4. Press OK. A preview image of the scan appears on the display. 5. Do one of the following: To reprint your original photo using the default print settings ▲ Press the button next to Print. To change print settings before reprinting your original photo a. Press Settings to change the print settings. The Settings screen appears. b. Do one of the following: • Press the button next to Print Size to change the print size. • Press the button next to Borderless to change the border printing options. • Press the button next to Prints to change the number of prints. c. Press OK. d. Press the button next to Print. Scan an image or document For original documents or images placed on the glass, you can start a scan from your computer or from the HP All-in-One. This section explains the second option: how to scan from the control panel of the HP All-in-One to a computer. To use the scan features, the HP All-in-One and computer must be connected and turned on. The HP Photosmart Software must also be installed and running on your computer prior to scanning. To verify that the HP Photosmart Software is running on a Windows computer, look for the HP Digital Imaging Monitor icon in the system tray at the lower right side of the screen, near the time. 64 Use the scan features Scan
-
 1
1 -
2
-
3
-
4
-
5
-
6
-
7
-
8
-
9
-
10
-
11
-
12
-
13
-
14
-
15
-
16
-
17
-
18
-
19
-
20
-
21
-
22
-
23
-
24
-
25
-
26
-
27
-
28
-
29
-
30
-
31
-
32
-
33
-
34
-
35
-
36
-
37
-
38
-
39
-
40
-
41
-
42
-
43
-
44
-
45
-
46
-
47
-
48
-
49
-
50
-
51
-
52
-
53
-
54
-
55
-
56
-
57
-
58
-
59
-
60
-
61
-
 62
62 -
 63
63 -
 64
64 -
 65
65 -
 66
66 -
 67
67 -
 68
68 -
 69
69 -
 70
70 -
 71
71 -
 72
72 -
73
-
74
-
75
-
76
-
77
-
78
-
79
-
80
-
81
-
82
-
83
-
84
-
85
-
86
-
87
-
88
-
89
-
90
-
91
-
92
-
93
-
94
-
95
-
96
-
97
-
98
-
99
-
100
-
101
-
102
-
103
-
104
-
105
-
106
-
107
-
108
-
109
-
110
-
111
-
112
-
113
-
114
-
115
-
116
-
117
-
118
-
119
-
120
-
121
-
122
-
123
-
124
-
125
-
126
-
127
-
128
-
129
-
130
-
131
-
132
-
133
-
134
-
135
-
136
-
137
-
138
-
139
-
140
-
141
-
142
-
143
-
144
-
145
-
146
-
147
-
148
-
149
-
150
-
151
-
152
-
153
-
154
-
155
-
156
-
157
-
158
-
159
-
160
-
161
-
162
-
163
-
164
-
165
-
166
-
167
-
168
-
169
-
170
-
171
-
172
-
173
-
174
-
175
-
176
-
177
-
178
-
179
-
180
-
181
-
182
-
183
-
184
-
185
-
186
-
187
-
188
-
189
-
190
-
191
-
192
-
193
-
194
-
195
-
196
-
197
-
198
-
199
-
200
-
201
-
202
-
203
-
204
-
205
-
206
-
207
-
208
-
209
-
210
-
211
-
212
-
213
-
214
-
215
-
216
-
217
-
218
-
219
-
220
-
221
-
222
-
223
-
224
-
225
-
226
-
227
-
228
-
229
-
230
-
231
-
232
-
233
-
234
-
235
-
236
-
237
-
238
-
239
-
240
-
241
-
242
-
243
 |
 |