HP Photosmart C4400 Full User Guide - Page 44
Print a multiple- document as a booklet
 |
View all HP Photosmart C4400 manuals
Add to My Manuals
Save this manual to your list of manuals |
Page 44 highlights
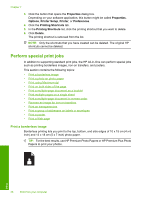
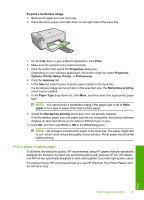
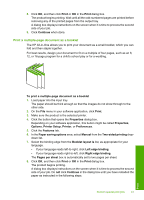
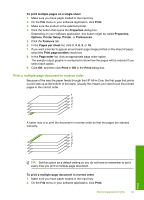
8. Click OK, and then click Print or OK in the Print dialog box. The product begins printing. Wait until all the odd-numbered pages are printed before removing any of the printed pages from the output tray. A dialog box displays instructions on the screen when it is time to process the second side of your job. 9. Click Continue when done. Print a multiple-page document as a booklet The HP All-in-One allows you to print your document as a small booklet, which you can fold and then staple together. For best results, design your document to fit on a multiple of four pages, such as an 8, 12, or 16-page program for a child's school play or for a wedding. To print a multiple-page document as a booklet 1. Load paper into the input tray. The paper should be thick enough so that the images do not show through to the other side. 2. On the File menu in your software application, click Print. 3. Make sure the product is the selected printer. 4. Click the button that opens the Properties dialog box. Depending on your software application, this button might be called Properties, Options, Printer Setup, Printer, or Preferences. 5. Click the Features tab. 6. In the Paper saving options area, select Manual from the Two-sided printing dropdown list. 7. Select the binding edge from the Booklet layout is list, as appropriate for your language. • If your language reads left-to-right, click Left edge binding. • If your language reads right-to-left, click Right edge binding. The Pages per sheet box is automatically set to two pages per sheet. 8. Click OK, and then click Print or OK in the Print dialog box. The product begins printing. A dialog box displays instructions on the screen when it is time to process the second side of your job. Do not click Continue in the dialog box until you have reloaded the paper as instructed in the following steps. Perform special print jobs 41 Print
-
 1
1 -
2
-
3
-
4
-
5
-
6
-
7
-
8
-
9
-
10
-
11
-
12
-
13
-
14
-
15
-
16
-
17
-
18
-
19
-
20
-
21
-
22
-
23
-
24
-
25
-
26
-
27
-
28
-
29
-
30
-
31
-
32
-
33
-
34
-
35
-
36
-
37
-
38
-
 39
39 -
 40
40 -
 41
41 -
 42
42 -
 43
43 -
 44
44 -
 45
45 -
 46
46 -
 47
47 -
 48
48 -
 49
49 -
50
-
51
-
52
-
53
-
54
-
55
-
56
-
57
-
58
-
59
-
60
-
61
-
62
-
63
-
64
-
65
-
66
-
67
-
68
-
69
-
70
-
71
-
72
-
73
-
74
-
75
-
76
-
77
-
78
-
79
-
80
-
81
-
82
-
83
-
84
-
85
-
86
-
87
-
88
-
89
-
90
-
91
-
92
-
93
-
94
-
95
-
96
-
97
-
98
-
99
-
100
-
101
-
102
-
103
-
104
-
105
-
106
-
107
-
108
-
109
-
110
-
111
-
112
-
113
-
114
-
115
-
116
-
117
-
118
-
119
-
120
-
121
-
122
-
123
-
124
-
125
-
126
-
127
-
128
-
129
-
130
-
131
-
132
-
133
-
134
-
135
-
136
-
137
-
138
-
139
-
140
-
141
-
142
-
143
-
144
-
145
-
146
-
147
-
148
-
149
-
150
-
151
-
152
-
153
-
154
-
155
-
156
-
157
-
158
-
159
-
160
-
161
-
162
-
163
-
164
-
165
-
166
-
167
-
168
-
169
-
170
-
171
-
172
-
173
-
174
-
175
-
176
-
177
-
178
-
179
-
180
-
181
-
182
-
183
-
184
-
185
-
186
-
187
-
188
-
189
-
190
-
191
-
192
-
193
-
194
-
195
-
196
-
197
-
198
-
199
-
200
-
201
-
202
-
203
-
204
-
205
-
206
-
207
-
208
-
209
-
210
-
211
-
212
-
213
-
214
-
215
-
216
-
217
-
218
-
219
-
220
-
221
-
222
-
223
-
224
-
225
-
226
-
227
-
228
-
229
-
230
-
231
-
232
-
233
-
234
-
235
-
236
-
237
-
238
-
239
-
240
-
241
-
242
-
243
 |
 |
