HP Photosmart C4400 Full User Guide - Page 176
Control Panel, Solution 3: Restart the computer, Solution 4: Uninstall and reinstall the product
 |
View all HP Photosmart C4400 manuals
Add to My Manuals
Save this manual to your list of manuals |
Page 176 highlights
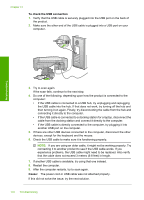
Troubleshooting 6. Check the USB cable to make sure it is functioning properly. NOTE: If you are using an older cable, it might not be working properly. Try connecting it to another product to see if the USB cable works. If you experience problems, the USB cable might need to be replaced. Also verify that the cable does not exceed 3 meters (9.8 feet) in length. 7. If another USB cable is available, try using that one instead. 8. Restart the computer. 9. After the computer restarts, try to scan again. Cause: The power cord or USB cable was not attached properly. If this did not solve the issue, try the next solution. Solution 3: Restart the computer Solution: Restart the computer. Cause: You might not have restarted the computer after installing the product software. Or, there might have been another problem with the computer. If this did not solve the issue, try the next solution. Solution 4: Uninstall and reinstall the product Solution: Uninstall the product from the Printers and Faxes control panel and then reinstall it. To uninstall and reinstall the product 1. Disconnect the USB cable between the product and the computer. 2. On the Windows taskbar, click Start, Printers and Faxes. 3. Right-click the product and select Delete. 4. Wait several seconds, and then reconnect the product to the computer with the USB cable. 5. Follow any onscreen prompts to reinstall the product. Cause: There might have been a problem when you originally installed the product. If this did not solve the issue, try the next solution. Solution 5: Uninstall and reinstall the HP Photosmart Software Solution: Uninstall the complete HP Photosmart Software from the computer and then reinstall it using the CD that came with your product. To uninstall and reinstall the software 1. On the Windows taskbar, click Start, Settings, Control Panel. 2. Double-click Add/Remove Programs. Errors 173
-
 1
1 -
2
-
3
-
4
-
5
-
6
-
7
-
8
-
9
-
10
-
11
-
12
-
13
-
14
-
15
-
16
-
17
-
18
-
19
-
20
-
21
-
22
-
23
-
24
-
25
-
26
-
27
-
28
-
29
-
30
-
31
-
32
-
33
-
34
-
35
-
36
-
37
-
38
-
39
-
40
-
41
-
42
-
43
-
44
-
45
-
46
-
47
-
48
-
49
-
50
-
51
-
52
-
53
-
54
-
55
-
56
-
57
-
58
-
59
-
60
-
61
-
62
-
63
-
64
-
65
-
66
-
67
-
68
-
69
-
70
-
71
-
72
-
73
-
74
-
75
-
76
-
77
-
78
-
79
-
80
-
81
-
82
-
83
-
84
-
85
-
86
-
87
-
88
-
89
-
90
-
91
-
92
-
93
-
94
-
95
-
96
-
97
-
98
-
99
-
100
-
101
-
102
-
103
-
104
-
105
-
106
-
107
-
108
-
109
-
110
-
111
-
112
-
113
-
114
-
115
-
116
-
117
-
118
-
119
-
120
-
121
-
122
-
123
-
124
-
125
-
126
-
127
-
128
-
129
-
130
-
131
-
132
-
133
-
134
-
135
-
136
-
137
-
138
-
139
-
140
-
141
-
142
-
143
-
144
-
145
-
146
-
147
-
148
-
149
-
150
-
151
-
152
-
153
-
154
-
155
-
156
-
157
-
158
-
159
-
160
-
161
-
162
-
163
-
164
-
165
-
166
-
167
-
168
-
169
-
170
-
 171
171 -
 172
172 -
 173
173 -
 174
174 -
 175
175 -
 176
176 -
 177
177 -
 178
178 -
 179
179 -
 180
180 -
 181
181 -
182
-
183
-
184
-
185
-
186
-
187
-
188
-
189
-
190
-
191
-
192
-
193
-
194
-
195
-
196
-
197
-
198
-
199
-
200
-
201
-
202
-
203
-
204
-
205
-
206
-
207
-
208
-
209
-
210
-
211
-
212
-
213
-
214
-
215
-
216
-
217
-
218
-
219
-
220
-
221
-
222
-
223
-
224
-
225
-
226
-
227
-
228
-
229
-
230
-
231
-
232
-
233
-
234
-
235
-
236
-
237
-
238
-
239
-
240
-
241
-
242
-
243
 |
 |