HP Scitex FB910 HP Scitex FB910 Printer Series - User Manual - Page 117
Replace Ink Filters, Connector, Filter, Zip-tie, Retaining strap
 |
View all HP Scitex FB910 manuals
Add to My Manuals
Save this manual to your list of manuals |
Page 117 highlights
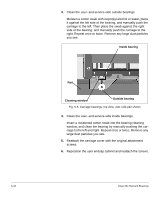
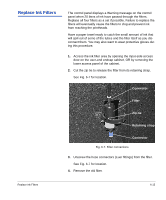
Replace Ink Filters The control panel displays a Warning message on the control panel when 20 liters of ink have passed through the filters. Replace all four filters as a set if possible. Failure to replace the filters will eventually cause the filters to clog and prevent ink from reaching the printheads. Have a paper towel ready to catch the small amount of ink that will spill out of some of the tubes and the filter itself as you disconnect them. You may also want to wear protective gloves during this procedure. 1. Access the ink filter area by opening the input-side access door on the user-end endcap cabinet, OR by removing the lower access panel of the cabinet. 2. Cut the zip tie to release the filter from its retaining strap. See Fig. 6-7 for location. Connector Filter Zip-tie Retaining strap Connector Fig. 6-7. Filter connections 3. Unscrew the hose connectors (Luer fittings) from the filter. See Fig. 6-7 for location. 4. Remove the old filter. Replace Ink Filters 6-15
-
 1
1 -
2
-
3
-
4
-
5
-
6
-
7
-
8
-
9
-
10
-
11
-
12
-
13
-
14
-
15
-
16
-
17
-
18
-
19
-
20
-
21
-
22
-
23
-
24
-
25
-
26
-
27
-
28
-
29
-
30
-
31
-
32
-
33
-
34
-
35
-
36
-
37
-
38
-
39
-
40
-
41
-
42
-
43
-
44
-
45
-
46
-
47
-
48
-
49
-
50
-
51
-
52
-
53
-
54
-
55
-
56
-
57
-
58
-
59
-
60
-
61
-
62
-
63
-
64
-
65
-
66
-
67
-
68
-
69
-
70
-
71
-
72
-
73
-
74
-
75
-
76
-
77
-
78
-
79
-
80
-
81
-
82
-
83
-
84
-
85
-
86
-
87
-
88
-
89
-
90
-
91
-
92
-
93
-
94
-
95
-
96
-
97
-
98
-
99
-
100
-
101
-
102
-
103
-
104
-
105
-
106
-
107
-
108
-
109
-
110
-
111
-
 112
112 -
 113
113 -
 114
114 -
 115
115 -
 116
116 -
 117
117 -
 118
118 -
 119
119 -
 120
120 -
 121
121 -
 122
122 -
123
-
124
-
125
-
126
-
127
-
128
-
129
-
130
-
131
-
132
-
133
-
134
-
135
-
136
-
137
-
138
-
139
-
140
-
141
-
142
-
143
-
144
-
145
-
146
-
147
-
148
 |
 |
