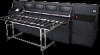
HP Scitex FB910 HP Scitex FB910 Printer Series - User Manual - Page 48
Tape the end of the media to printer side of takeup roller
 |
View all HP Scitex FB910 manuals
Add to My Manuals
Save this manual to your list of manuals |
Page 48 highlights
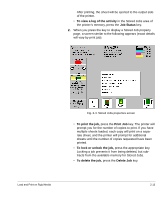
15. Check for wrinkles in the media across the full length and width of the belt. If you see any wrinkles, turn off the fans and smooth them out with your hand. Repeat steps 11 through 15 until no wrinkles are visible. 16. Place the foam press roller p into operating position. 17. If you are not using the takeup system, go to step 23. 18. Align the cardboard takeup core to the media and tighten the collets to lock the core in place. 19. Lift the first dancer bar s (with the gears), and lock in the upper position. 20. Pull the media under the first dancer bar, over second dancer bar t, and down to the printer side of takeup roller u. Looking down the length of the takeup roller from the user end, the roller rotates clockwise. Ensure that the media is wrapped as shown in Figure 2-5 on page 2-15. 21. Tape the end of the media to printer side of takeup roller, starting in the middle and working out to both ends. Be sure to maintain even tension across the width of the media. 22. Release the dancer bar locking lever. 23. Press the Proceed key. 24. Enter the media length or press the Esc key for an undefined length. The printer measures the media width. 25. On the Front Page screen, press the Proceed key. The Front Page screen appears on the control panel. 2-18 Load and Print on Roll-Fed Media
-
 1
1 -
2
-
3
-
4
-
5
-
6
-
7
-
8
-
9
-
10
-
11
-
12
-
13
-
14
-
15
-
16
-
17
-
18
-
19
-
20
-
21
-
22
-
23
-
24
-
25
-
26
-
27
-
28
-
29
-
30
-
31
-
32
-
33
-
34
-
35
-
36
-
37
-
38
-
39
-
40
-
41
-
42
-
 43
43 -
 44
44 -
 45
45 -
 46
46 -
 47
47 -
 48
48 -
 49
49 -
 50
50 -
 51
51 -
 52
52 -
 53
53 -
54
-
55
-
56
-
57
-
58
-
59
-
60
-
61
-
62
-
63
-
64
-
65
-
66
-
67
-
68
-
69
-
70
-
71
-
72
-
73
-
74
-
75
-
76
-
77
-
78
-
79
-
80
-
81
-
82
-
83
-
84
-
85
-
86
-
87
-
88
-
89
-
90
-
91
-
92
-
93
-
94
-
95
-
96
-
97
-
98
-
99
-
100
-
101
-
102
-
103
-
104
-
105
-
106
-
107
-
108
-
109
-
110
-
111
-
112
-
113
-
114
-
115
-
116
-
117
-
118
-
119
-
120
-
121
-
122
-
123
-
124
-
125
-
126
-
127
-
128
-
129
-
130
-
131
-
132
-
133
-
134
-
135
-
136
-
137
-
138
-
139
-
140
-
141
-
142
-
143
-
144
-
145
-
146
-
147
-
148
 |
 |
