HP T5125 Troubleshooting Guide - HP Compaq t5000 Series Thin Client, 8th Editi - Page 64
Formatting a USB Flash Drive - update
 |
UPC - 082960980097
View all HP T5125 manuals
Add to My Manuals
Save this manual to your list of manuals |
Page 64 highlights
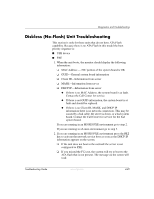
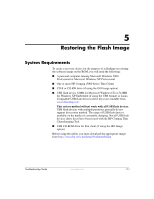
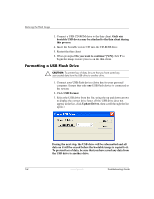
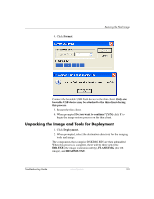
Restoring the Flash Image 3. Connect a USB CD-ROM drive to the thin client. Only one bootable USB device may be attached to the thin client during this process. 4. Insert the bootable restore CD into the CD-ROM drive. 5. Restart the thin client. 6. When prompted Do you want to continue? [Y/N] click Y to begin the image restore process on the thin client. Formatting a USB Flash Drive Ä CAUTION: To prevent loss of data, be sure that you have saved any user-created data from the USB drive to another drive. 1. Connect your USB flash device (drive key) to your personal computer. Ensure that only one USB flash device is connected to the system. 2. Click USB Format. 3. Select the USB drive from the list, using the up and down arrows to display the correct drive letter. (If the USB drive does not appear in the list, click Update Drives, then scroll through the list again.) During the next step, the USB drive will be reformatted and all data on it will be erased before the bootable image is copied to it. To prevent loss of data, be sure that you have saved any data from the USB drive to another drive. 5-4 www.hp.com Troubleshooting Guide
-
 1
1 -
2
-
3
-
4
-
5
-
6
-
7
-
8
-
9
-
10
-
11
-
12
-
13
-
14
-
15
-
16
-
17
-
18
-
19
-
20
-
21
-
22
-
23
-
24
-
25
-
26
-
27
-
28
-
29
-
30
-
31
-
32
-
33
-
34
-
35
-
36
-
37
-
38
-
39
-
40
-
41
-
42
-
43
-
44
-
45
-
46
-
47
-
48
-
49
-
50
-
51
-
52
-
53
-
54
-
55
-
56
-
57
-
58
-
 59
59 -
 60
60 -
 61
61 -
 62
62 -
 63
63 -
 64
64 -
 65
65 -
 66
66 -
 67
67 -
 68
68 -
 69
69 -
70
-
71
-
72
-
73
-
74
-
75
-
76
-
77
-
78
-
79
-
80
-
81
-
82
-
83
-
84
-
85
-
86
-
87
-
88
-
89
-
90
-
91
-
92
-
93
-
94
-
95
-
96
-
97
-
98
-
99
-
100
-
101
-
102
 |
 |