HP Vectra VEi8 HP Vectra VEi7, User's Guide - Page 27
Removing and Replacing the Cover and Front Panel
 |
View all HP Vectra VEi8 manuals
Add to My Manuals
Save this manual to your list of manuals |
Page 27 highlights
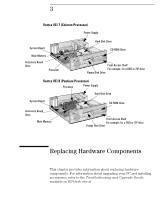
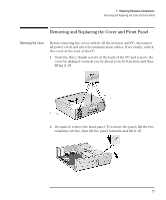
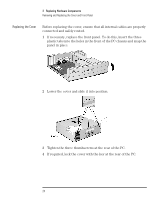
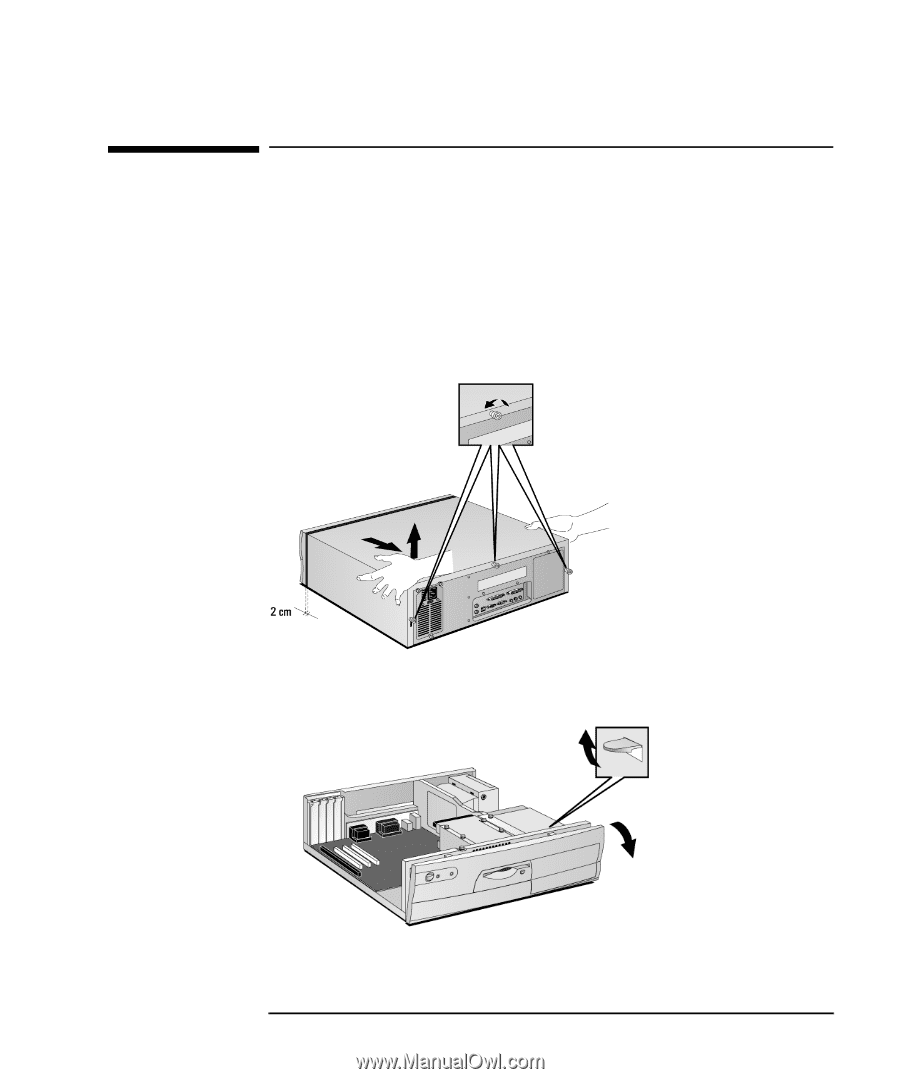
3 Replacing Hardware Components Removing and Replacing the Cover and Front Panel Removing and Replacing the Cover and Front Panel Removing the Cover Before removing the cover, switch off the monitor and PC, disconnect all power cords and any telecommunication cables. If necessary, unlock the cover at the rear of the PC. 1 Undo the three thumb screws at the back of the PC and remove the cover by sliding it towards you by about 2 cm (0.8 inches) and then lifting it off. 2 If required, remove the front panel. To remove the panel, lift the two retaining catches, then tilt the panel forwards and lift it off. English 23
-
 1
1 -
2
-
3
-
4
-
5
-
6
-
7
-
8
-
9
-
10
-
11
-
12
-
13
-
14
-
15
-
16
-
17
-
18
-
19
-
20
-
21
-
 22
22 -
 23
23 -
 24
24 -
 25
25 -
 26
26 -
 27
27 -
 28
28 -
 29
29 -
 30
30 -
 31
31 -
 32
32 -
33
-
34
-
35
-
36
-
37
-
38
-
39
-
40
-
41
-
42
-
43
-
44
-
45
-
46
-
47
-
48
-
49
-
50
-
51
-
52
-
53
-
54
-
55
-
56
-
57
-
58
-
59
-
60
-
61
-
62
-
63
-
64
-
65
-
66
-
67
-
68
-
69
-
70
 |
 |
English
23
3
Replacing Hardware Components
Removing and Replacing the Cover and Front Panel
Removing and Replacing the Cover and Front Panel
Removing the Cover
Before removing the cover, switch off the monitor and PC, disconnect
all power cords and any telecommunication cables. If necessary, unlock
the cover at the rear of the PC.
1
Undo the three thumb screws at the back of the PC and remove the
cover by sliding it towards you by about 2 cm (0.8 inches) and then
lifting it off.
2
If required, remove the front panel. To remove the panel, lift the two
retaining catches, then tilt the panel forwards and lift it off.