HP Vectra VEi8 HP Vectra VEi7, User's Guide - Page 44
Replacing the Power Supply
 |
View all HP Vectra VEi8 manuals
Add to My Manuals
Save this manual to your list of manuals |
Page 44 highlights
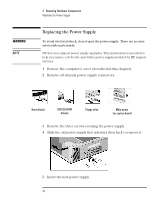
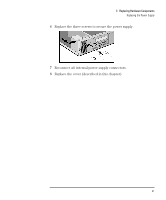
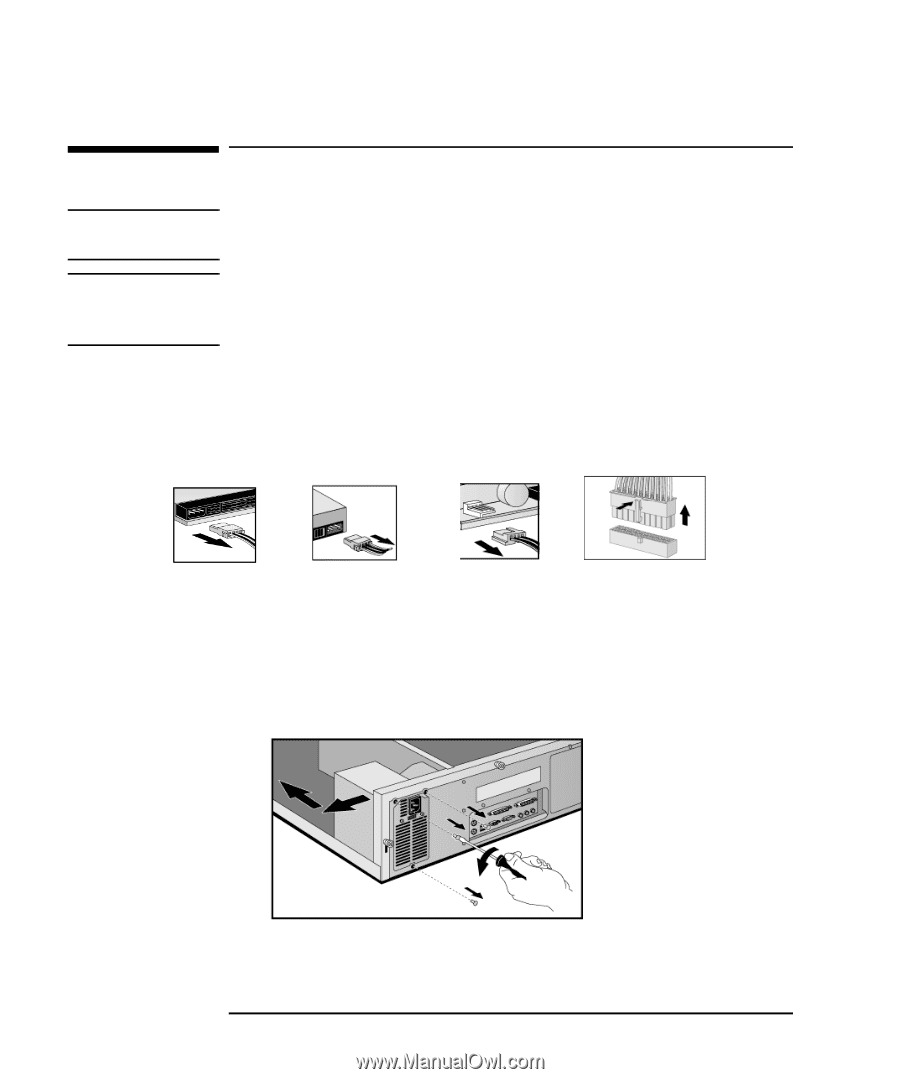
WARNING NOTE 3 Replacing Hardware Components Replacing the Power Supply Replacing the Power Supply To avoid electrical shock, do not open the power supply. There are no user- serviceable parts inside. HP does not support power supply upgrades. This information is provided to help you replace a defective unit with a power supply provided by HP support services. 1 Remove the computer's cover (described in this chapter). 2 Remove all internal power supply connectors. Hard drive(s) DVD/CD-ROM drive(s) Floppy drive Main power (on system board) 3 Remove the three screws securing the power supply. 4 Slide the old power supply first sideways then back to remove it. 5 Insert the new power supply. 40 English
-
 1
1 -
2
-
3
-
4
-
5
-
6
-
7
-
8
-
9
-
10
-
11
-
12
-
13
-
14
-
15
-
16
-
17
-
18
-
19
-
20
-
21
-
22
-
23
-
24
-
25
-
26
-
27
-
28
-
29
-
30
-
31
-
32
-
33
-
34
-
35
-
36
-
37
-
38
-
 39
39 -
 40
40 -
 41
41 -
 42
42 -
 43
43 -
 44
44 -
 45
45 -
 46
46 -
 47
47 -
 48
48 -
 49
49 -
50
-
51
-
52
-
53
-
54
-
55
-
56
-
57
-
58
-
59
-
60
-
61
-
62
-
63
-
64
-
65
-
66
-
67
-
68
-
69
-
70
 |
 |
3
Replacing Hardware Components
Replacing the Power Supply
40
English
Replacing the Power Supply
WARNING
To avoid electrical shock, do not open the power supply. There are no user-
serviceable parts inside
.
NOTE
HP does not support power supply upgrades. This information is provided to
help you replace a defective unit with a power supply provided by HP support
services.
1
Remove the computer’s cover (described in this chapter).
2
Remove
all
internal power supply connectors.
3
Remove the three screws securing the power supply.
4
Slide the old power supply first sideways then back to remove it.
5
Insert the new power supply.
Hard drive(s)
DVD/CD-ROM
drive(s)
Floppy drive
Main power
(on system board)