HP Vectra VEi8 HP Vectra VEi7, User's Guide - Page 28
Replacing the Cover
 |
View all HP Vectra VEi8 manuals
Add to My Manuals
Save this manual to your list of manuals |
Page 28 highlights
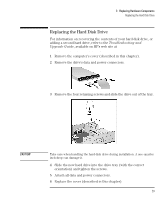
3 Replacing Hardware Components Removing and Replacing the Cover and Front Panel Replacing the Cover Before replacing the cover, ensure that all internal cables are properly connected and safely routed. 1 If necessary, replace the front panel. To do this, insert the three plastic tabs into the holes in the front of the PC chassis and snap the panel in place. 2 Lower the cover and slide it into position. 3 Tighten the three thumbscrews at the rear of the PC. 4 If required, lock the cover with the key at the rear of the PC. 24 English
-
 1
1 -
2
-
3
-
4
-
5
-
6
-
7
-
8
-
9
-
10
-
11
-
12
-
13
-
14
-
15
-
16
-
17
-
18
-
19
-
20
-
21
-
22
-
 23
23 -
 24
24 -
 25
25 -
 26
26 -
 27
27 -
 28
28 -
 29
29 -
 30
30 -
 31
31 -
 32
32 -
 33
33 -
34
-
35
-
36
-
37
-
38
-
39
-
40
-
41
-
42
-
43
-
44
-
45
-
46
-
47
-
48
-
49
-
50
-
51
-
52
-
53
-
54
-
55
-
56
-
57
-
58
-
59
-
60
-
61
-
62
-
63
-
64
-
65
-
66
-
67
-
68
-
69
-
70
 |
 |

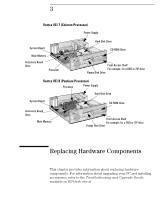
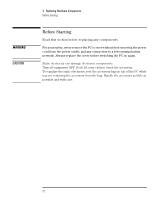
3
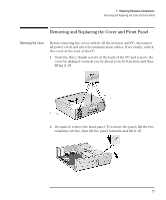
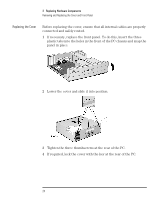
Replacing Hardware Components
Removing and Replacing the Cover and Front Panel
24
English
Replacing the Cover
Before replacing the cover, ensure that all internal cables are properly
connected and safely routed.
1
If necessary, replace the front panel. To do this, insert the three
plastic tabs into the holes in the front of the PC chassis and snap the
panel in place.
2
Lower the cover and slide it into position.
3
Tighten the three thumbscrews at the rear of the PC.
4
If required, lock the cover with the key at the rear of the PC.