HP Vectra VEi8 HP Vectra VEi7, User's Guide - Page 43
Replace the cover described in
 |
View all HP Vectra VEi8 manuals
Add to My Manuals
Save this manual to your list of manuals |
Page 43 highlights
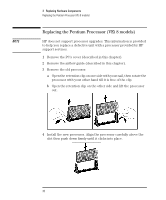
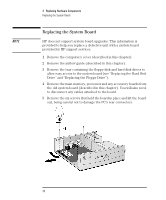
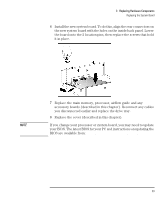
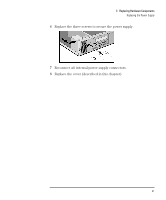
3 Replacing Hardware Components Replacing the System Board 6 Install the new system board. To do this, align the rear connectors on the new system board with the holes on the inside back panel. Lower the board onto the 2 location pins, then replace the screws that hold it in place. NOTE 7 Replace the main memory, processor, airflow guide and any accessory boards (described in this chapter). Reconnect any cables you disconnected earlier and replace the drive tray. 8 Replace the cover (described in this chapter). If you change your processor or system board, you may need to update your BIOS. The latest BIOS for your PC and instructions on updating the BIOS are available from: www.hp.com/go/vectrasupport. English 39
-
 1
1 -
2
-
3
-
4
-
5
-
6
-
7
-
8
-
9
-
10
-
11
-
12
-
13
-
14
-
15
-
16
-
17
-
18
-
19
-
20
-
21
-
22
-
23
-
24
-
25
-
26
-
27
-
28
-
29
-
30
-
31
-
32
-
33
-
34
-
35
-
36
-
37
-
 38
38 -
 39
39 -
 40
40 -
 41
41 -
 42
42 -
 43
43 -
 44
44 -
 45
45 -
 46
46 -
 47
47 -
 48
48 -
49
-
50
-
51
-
52
-
53
-
54
-
55
-
56
-
57
-
58
-
59
-
60
-
61
-
62
-
63
-
64
-
65
-
66
-
67
-
68
-
69
-
70
 |
 |
English
39
3
Replacing Hardware Components
Replacing the System Board
6
Install the new system board. To do this, align the rear connectors on
the new system board with the holes on the inside back panel. Lower
the board onto the 2 location pins, then replace the screws that hold
it in place.
7
Replace the main memory, processor, airflow guide and any
accessory boards (described in this chapter). Reconnect any cables
you disconnected earlier and replace the drive tray.
8
Replace the cover (described in this chapter).
NOTE
If you change your processor or system board, you may need to update
your BIOS. The latest BIOS for your PC and instructions on updating the
BIOS are available from:
www.hp.com/go/vectrasupport
.