HP ap5000 Maintenance and Service Guide: HP ap5000 All-In-One Point of Sale Sy - Page 15
Computer Setup (F10) Utility, Computer Setup (F10) Utilities, Using Computer Setup (F10) Utilities - all in one pos
 |
View all HP ap5000 manuals
Add to My Manuals
Save this manual to your list of manuals |
Page 15 highlights
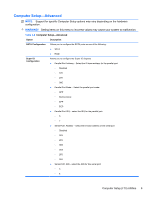
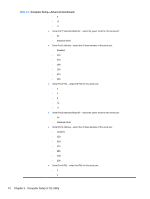
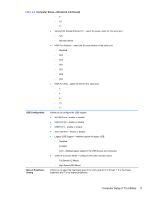
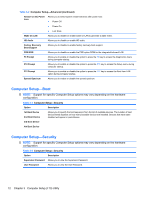
3 Computer Setup (F10) Utility Computer Setup (F10) Utilities Use Computer Setup (F10) Utility to do the following: ● Change factory default settings. ● Set the system date and time. ● Set, view, change, or verify the system configuration, including settings for serial and parallel ports. ● View settings for processor and memory. ● Modify the boot order of bootable devices. ● Adjust the brightness of the LCD panel. ● Establish a supervisor password that controls access to Computer Setup (F10) Utility and the settings described in this section. CAUTION: The VGA port on the ap5000 is a Powered VGA Port. If your monitor does not support the "Powered VGA" feature, make sure to plug it in prior to powering on the POS system in order to prevent possible damage to your monitor. Using Computer Setup (F10) Utilities Computer Setup can be accessed only by turning the computer on or restarting the system. To access the Computer Setup Utilities menu, complete the following steps: 1. Turn on or restart the computer. 2. As soon as the computer is turned on, press F10 before the computer boots to the operating system to enter Computer Setup. NOTE: If you do not press F10 at the appropriate time, you must restart the computer and again press F10 before the computer boots to the operating system to access the utility. 3. The Computer Setup Utility screen is divided into menu headings and actions. Five menu headings appear on the Computer Setup Utility screen: ● Main ● Advanced ● Boot Computer Setup (F10) Utilities 7
-
 1
1 -
2
-
3
-
4
-
5
-
6
-
7
-
8
-
9
-
 10
10 -
 11
11 -
 12
12 -
 13
13 -
 14
14 -
 15
15 -
 16
16 -
 17
17 -
 18
18 -
 19
19 -
 20
20 -
21
-
22
-
23
-
24
-
25
-
26
-
27
-
28
-
29
-
30
-
31
-
32
-
33
-
34
-
35
-
36
-
37
-
38
-
39
-
40
-
41
-
42
-
43
-
44
-
45
-
46
-
47
-
48
-
49
-
50
-
51
-
52
-
53
-
54
-
55
-
56
-
57
-
58
-
59
-
60
-
61
-
62
-
63
-
64
-
65
-
66
-
67
-
68
-
69
-
70
-
71
-
72
-
73
-
74
-
75
-
76
-
77
-
78
-
79
-
80
-
81
-
82
-
83
-
84
-
85
-
86
-
87
-
88
-
89
 |
 |
