HP ap5000 Maintenance and Service Guide: HP ap5000 All-In-One Point of Sale Sy - Page 65
Installing Additional Memory, DIMMs, DDR2-SDRAM DIMMs
 |
View all HP ap5000 manuals
Add to My Manuals
Save this manual to your list of manuals |
Page 65 highlights
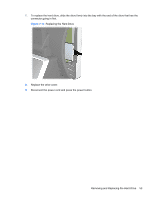
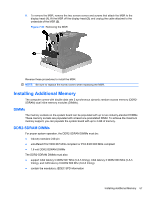
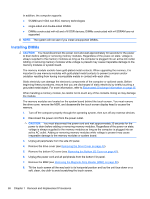
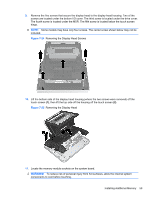
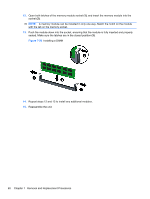
8. To remove the MSR, remove the two screws covers and screws that attach the MSR to the display head (1), lift the MSR off the display head (2), and unplug the cable attached to the underside of the MSR (3). Figure 7-23 Removing the MSR Reverse these procedures to install the MSR. NOTE: Be sure to replace the screw covers when replacing the MSR. Installing Additional Memory The computer comes with double data rate 2 synchronous dynamic random access memory (DDR2SDRAM) dual inline memory modules (DIMMs). DIMMs The memory sockets on the system board can be populated with up to two industry-standard DIMMs. These memory sockets are populated with at least one preinstalled DIMM. To achieve the maximum memory support, you can populate the system board with up to 4-GB of memory. DDR2-SDRAM DIMMs For proper system operation, the DDR2-SDRAM DIMMs must be: ● industry-standard 240-pin ● unbuffered PC2-5300 667 MHz-compliant or PC2-6400 800 MHz-compliant ● 1.8 volt DDR2-SDRAM DIMMs The DDR2-SDRAM DIMMs must also: ● support CAS latency 5 DDR2 667 Mhz (5-5-5 timing), CAS latency 5 DDR2 800 Mhz (5-5-5 timing), and CAS latency 6 DDR2 800 Mhz (6-6-6 timing) ● contain the mandatory JEDEC SPD information Installing Additional Memory 57
-
 1
1 -
2
-
3
-
4
-
5
-
6
-
7
-
8
-
9
-
10
-
11
-
12
-
13
-
14
-
15
-
16
-
17
-
18
-
19
-
20
-
21
-
22
-
23
-
24
-
25
-
26
-
27
-
28
-
29
-
30
-
31
-
32
-
33
-
34
-
35
-
36
-
37
-
38
-
39
-
40
-
41
-
42
-
43
-
44
-
45
-
46
-
47
-
48
-
49
-
50
-
51
-
52
-
53
-
54
-
55
-
56
-
57
-
58
-
59
-
 60
60 -
 61
61 -
 62
62 -
 63
63 -
 64
64 -
 65
65 -
 66
66 -
 67
67 -
 68
68 -
 69
69 -
 70
70 -
71
-
72
-
73
-
74
-
75
-
76
-
77
-
78
-
79
-
80
-
81
-
82
-
83
-
84
-
85
-
86
-
87
-
88
-
89
 |
 |
