HP ap5000 Maintenance and Service Guide: HP ap5000 All-In-One Point of Sale Sy - Page 68
Removal and Replacement Procedures, Installing a DIMM
 |
View all HP ap5000 manuals
Add to My Manuals
Save this manual to your list of manuals |
Page 68 highlights
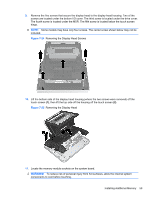
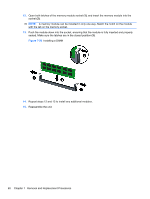
12. Open both latches of the memory module socket (1), and insert the memory module into the socket (2). NOTE: A memory module can be installed in only one way. Match the notch on the module with the tab on the memory socket. 13. Push the module down into the socket, ensuring that the module is fully inserted and properly seated. Make sure the latches are in the closed position (3). Figure 7-26 Installing a DIMM 14. Repeat steps 12 and 13 to install any additional modules. 15. Reassemble the unit. 60 Chapter 7 Removal and Replacement Procedures
-
 1
1 -
2
-
3
-
4
-
5
-
6
-
7
-
8
-
9
-
10
-
11
-
12
-
13
-
14
-
15
-
16
-
17
-
18
-
19
-
20
-
21
-
22
-
23
-
24
-
25
-
26
-
27
-
28
-
29
-
30
-
31
-
32
-
33
-
34
-
35
-
36
-
37
-
38
-
39
-
40
-
41
-
42
-
43
-
44
-
45
-
46
-
47
-
48
-
49
-
50
-
51
-
52
-
53
-
54
-
55
-
56
-
57
-
58
-
59
-
60
-
61
-
62
-
 63
63 -
 64
64 -
 65
65 -
 66
66 -
 67
67 -
 68
68 -
 69
69 -
 70
70 -
 71
71 -
 72
72 -
 73
73 -
74
-
75
-
76
-
77
-
78
-
79
-
80
-
81
-
82
-
83
-
84
-
85
-
86
-
87
-
88
-
89
 |
 |

12.
Open both latches of the memory module socket
(1)
, and insert the memory module into the
socket
(2)
.
NOTE:
A memory module can be installed in only one way. Match the notch on the module
with the tab on the memory socket.
13.
Push the module down into the socket, ensuring that the module is fully inserted and properly
seated. Make sure the latches are in the closed position
(3)
.
Figure 7-26
Installing a DIMM
14.
Repeat steps 12 and 13 to install any additional modules.
15.
Reassemble the unit.
60
Chapter 7
Removal and Replacement Procedures