HP dx7510 Service Reference Guide: HP Compaq dx7510/dx7518 Business PC - Page 12
Save & Exit Setup, Exit Without Saving, on the Computer Setup Utility - bios
 |
View all HP dx7510 manuals
Add to My Manuals
Save this manual to your list of manuals |
Page 12 highlights
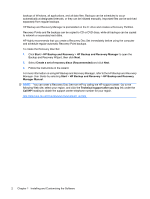
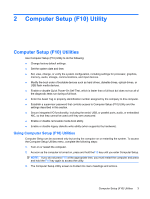
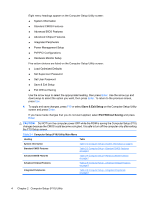
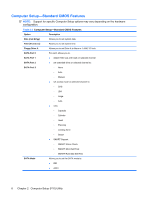
Eight menu headings appear on the Computer Setup Utility screen: ● System Information ● Standard CMOS Features ● Advanced BIOS Features ● Advanced Chipset Features ● Integrated Peripherals ● Power Management Setup ● PnP/PCI Configurations ● Hardware Monitor Setup Five action choices are listed on the Computer Setup Utility screen: ● Load Optimized Defaults ● Set Supervisor Password ● Set User Password ● Save & Exit Setup ● Exit Without Saving Use the arrow keys to select the appropriate heading, then press Enter. Use the arrow (up and down) keys to select the option you want, then press Enter. To return to the previous screen, press Esc. 4. To apply and save changes, press F10 or select Save & Exit Setup on the Computer Setup Utility screen and press Enter. If you have made changes that you do not want applied, select Exit Without Saving and press Enter. CAUTION: Do NOT turn the computer power OFF while the ROM is saving the Computer Setup (F10) changes because the CMOS could become corrupted. It is safe to turn off the computer only after exiting the F10 Setup screen. Table 2-1 Computer Setup (F10) Utility Main Menu Heading Table System Information Table 2-2 Computer Setup-System Information on page 5 Standard CMOS Features Table 2-3 Computer Setup-Standard CMOS Features on page 6 Advanced BIOS Features Table 2-4 Computer Setup-Advanced BIOS Features on page 7 Advanced Chipset Features Table 2-5 Computer Setup-Advanced Chipset Features on page 8 Integrated Peripherals Table 2-6 Computer Setup-Integrated Peripherals on page 9 4 Chapter 2 Computer Setup (F10) Utility
-
 1
1 -
2
-
3
-
4
-
5
-
6
-
 7
7 -
 8
8 -
 9
9 -
 10
10 -
 11
11 -
 12
12 -
 13
13 -
 14
14 -
 15
15 -
 16
16 -
 17
17 -
18
-
19
-
20
-
21
-
22
-
23
-
24
-
25
-
26
-
27
-
28
-
29
-
30
-
31
-
32
-
33
-
34
-
35
-
36
-
37
-
38
-
39
-
40
-
41
-
42
-
43
-
44
-
45
-
46
-
47
-
48
-
49
-
50
-
51
-
52
-
53
-
54
-
55
-
56
-
57
-
58
-
59
-
60
-
61
-
62
-
63
-
64
-
65
-
66
-
67
-
68
-
69
-
70
-
71
-
72
-
73
-
74
-
75
-
76
-
77
-
78
-
79
-
80
-
81
-
82
-
83
-
84
-
85
-
86
-
87
-
88
-
89
-
90
-
91
-
92
-
93
-
94
-
95
-
96
-
97
-
98
-
99
-
100
-
101
-
102
-
103
-
104
-
105
 |
 |