HP dx7510 Service Reference Guide: HP Compaq dx7510/dx7518 Business PC - Page 42
Front Bezel
 |
View all HP dx7510 manuals
Add to My Manuals
Save this manual to your list of manuals |
Page 42 highlights
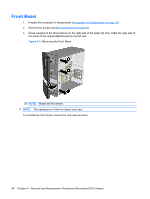
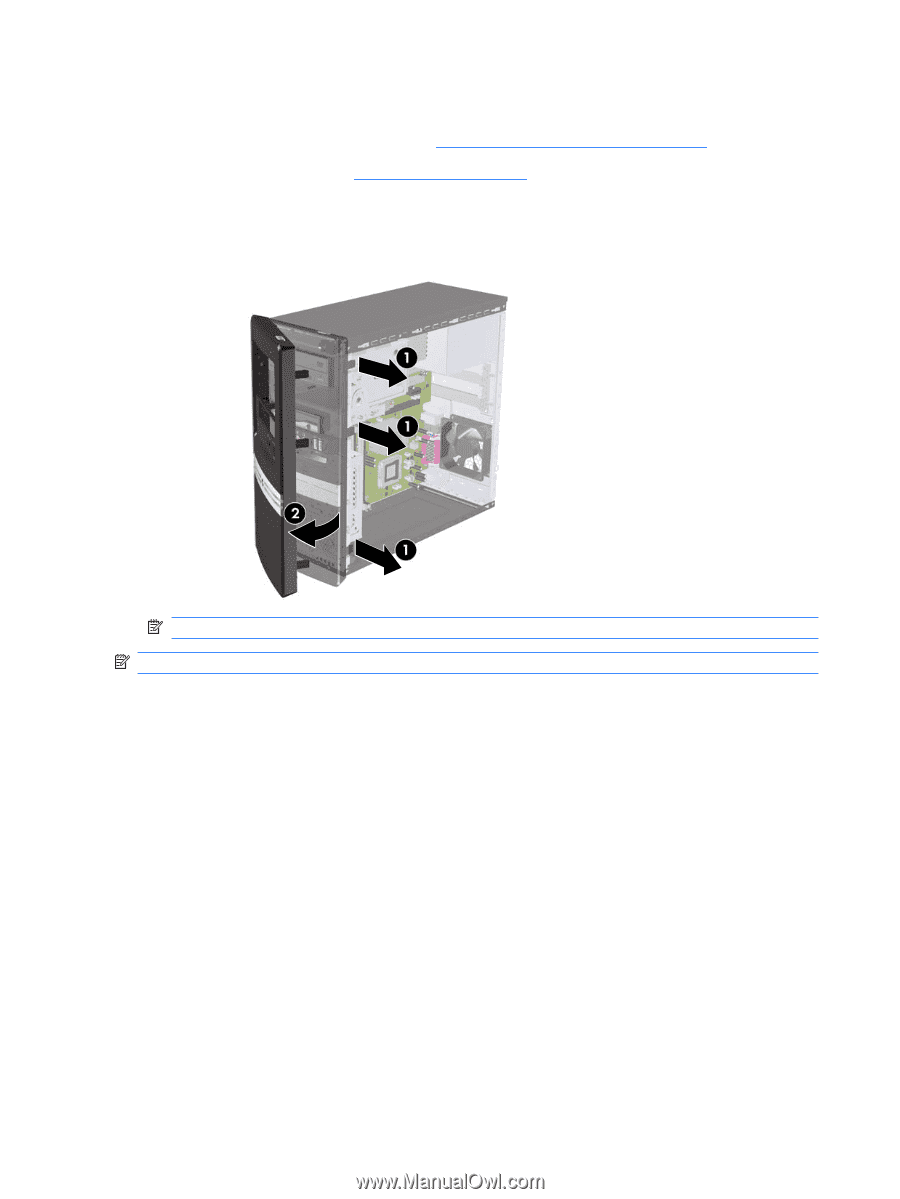
Front Bezel 1. Prepare the computer for disassembly (Preparation for Disassembly on page 32). 2. Remove the access panel (Access Panel on page 33). 3. Press outward on the three latches on the right side of the bezel (1), then rotate the right side of the bezel off the chassis (2) followed by the left side. Figure 6-3 Removing the Front Bezel NOTE: Model dx7518 shown. NOTE: The appearance of the front bezel may vary. To reinstall the front bezel, reverse the removal procedure. 34 Chapter 6 Removal and Replacement Procedures Microtower (MT) Chassis
-
 1
1 -
2
-
3
-
4
-
5
-
6
-
7
-
8
-
9
-
10
-
11
-
12
-
13
-
14
-
15
-
16
-
17
-
18
-
19
-
20
-
21
-
22
-
23
-
24
-
25
-
26
-
27
-
28
-
29
-
30
-
31
-
32
-
33
-
34
-
35
-
36
-
 37
37 -
 38
38 -
 39
39 -
 40
40 -
 41
41 -
 42
42 -
 43
43 -
 44
44 -
 45
45 -
 46
46 -
 47
47 -
48
-
49
-
50
-
51
-
52
-
53
-
54
-
55
-
56
-
57
-
58
-
59
-
60
-
61
-
62
-
63
-
64
-
65
-
66
-
67
-
68
-
69
-
70
-
71
-
72
-
73
-
74
-
75
-
76
-
77
-
78
-
79
-
80
-
81
-
82
-
83
-
84
-
85
-
86
-
87
-
88
-
89
-
90
-
91
-
92
-
93
-
94
-
95
-
96
-
97
-
98
-
99
-
100
-
101
-
102
-
103
-
104
-
105
 |
 |
Front Bezel
1.
Prepare the computer for disassembly (
Preparation for Disassembly
on page
32
).
2.
Remove the access panel (
Access Panel
on page
33
).
3.
Press outward on the three latches on the right side of the bezel
(1)
, then rotate the right side of
the bezel off the chassis
(2)
followed by the left side.
Figure 6-3
Removing the Front Bezel
NOTE:
Model dx7518 shown.
NOTE:
The appearance of the front bezel may vary.
To reinstall the front bezel, reverse the removal procedure.
34
Chapter 6
Removal and Replacement Procedures Microtower (MT) Chassis