Honeywell NX4S1 User Guide - Page 14
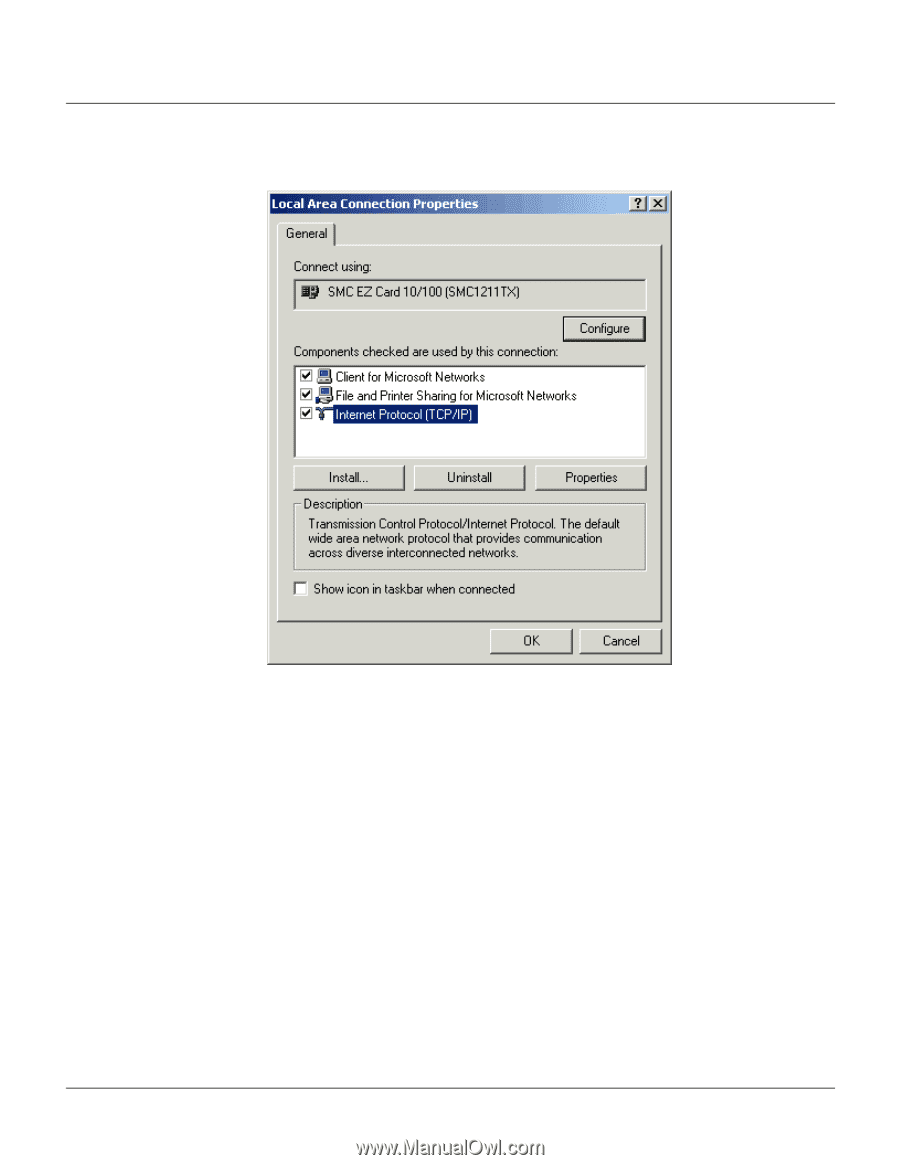
Highlight the Internet Protocol TCP/IP connection.
 |
View all Honeywell NX4S1 manuals
Add to My Manuals
Save this manual to your list of manuals |
Page 14 highlights
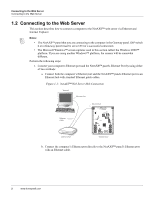
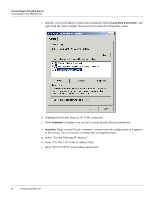
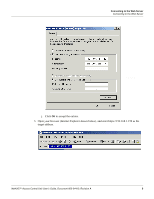
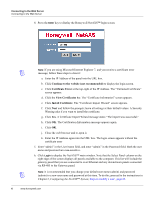
Connecting to the Web Server Connecting to the Web Server c. Identify your local Ethernet connection (commonly labeled Local Area Connection), and right click the icon to display the Local Area Connection Properties screen. d. Highlight the Internet Protocol (TCP/IP) connection. e. Click Properties to display your system's current Internet Protocol properties. f. Important: Keep a record of your computer's current network configuration as it appears in this screen. You will need to re-instate this configuration later. g. Select "Use the following IP address." h. Enter "192.168.1.10" in the IP address field. i. Enter "255.255.255.0" in the Subnet mask field. 4 www.honeywell.com
-
 1
1 -
2
-
3
-
4
-
5
-
6
-
7
-
8
-
 9
9 -
 10
10 -
 11
11 -
 12
12 -
 13
13 -
 14
14 -
 15
15 -
 16
16 -
 17
17 -
 18
18 -
 19
19 -
20
-
21
-
22
-
23
-
24
-
25
-
26
-
27
-
28
-
29
-
30
-
31
-
32
-
33
-
34
-
35
-
36
-
37
-
38
-
39
-
40
-
41
-
42
-
43
-
44
-
45
-
46
-
47
-
48
-
49
-
50
-
51
-
52
-
53
-
54
-
55
-
56
-
57
-
58
-
59
-
60
-
61
-
62
-
63
-
64
-
65
-
66
-
67
-
68
-
69
-
70
-
71
-
72
-
73
-
74
-
75
-
76
-
77
-
78
-
79
-
80
-
81
-
82
-
83
-
84
-
85
-
86
-
87
-
88
-
89
-
90
-
91
-
92
-
93
-
94
-
95
-
96
-
97
-
98
-
99
-
100
-
101
-
102
-
103
-
104
-
105
-
106
-
107
-
108
-
109
 |
 |
4
www.honeywell.com
Connecting to the Web Server
Connecting to the Web Server
c.
Identify your local Ethernet connection (commonly labeled
Local Area Connection
), and
right click the icon to display the Local Area Connection Properties screen.
d.
Highlight the Internet Protocol (TCP/IP) connection.
e. Click
Properties
to display your system’s current Internet Protocol properties.
f.
Important
: Keep a record of your computer’s current network configuration as it appears
in this screen. You will need to re-instate this configuration later.
g.
Select “Use the following IP address."
h.
Enter "192.168.1.10" in the IP address field.
i.
Enter "255.255.255.0" in the Subnet mask field.