Honeywell NX4S1 User Guide - Page 35
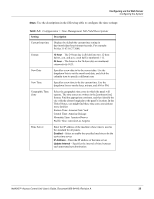
Table 2-3, Configuration > Time Management Tab Field Descriptions
 |
View all Honeywell NX4S1 manuals
Add to My Manuals
Save this manual to your list of manuals |
Page 35 highlights
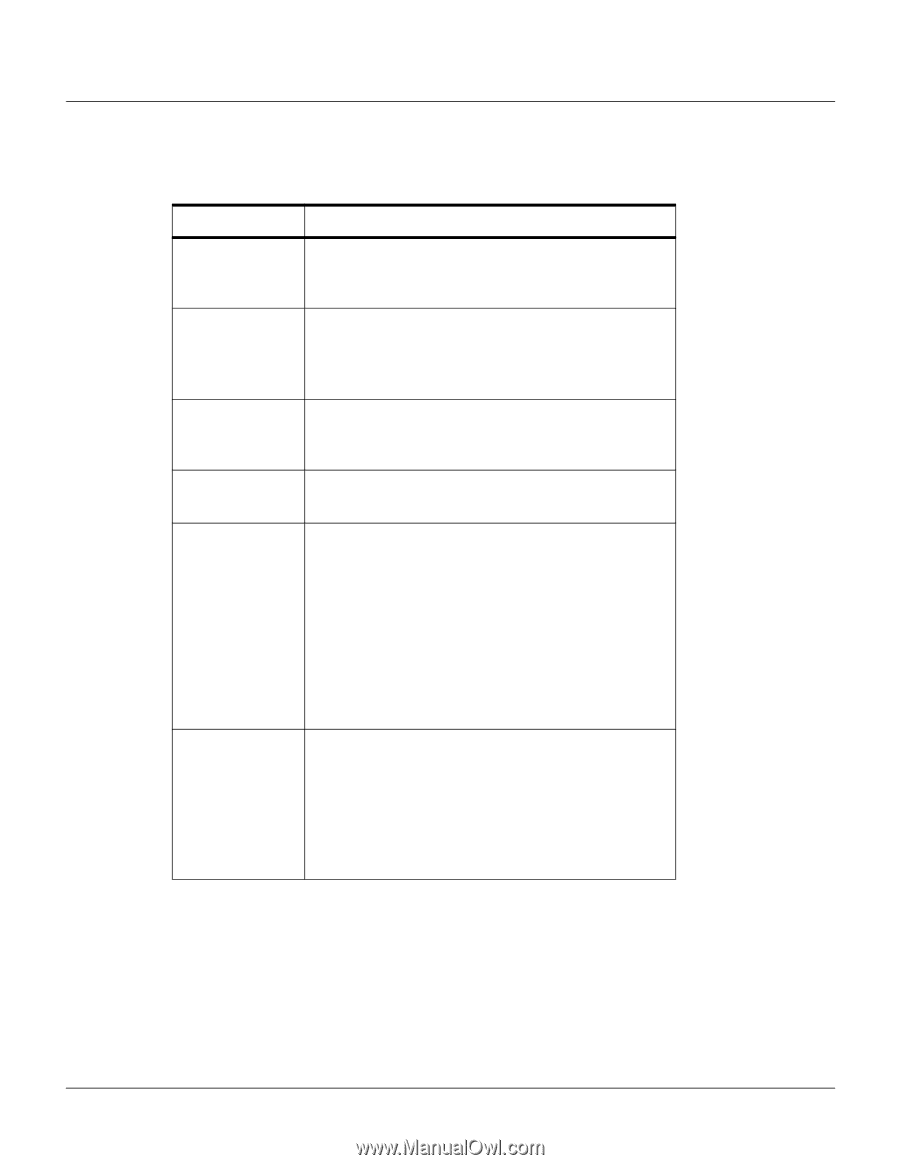
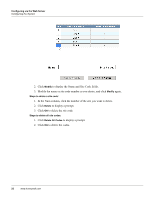
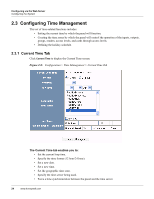
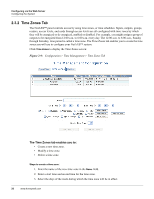
Configuring via the Web Server Configuring the System Steps: Use the descriptions in the following table to configure the time settings: Table 2-3: Configuration > Time Management Tab Field Descriptions Setting Description Current loop time Displays by default the current time setting in day/month/date/hour/minutes/seconds. For example: Fri Oct 31 07:16:27 2008. Format 12 hour - The 24-hour day is divided into two 12-hour halves, a.m. and p.m.; each half is numbered 1-12. 24 hour - The hours in the 24-hour day are numbered consecutively 0-23. New Date Specifies a new date to be the current date. Use the dropdown lists to set the month and date, and click the calendar icon to specify a different year. New Time Specifies a new time to be the current time. Use the dropdown lists to set the hour, minute, and AM or PM. Geographic Time Zone Select the geographic time zone in which the panel will operate. The time zones are written in the [continent/city] format. Find the appropriate continent, and then identify the city with the closest longitude to the panel's location. In the United States, you might find these time zone associations more familiar: Eastern Time: America/New York Central Time: America/Chicago Mountain Time: America/Denver Pacific Time: America/Los Angeles Time Server Enter the IP address of the machine whose time is used as the standard for all panels. Enabled - Select to enable the specified machine to be the active time server. IP Address - Enter the IP address of the time server. Update Interval - Specifies the interval of time between each automated synchronization. NetAXS™ Access Control Unit User's Guide, Document 800-04410, Revision A 25
-
 1
1 -
2
-
3
-
4
-
5
-
6
-
7
-
8
-
9
-
10
-
11
-
12
-
13
-
14
-
15
-
16
-
17
-
18
-
19
-
20
-
21
-
22
-
23
-
24
-
25
-
26
-
27
-
28
-
29
-
 30
30 -
 31
31 -
 32
32 -
 33
33 -
 34
34 -
 35
35 -
 36
36 -
 37
37 -
 38
38 -
 39
39 -
 40
40 -
41
-
42
-
43
-
44
-
45
-
46
-
47
-
48
-
49
-
50
-
51
-
52
-
53
-
54
-
55
-
56
-
57
-
58
-
59
-
60
-
61
-
62
-
63
-
64
-
65
-
66
-
67
-
68
-
69
-
70
-
71
-
72
-
73
-
74
-
75
-
76
-
77
-
78
-
79
-
80
-
81
-
82
-
83
-
84
-
85
-
86
-
87
-
88
-
89
-
90
-
91
-
92
-
93
-
94
-
95
-
96
-
97
-
98
-
99
-
100
-
101
-
102
-
103
-
104
-
105
-
106
-
107
-
108
-
109
 |
 |