Honeywell NX4S1 User Guide - Page 20
Overview, Con the Panel, Con the Time Zones, Con the Access Levels
 |
View all Honeywell NX4S1 manuals
Add to My Manuals
Save this manual to your list of manuals |
Page 20 highlights
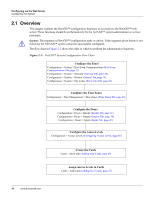
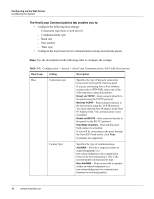
Configuring via the Web Server Configuring the System 2.1 Overview This chapter explains the NetAXS™ configuration functions as accessed via the NetAXS™ web server. These functions should be performed only by the NetAXS™ system administrator or service personnel. Caution: The sequence of NetAXS™ configuration tasks is critical. If the sequence given below is not followed, the NetAXS™ system cannot be successfully configured. The flow chart in Figure 2-1 shows the order in which to perform the administrative functions. Figure 2-1: NetAXS™ System Configuration Flow Chart Configure the Panel Configuration > System > Host/Loop Communications (Host/Loop Communications Tab, page 11) Configuration > System > Network (Network Tab, page 20) Configuration > System > General (General Tab, page 14) Configuration > System > Site Codes (Site Codes Tab, page 21) Configure the Time Zones Configuration > Time Management > Time Zones (Time Zones Tab, page 26) Configure the Doors Configuration > Doors > Reader (Reader Tab, page 31) Configuration > Doors > Output (Outputs Tab, page 38) Configuration > Doors > Inputs (Inputs Tab, page 42) Configure the Access Levels Configuration > Access Levels (Configuring Access Levels, page 45) Create the Cards Cards > Add Cards (Adding New Cards, page 47) Assign Access Levels to Cards Cards > Add Cards (Adding New Cards, page 47) 10 www.honeywell.com
-
 1
1 -
2
-
3
-
4
-
5
-
6
-
7
-
8
-
9
-
10
-
11
-
12
-
13
-
14
-
 15
15 -
 16
16 -
 17
17 -
 18
18 -
 19
19 -
 20
20 -
 21
21 -
 22
22 -
 23
23 -
 24
24 -
 25
25 -
26
-
27
-
28
-
29
-
30
-
31
-
32
-
33
-
34
-
35
-
36
-
37
-
38
-
39
-
40
-
41
-
42
-
43
-
44
-
45
-
46
-
47
-
48
-
49
-
50
-
51
-
52
-
53
-
54
-
55
-
56
-
57
-
58
-
59
-
60
-
61
-
62
-
63
-
64
-
65
-
66
-
67
-
68
-
69
-
70
-
71
-
72
-
73
-
74
-
75
-
76
-
77
-
78
-
79
-
80
-
81
-
82
-
83
-
84
-
85
-
86
-
87
-
88
-
89
-
90
-
91
-
92
-
93
-
94
-
95
-
96
-
97
-
98
-
99
-
100
-
101
-
102
-
103
-
104
-
105
-
106
-
107
-
108
-
109
 |
 |
