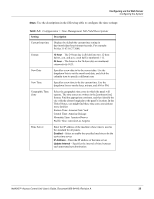
Honeywell NX4S1 User Guide - Page 40
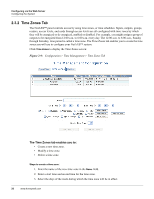
on a time zone configuration
 |
View all Honeywell NX4S1 manuals
Add to My Manuals
Save this manual to your list of manuals |
Page 40 highlights
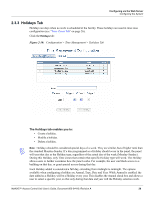
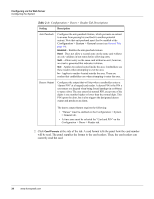
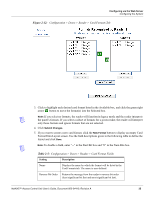
Configuring via the Web Server Configuring the System While Annual is selected, the Year box is grayed out. The NX4 can support three different Holiday Types (Type 1, Type 2, and Type 3), but a user can only select one type per day. Also of note, a single calendar day cannot be set for more than one type of Holiday. For example, the 4th of July could be a Type 1 Holiday, but then Type 2 and 3 would not be able to work on the 4th of July. Holidays or special events that require multiple days will require a Holiday entry for each date that is to be special. For example, Thanksgiving is usually two days, Thursday and Friday. Both of these days would require a separate Holiday date entry and use the same Holiday Type. Beyond that, Type 1, 2, and 3 can be configured any way you wish. Steps to create a holiday: 1. Enter the name of the new holiday in the Name field (up to 25 characters). 2. If the holiday will occur annually, select the Annual checkbox. 3. Assign a type to the holiday, either Type 1, Type 2, or Type 3. The type you assign will map to a time zone configuration, and the holiday will be regarded according to the rules of that time zone (see "Time Zones Tab" on page 26). 4. Select the holiday's month and date from the drop down lists. 5. Click the Add Holiday button. Steps to modify a holiday: 1. In the Holiday column, click the number of the holiday you want to modify. 2. Change the holiday settings as you desire. 3. Click the Modify button to accept the changes. Steps to delete a holiday: 1. In the Holiday column, click the number of the holiday you want to delete. 2. Click the Delete button. 3. Click OK at the delete prompt. 30 www.honeywell.com
-
 1
1 -
2
-
3
-
4
-
5
-
6
-
7
-
8
-
9
-
10
-
11
-
12
-
13
-
14
-
15
-
16
-
17
-
18
-
19
-
20
-
21
-
22
-
23
-
24
-
25
-
26
-
27
-
28
-
29
-
30
-
31
-
32
-
33
-
34
-
 35
35 -
 36
36 -
 37
37 -
 38
38 -
 39
39 -
 40
40 -
 41
41 -
 42
42 -
 43
43 -
 44
44 -
 45
45 -
46
-
47
-
48
-
49
-
50
-
51
-
52
-
53
-
54
-
55
-
56
-
57
-
58
-
59
-
60
-
61
-
62
-
63
-
64
-
65
-
66
-
67
-
68
-
69
-
70
-
71
-
72
-
73
-
74
-
75
-
76
-
77
-
78
-
79
-
80
-
81
-
82
-
83
-
84
-
85
-
86
-
87
-
88
-
89
-
90
-
91
-
92
-
93
-
94
-
95
-
96
-
97
-
98
-
99
-
100
-
101
-
102
-
103
-
104
-
105
-
106
-
107
-
108
-
109
 |
 |