Honeywell NX4S1 User Guide - Page 45
Configuration > Doors > Reader > Card Formats Tab, Table 2-5
 |
View all Honeywell NX4S1 manuals
Add to My Manuals
Save this manual to your list of manuals |
Page 45 highlights
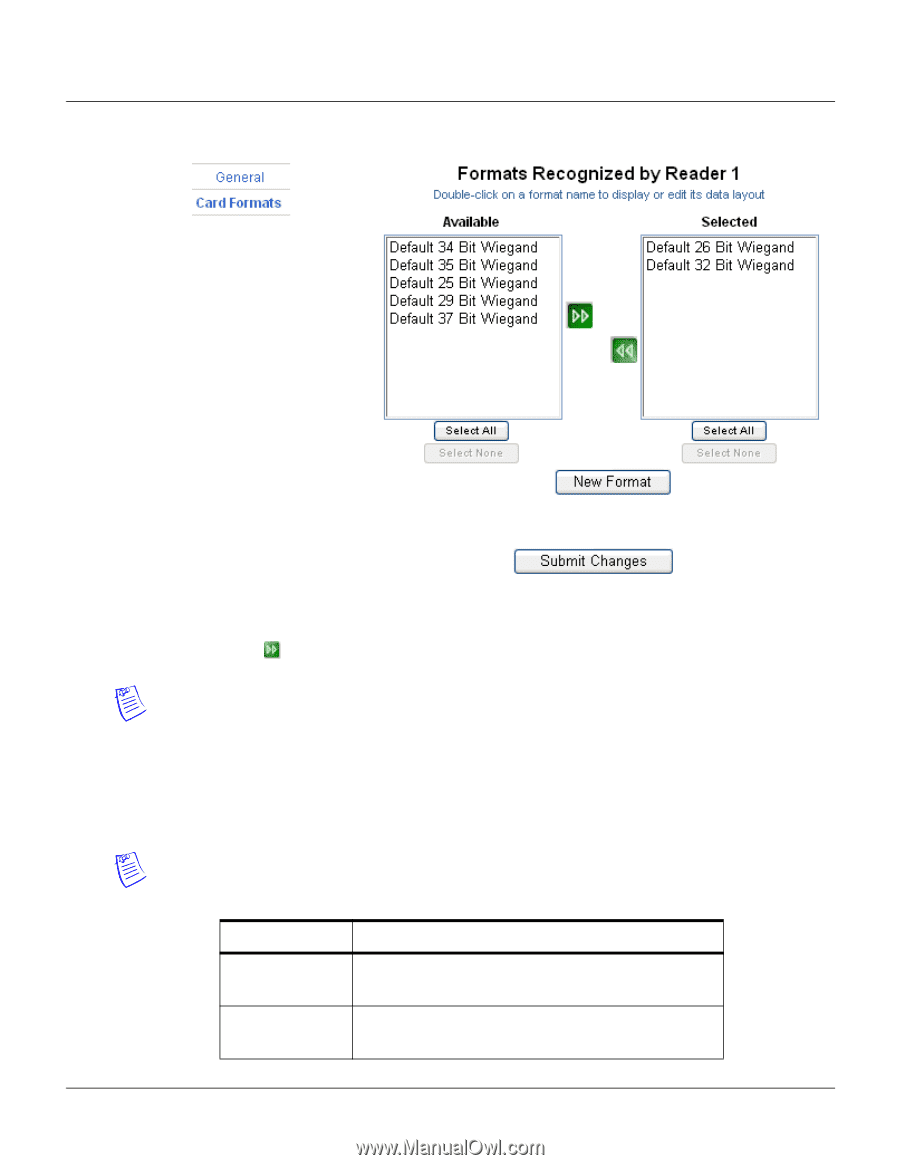
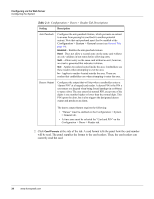
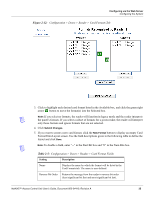
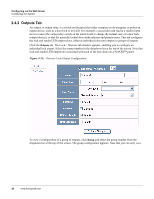
Configuring via the Web Server Configuring the System Figure 2-12: Configuration > Doors > Reader > Card Formats Tab 3. Click to highlight each desired card format listed in the Available box, and click the green right arrow button to move the format(s) into the Selected box. Note: If you select no formats, the reader will function in legacy mode and the reader interprets the panel's formats. If you select a subset of formats for a given reader, the reader will interpret only those formats and ignore formats that are not selected. 4. Click Submit Changes. 5. If you want to create a new card format, click the New Format button to display an empty Card Format Data Layout screen. Use the field descriptions given in the following table to define the layout and click Save. Note: To disable a field, enter "--" in the Start Bit box and "0" in the Num Bits box. Table 2-5: Configuration > Doors > Reader > Card Format Fields Setting Description Name Displays the name by which the format will be listed in the Card Formats tab. The name is user-defined. Reverse Bit Order Returns the message from the reader in reverse bit order (least significant bit first and most significant bit last). NetAXS™ Access Control Unit User's Guide, Document 800-04410, Revision A 35
-
 1
1 -
2
-
3
-
4
-
5
-
6
-
7
-
8
-
9
-
10
-
11
-
12
-
13
-
14
-
15
-
16
-
17
-
18
-
19
-
20
-
21
-
22
-
23
-
24
-
25
-
26
-
27
-
28
-
29
-
30
-
31
-
32
-
33
-
34
-
35
-
36
-
37
-
38
-
39
-
 40
40 -
 41
41 -
 42
42 -
 43
43 -
 44
44 -
 45
45 -
 46
46 -
 47
47 -
 48
48 -
 49
49 -
 50
50 -
51
-
52
-
53
-
54
-
55
-
56
-
57
-
58
-
59
-
60
-
61
-
62
-
63
-
64
-
65
-
66
-
67
-
68
-
69
-
70
-
71
-
72
-
73
-
74
-
75
-
76
-
77
-
78
-
79
-
80
-
81
-
82
-
83
-
84
-
85
-
86
-
87
-
88
-
89
-
90
-
91
-
92
-
93
-
94
-
95
-
96
-
97
-
98
-
99
-
100
-
101
-
102
-
103
-
104
-
105
-
106
-
107
-
108
-
109
 |
 |