IBM 25R0012 User Guide - Page 37
Function, Unmake
 |
UPC - 000435800176
View all IBM 25R0012 manuals
Add to My Manuals
Save this manual to your list of manuals |
Page 37 highlights
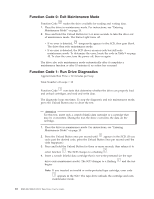
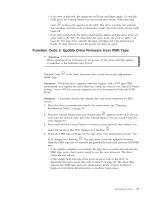
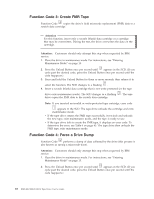
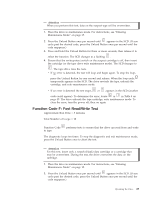
2. Within a 1.5-second interval, press the Unload Button three times. The Status Light becomes solid amber, which means that the drive is in maintenance mode. 3. Press the Unload Button once per 1.5 seconds until 7 appears in the Single-character Display (SCD). If you cycle past 7 , continue to press the Unload Button until it displays again. 4. To select the function, press and hold the Unload Button for three seconds. After you select the function, 7 flashes and the drive automatically starts the test. v If the test is successful, it loops and begins again. To half the test, press the Unload Button. The test continues to the end of its loop and then stops. The drive then displays 0 and exits maintenance mode. v If the test fails, 9 displays, the test stops, and the drive exits maintenance mode. To resolve the error, locate 9 in Table 9 on page 45 Function Code 8: Unmake FMR Tape Function Code 8 erases the field microcode replacement (FMR) data and rewrites the cartridge memory on the tape. This converts the cartridge into a valid scratch (blank) data cartridge. Attention: Customers should only attempt this step when requested by IBM service. 1. Place the drive in maintenance mode. For instructions, see "Entering Maintenance Mode" on page 15. 2. Press the Unload Button once per second until 8 appears in the SCD. (If you cycle past the desired code, press the Unload Button once per second until the code reappears.) 3. Press and hold the Unload Button for three or more seconds, then release it to select function 8 . The SCD changes to a flashing C . 4. Insert the FMR data cartridge (or the tape drive exits maintenance mode). The SCD changes to a flashing 8 . The tape drive erases the firmware on the tape and rewrites the header in the cartridge memory to change the cartridge to a valid scratch (blank) data cartridge: v If the operation is successful, the tape drive displays function code 0 , rewinds and unloads the newly converted scratch data cartridge, and exits maintenance mode. v If the operation is not successful, an error code displays. To determine the error, locate the code in Table 9 on page 45. To clear the error, turn the power off, then on again. Operating the Drive 21
-
 1
1 -
2
-
3
-
4
-
5
-
6
-
7
-
8
-
9
-
10
-
11
-
12
-
13
-
14
-
15
-
16
-
17
-
18
-
19
-
20
-
21
-
22
-
23
-
24
-
25
-
26
-
27
-
28
-
29
-
30
-
31
-
 32
32 -
 33
33 -
 34
34 -
 35
35 -
 36
36 -
 37
37 -
 38
38 -
 39
39 -
 40
40 -
 41
41 -
 42
42 -
43
-
44
-
45
-
46
-
47
-
48
-
49
-
50
-
51
-
52
-
53
-
54
-
55
-
56
-
57
-
58
-
59
-
60
-
61
-
62
-
63
-
64
-
65
-
66
-
67
-
68
-
69
-
70
-
71
-
72
-
73
-
74
-
75
-
76
-
77
-
78
-
79
-
80
-
81
-
82
-
83
-
84
-
85
-
86
-
87
-
88
-
89
-
90
-
91
-
92
-
93
-
94
-
95
-
96
-
97
-
98
-
99
-
100
-
101
-
102
-
103
-
104
-
105
-
106
-
107
-
108
-
109
-
110
-
111
-
112
-
113
-
114
-
115
-
116
-
117
-
118
-
119
-
120
 |
 |
