IBM 25R0012 User Guide - Page 69
Before, Begin, Recommended, Tools, Beginning, Procedure
 |
UPC - 000435800176
View all IBM 25R0012 manuals
Add to My Manuals
Save this manual to your list of manuals |
Page 69 highlights
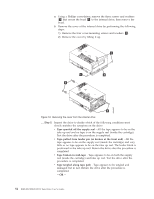
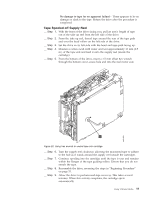
Attention v Before using this procedure, you must have exhausted all other means of removing the tape cartridge from the drive. Use this procedure only if you cannot remove the tape cartridge by using any other means. v Determine from the customer if the cartridge contains critical customer data. If the cartridge contains sensitive data that cannot leave the site, inform the customer that certain failure conditions diagnostics will be performed to test the drive for continued use. v The following removal procedures can destroy customer data! Use extreme care when handling or removing the customer's tape cartridges to minimize tape damage and lost data. v DO NOT TOUCH the magnetic tape or tape path. Both are extremely sensitive to the oil and salt from your skin. Use clean, lint-free gloves when working around magnetic tape or the tape path components. v Electrostatic-sensitive components: Consider using an ESD Kit. v After you remove the tape cartridge, advise the customer to copy the data to another cartridge and to remove this tape cartridge from service. v Do not use power tools or magnetic tools to perform this procedure. v To avoid contamination and electrostatic-discharge damage to the drive, never touch the head or electronic components inside the drive. v If you cannot remove the cartridge from the drive using the following procedures, contact your next level of support. Before You Begin 1. If you have not already done so, attempt to remove the cartridge with the device power ON and using library manager, a host application, or the Unload Button. 2. If you have not already done so, attempt to remove the cartridge by power cycling the drive. Look for the drive to attempt a mid-tape recovery. Note: It can take as long as five minutes for the cartridge to rewind and unload. 3. If the cartridge unloads, inform the operator that the cartridge is unloaded. If the cartridge does not unload, continue with this procedure. Recommended Tools v 2.5 mm offset hex wrench (do not use magnetized wrench) v #1 Phillips screwdriver v ESD Kit v Flashlight (optional) v #1 Flathead screwdriver (optional) Beginning Procedure __ Step 1. Refer to the enclosure documentation for instructions on removing the drive. __ Step 2. Place the drive on a non-slip, sturdy work surface. __ Step 3. Ground yourself to the drive by using an ESD Kit. __ Step 4. Remove the cover of the drive by performing the following steps: Using Ultrium Media 53
-
 1
1 -
2
-
3
-
4
-
5
-
6
-
7
-
8
-
9
-
10
-
11
-
12
-
13
-
14
-
15
-
16
-
17
-
18
-
19
-
20
-
21
-
22
-
23
-
24
-
25
-
26
-
27
-
28
-
29
-
30
-
31
-
32
-
33
-
34
-
35
-
36
-
37
-
38
-
39
-
40
-
41
-
42
-
43
-
44
-
45
-
46
-
47
-
48
-
49
-
50
-
51
-
52
-
53
-
54
-
55
-
56
-
57
-
58
-
59
-
60
-
61
-
62
-
63
-
 64
64 -
 65
65 -
 66
66 -
 67
67 -
 68
68 -
 69
69 -
 70
70 -
 71
71 -
 72
72 -
 73
73 -
 74
74 -
75
-
76
-
77
-
78
-
79
-
80
-
81
-
82
-
83
-
84
-
85
-
86
-
87
-
88
-
89
-
90
-
91
-
92
-
93
-
94
-
95
-
96
-
97
-
98
-
99
-
100
-
101
-
102
-
103
-
104
-
105
-
106
-
107
-
108
-
109
-
110
-
111
-
112
-
113
-
114
-
115
-
116
-
117
-
118
-
119
-
120
 |
 |
