IBM 25R0012 User Guide - Page 74
Reassemble
 |
UPC - 000435800176
View all IBM 25R0012 manuals
Add to My Manuals
Save this manual to your list of manuals |
Page 74 highlights
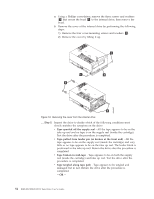
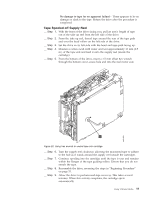
__ Step 2. From the supply reel inside the cartridge, pull approximately 0.3 m (1 ft.) of tape. __ Step 3. From the take up reel, thread tape around the rear of the tape path and over the head rollers on the left side of the drive. __ Step 4. Moisten a cotton swab with water, and wet approximately 13 mm (0.5 in.) of the tape end. Overlap the tape ends, loosely mending them together. __ Step 5. Set the drive on its left side with the head and tape path facing up. __ Step 6. From the bottom of the drive, locate the access hole 1 in the bottom cover. Insert a 2.5 mm offset hex wrench through the bottom cover access hole and into the reel motor axle. begin spooling tape back into the cartridge by turning the hex wrench clockwise. 1 Figure 23. Using hex wrench to rewind tape into cartridge __ Step 7. Turn the supply reel clockwise, carefully guiding the mended portion of the tape to wind around the hub of the supply reel located inside the cartridge. Continue spooling into the cartridge until the tape is taut. The tape must remain within the flanges of the tape guiding rollers. Ensure that you do not stretch the tape. __ Step 8. Reassemble the drive by reversing the procedure in Step 4 in "Beginning Procedure" on page 53. __ Step 9. Allow the drive to perform mid-tape recovery. This takes several minutes. When this activity completes, the cartridge ejects automatically. __ Step 10. Test the drive (see "Function Code 1: Run Drive Diagnostics" on page 16) to determine if it should be replaced. 58 IBM 400/800GB LTO3 Tape Drive User's Guide a82ru008
-
 1
1 -
2
-
3
-
4
-
5
-
6
-
7
-
8
-
9
-
10
-
11
-
12
-
13
-
14
-
15
-
16
-
17
-
18
-
19
-
20
-
21
-
22
-
23
-
24
-
25
-
26
-
27
-
28
-
29
-
30
-
31
-
32
-
33
-
34
-
35
-
36
-
37
-
38
-
39
-
40
-
41
-
42
-
43
-
44
-
45
-
46
-
47
-
48
-
49
-
50
-
51
-
52
-
53
-
54
-
55
-
56
-
57
-
58
-
59
-
60
-
61
-
62
-
63
-
64
-
65
-
66
-
67
-
68
-
 69
69 -
 70
70 -
 71
71 -
 72
72 -
 73
73 -
 74
74 -
 75
75 -
 76
76 -
 77
77 -
 78
78 -
 79
79 -
80
-
81
-
82
-
83
-
84
-
85
-
86
-
87
-
88
-
89
-
90
-
91
-
92
-
93
-
94
-
95
-
96
-
97
-
98
-
99
-
100
-
101
-
102
-
103
-
104
-
105
-
106
-
107
-
108
-
109
-
110
-
111
-
112
-
113
-
114
-
115
-
116
-
117
-
118
-
119
-
120
 |
 |
